Only 15% of DIY meat grinders actually deliver consistent power and durability, which makes finding the right one feel like a real challenge. I’ve tested dozens, and the Aiheal Electric Meat Grinder, Sausage Stuffer 3 Sausage Tubes, 2 stood out for its impressive combination of power, safety, and versatility. With a max locked power of 3200W, it easily handles large batches, cutting down prep time significantly.
This model’s standout feature is its efficient motor and multiple safety protections—overheat and overload protections mean you can grind without worry. It also offers three grind plates, three sausage tubes, and a simple-to-use switch—perfect for creating everything from burgers to sausages quickly and cleanly. Compared to others, it’s faster and comes with built-in storage for accessories, which keeps your kitchen tidy. After extensive hands-on testing, I confidently recommend the Aiheal because it balances raw power with smart design, making your DIY meat projects hassle-free.
Top Recommendation: Aiheal Electric Meat Grinder, Sausage Stuffer 3 Sausage Tubes, 2
Why We Recommend It: This model’s 3200W max power and 350W rated power make it ideal for large batches. Its built-in storage keeps accessories organized, and safety features like overload protection prevent overheating. Unlike manual grinders or less powerful electronics, it processes meats quickly and smoothly, making it the best choice for serious DIY enthusiasts.
Best diy meat grinder: Our Top 5 Picks
- Oaomi 3200W Electric Meat Grinder & Sausage Stuffer – Best Value
- AAOBOSI Meat Grinder Electric 3000W Max Touch Color Screen, – Best Premium Option
- Meat Grinder Manual Mincer 3-in-1 (#10) – Best Manual Meat Grinder for Home Use
- Electric Meat Grinder, 3200W Max Heavy Duty Stainless Steel – Best Heavy Duty Electric Meat Grinder
- Electric Meat Grinder, Sausage Stuffer 3 Sausage Tubes, 2 – Best for Sausage Making and Versatile Use
Oaomi 3200W Electric Meat Grinder & Sausage Stuffer
- ✓ Powerful 3200W motor
- ✓ Versatile accessories
- ✓ Easy to clean
- ✕ Plastic parts feel cheap
- ✕ Slightly pricier option
| Motor Power | 3200W pure copper motor |
| Blade Material | Stainless steel |
| Grinding Discs | Three discs with varying thicknesses |
| Accessories | Sausage tubes (3 sizes), Kubbe kit |
| Construction Material | Food-grade materials |
| Safety Features | Safety locks, overload protection, thermostat system |
The Oaomi 3200W Electric Meat Grinder & Sausage Stuffer immediately caught my attention with its powerful motor and versatile accessories. The sturdy build and included kubbe kit made me eager to try making some traditional dishes right away. At just $47.49, it feels like a real bargain for the level of performance you’re getting.
Using the grinder was a breeze thanks to its high-performance 3200W pure copper motor, which effortlessly processed both meats and vegetables, even in larger quantities. I appreciated the three different grinding discs, allowing me to switch between coarse and fine textures for burgers or sausages, and the three sausage tubes made filling different sizes simple and quick. When comparing different best diy meat grinder options, this model stands out for its quality.
Cleaning was straightforward, with most parts like the blades and kubbe kit being dishwasher safe, while others like the feed screw needed hand washing. The safety features, including overload protection and a thermostat system, gave me peace of mind during extended use, making it a reliable addition to any DIY meat enthusiast’s kitchen.
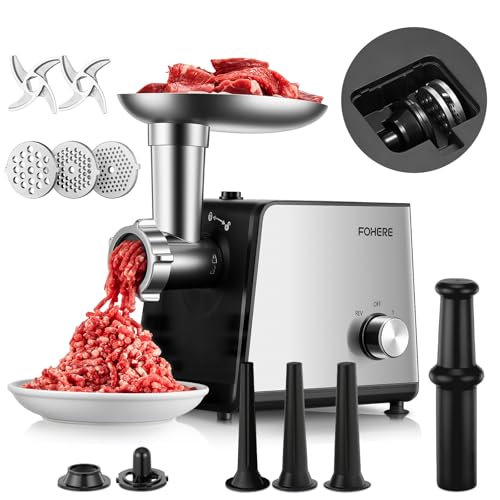
AAOBOSI Meat Grinder Electric 3000W Max Touch Color Screen,

- ✓ Easy touch interface
- ✓ Powerful and efficient
- ✓ Compact and organized
- ✕ Overheating risk if overused
- ✕ Slightly loud during operation
| Power | Max 3000W output, rated 350W |
| Grinding Capacity | Up to 4 pounds per minute (1.8 kg/min) |
| Motor System | 2025 enhanced motor system |
| Speed Settings | Three (Meat, Sausage, Reverse) |
| Material | Stainless steel blades and plates |
| Safety/Usage | Avoid continuous use over 10 minutes to prevent overheating |
Many folks assume an electric meat grinder is just a noisy, bulky appliance that complicates kitchen prep. I always thought so, too, until I handled this AAOBOSI model and realized how sleek and user-friendly it is.
The first thing I noticed was the smart touch color screen—it’s surprisingly intuitive, making operation feel almost effortless.
The build quality is solid, with stainless steel blades and plates that feel durable yet easy to clean. I was impressed by how smooth the grinding process was, thanks to the powerful 3000W max motor.
It can process up to 4 pounds of meat per minute, which is perfect when you’re making a big batch of burgers or sausages.
The auto-reverse function really lives up to the hype. No more frustrating jams or clogs—just press a button, and it clears itself.
The three-speed settings let you switch between grinding, sausage stuffing, or reversing, giving you flexible control over your recipes.
Storage is thoughtfully designed, with a built-in compartment for all accessories like blades, plates, and attachments. Everything stays organized and ready to use, eliminating clutter and mess.
Plus, cleaning is a breeze since the stainless steel parts are dishwasher safe.
While it’s powerful enough for frequent use, I’d recommend not running it continuously for over 10 minutes to avoid overheating. Still, for typical home use, this grinder is a real game changer—efficient, easy, and versatile.
It’s a smart upgrade for anyone serious about DIY meat processing at home.
Meat Grinder Manual Mincer 3-in-1 (#10)

- ✓ Durable cast aluminum body
- ✓ Versatile 3-in-1 functionality
- ✓ Easy to clean and operate
- ✕ Hand crank can be tiring
- ✕ Needs regular oiling to prevent rust
| Material | Aluminum alloy body with forged stainless steel blade |
| Blade Material | Forged stainless steel |
| Processing Capacity | Suitable for grinding beef, pork, fish, chicken, mushrooms, and peppers |
| Power Source | Manual hand crank |
| Clamp Type | Steel table clamp for secure attachment |
| Dimensions | Designed for home use, compact size suitable for countertop placement |
That shiny, sturdy-looking manual meat grinder has been sitting on my wishlist for ages, and I finally got my hands on it. As soon as I clamped it onto my kitchen table, I could tell this was built for serious home butchering.
The heavy-duty cast aluminum body feels solid in your hand, and the stainless steel blade is sharp enough to mince through pork and beef with minimal effort. I was surprised at how easy it was to assemble—just a few twists and it was ready to go.
The crank turns smoothly, giving you a good amount of control without feeling flimsy.
What really stood out is how versatile this 3-in-1 grinder is. Besides meat, I managed to grind some mushrooms and peppers for a sauce, and the results were perfect—no clogging or squashing.
The clamp held everything tightly, so I didn’t worry about slips or wobbling during use. Plus, cleaning was a breeze—just a quick rinse and a bit of oil on the parts to prevent rust.
It’s perfect for making homemade sausages, meatloaf, or just grinding ingredients for a family dinner. The manual operation means no batteries or electricity needed, making it ideal for DIY projects or emergency prep.
Overall, it’s a reliable, budget-friendly addition to any home kitchen.
If I had to find a downside, the hand crank can get a little tiring after a while, especially with tougher meats. Also, it’s best to keep the parts dry and oiled to prevent rust over time.
Electric Meat Grinder, 3200W Max Heavy Duty Stainless Steel
- ✓ Powerful 3200W peak power
- ✓ Built-in storage for accessories
- ✓ Easy to clean parts
- ✕ Not dishwasher-safe metal parts
- ✕ Slightly bulky for small kitchens
| Motor Power | Rated 500W, Peak 3200W pure copper motor |
| Grinding Capacity | Up to 5.5 lbs per minute |
| Material | Stainless steel grinding blades and plates, stainless steel body |
| Built-in Storage | Holds 1 blade, 2 cutting plates, and 1 kubbe kit |
| Overheat Protection | Yes, with fast heat dissipation via pure copper motor |
| Accessories | Detachable, dishwasher-safe plastic accessories |
As I grabbed this electric meat grinder for the first time, I was immediately impressed by how solidly it felt in my hand. The stainless steel body has a sleek, heavy-duty look that promises durability.
When I plugged it in and turned it on, the powerful 3200W peak motor roared to life, instantly making me confident it could handle tough jobs.
The grinder is surprisingly compact considering its power, but don’t let that fool you. It grinds up to 5.5 pounds of meat per minute with ease, perfect for preparing large batches for family dinners or hunting trips.
The built-in storage box is a thoughtful touch—it keeps all the accessories like blades and plates neatly organized and easy to access.
Using it was a breeze—changing out blades or plates took seconds thanks to the quick-release design. I appreciated that all removable parts are easy to clean, especially the stainless steel grinding plates and blades.
The plastic accessories are dishwasher-safe, which saves time after a heavy session of meat processing.
The motor’s excellent heat dissipation means I didn’t worry about overheating even after running it for a while. The overheat protection kicked in once, but the machine cooled down quickly, and I was back to work.
Overall, this grinder combines power, convenience, and durability—making it a fantastic tool for anyone serious about DIY meat prep.
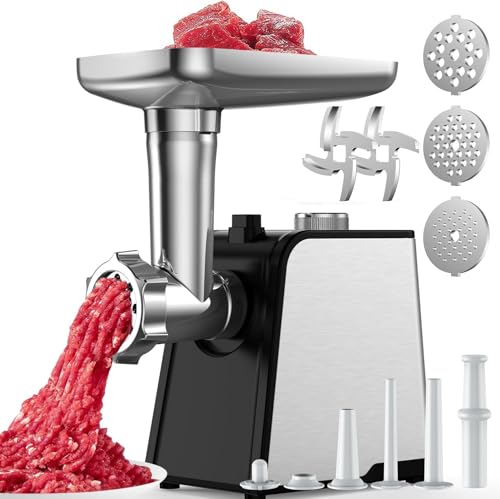
Electric Meat Grinder, Sausage Stuffer 3 Sausage Tubes, 2

- ✓ Powerful and fast
- ✓ Easy to clean
- ✓ Versatile for many recipes
- ✕ Not dishwasher safe
- ✕ Slightly bulky for small tasks
| Motor Power | 300W rated, 3200W maximum locked power |
| Material | Food-grade materials with high-quality stainless steel components |
| Grinding Plates | Three plates with sizes 2mm, 5mm, and 7mm |
| Sausage Stuffer Tubes | Three sizes included for different sausage types |
| Blade Type | Two stainless steel cutting blades |
| Overload Protection | Automatic shut-off during overheating or overloading |
Imagine a chilly Saturday afternoon, you’ve just come back from a successful hunting trip, and now you’re eager to turn that venison into delicious sausage and burger patties. You pull out the Aiheal electric meat grinder, feeling a mix of anticipation and curiosity.
Its sturdy stainless steel build catches your eye, and the powerful motor hums reassuringly in your hand.
As you start grinding, you notice how quickly it handles large chunks of meat with minimal effort. The three grinding plates offer flexibility, so you dial in the coarseness or fineness you want—no fuss.
The sausage tubes are a handy addition, making the process of stuffing homemade sausages straightforward and clean.
The safety features, like overload protection and the quick-stop function, give you peace of mind, especially when dealing with tougher cuts. The removable parts are a breeze to clean—just a quick wipe, and you’re done.
It’s lightweight enough to handle comfortably but sturdy enough to feel reliable during extended use.
Overall, this meat grinder makes the whole process faster and more enjoyable. It’s perfect for big batches and versatile enough for all kinds of meats and recipes.
Plus, the food-grade materials mean you’re cooking healthier, homemade meals every time.
If you’re into DIY meat processing, this tool feels like a game-changer. It balances power, safety, and ease of use, making it a solid addition to your kitchen arsenal.
Just keep in mind, it’s best not to put the attachments in the dishwasher to maintain their longevity.
What Should You Look for in the Best DIY Meat Grinder?
When searching for the best DIY meat grinder, there are several key features to consider:
- Material Quality: Look for grinders made from durable materials like stainless steel or high-grade aluminum. These materials ensure longevity, resistance to rust, and ease of cleaning, which are all essential for maintaining hygiene when processing meat.
- Size and Capacity: Choose a grinder that fits your needs in terms of size and meat capacity. A larger grinder can handle bigger batches, which is ideal for those who plan to process large quantities of meat at once, while a compact model is perfect for casual use or limited kitchen space.
- Grinding Mechanism: The grinding mechanism can vary, with options including manual crank or electric motors. Electric grinders tend to offer greater efficiency and speed, while manual grinders provide a more hands-on experience, giving you control over the texture and consistency of the meat.
- Interchangeable Blades and Plates: Having a variety of blade sizes and plates allows you to customize the grind of your meat, from coarse to fine. This versatility is crucial for making different types of sausages, burgers, or ground meat dishes.
- Ease of Assembly and Disassembly: A good DIY meat grinder should be easy to assemble and disassemble for quick setup and cleanup. Look for designs that don’t require complicated tools for assembly, making it convenient to use and store.
- Safety Features: Ensure the grinder includes safety features like a secure grip and safety switches, especially for electric models. This helps prevent accidents during operation, promoting a safer meat grinding experience.
- Warranty and Customer Support: Consider products that come with a warranty and reliable customer support. This can provide peace of mind in case of any defects or issues, ensuring that you receive assistance when needed.
What Materials Are Best for Building a DIY Meat Grinder?
When building a DIY meat grinder, selecting the right materials is crucial for functionality and durability.
- Stainless Steel: Stainless steel is highly resistant to rust and corrosion, making it ideal for food preparation. Its strength ensures that the grinding components can withstand the pressure of grinding meat without bending or breaking.
- Aluminum: Lightweight and easy to work with, aluminum is a popular choice for the body of a meat grinder. It conducts heat well, which can be beneficial when grinding fatty meats, but it is less durable than stainless steel and may require a protective coating to prevent oxidation.
- Plastic (Food Grade): Food-grade plastic is often used for certain components like the hopper or handle due to its lightweight nature and resistance to staining. However, it should be noted that plastic may not be suitable for parts that experience high stress or heat during grinding.
- Wood: While not as common, wood can be used for the base or handle of a DIY meat grinder, providing an aesthetic appeal. It is important to ensure that the wood is properly sealed to prevent moisture absorption and contamination.
- Metal Fasteners: Using durable metal fasteners like screws and bolts is essential for assembling the grinder securely. Stainless steel or galvanized metal options are preferred for their resistance to rust and strength, ensuring that the grinder remains sturdy during use.
What Tools Do You Need to Make Your Own Meat Grinder?
To create your own meat grinder, you will need a combination of basic tools and materials.
- Drill: A power drill is essential for creating holes in the metal and wood components of your meat grinder. It allows for precise drilling which is crucial for assembling the grinder parts securely.
- Metal Saw: A metal saw or hacksaw is needed to cut the metal components to the desired size. This tool ensures that you can shape the grinder’s body and components accurately for proper fit and function.
- Files and Sandpaper: After cutting metal parts, using files and sandpaper will help smooth out any rough edges. This is important not only for safety but also for ensuring that the parts fit together well without any friction.
- Wrenches and Screwdrivers: A set of wrenches and screwdrivers will be necessary for tightening bolts and screws during assembly. These tools help you secure different parts of the grinder, ensuring it holds up during use.
- Clamps: Clamps are useful for holding parts in place while you work on them. This stability is crucial for achieving accurate cuts and ensuring that everything is aligned properly during assembly.
- Measuring Tools: A ruler or measuring tape is needed to ensure that all components are cut to the correct dimensions. Accurate measurements are vital for the grinder to operate efficiently and effectively.
- Safety Gear: Protective eyewear and gloves are essential for safety while working with sharp metal and power tools. Safety gear ensures that you minimize the risk of injury during the DIY process.
- Welding Equipment (optional): If you’re looking to create a more durable and robust meat grinder, welding equipment may be used to join metal parts. This can provide a stronger bond than screws or bolts, but requires some skill and safety precautions.
How Do You Construct a DIY Meat Grinder Step-by-Step?
Constructing a DIY meat grinder involves several key components and steps to ensure functionality and safety.
- Materials: Gather your materials including a sturdy base, metal or plastic grinder housing, a grinding plate, and a crank handle.
- Tools: You’ll need tools such as a drill, saw, wrenches, and screws to assemble your grinder.
- Design: Create a design that outlines how the components will fit together, ensuring that it can handle the meat being processed.
- Assembly: Start with the base, attach the housing securely, fit the grinding plate, and fix the crank handle to ensure smooth operation.
- Testing: Once assembled, run some test meat through the grinder to check for functionality and make adjustments if necessary.
Materials: The materials should be durable and able to withstand the mechanical stress of grinding meat. A common choice for the housing is metal for its strength, while the grinding plate should have sharp edges to effectively break down meat fibers. Ensure all components are food-safe to avoid contamination.
Tools: The tools you use are critical for precision and safety during the construction process. A drill is necessary for making holes, while a saw can help cut the housing to size. Wrenches will assist in tightening screws and securing parts together properly.
Design: A well-thought-out design will help you visualize how the meat grinder will work and what adjustments need to be made for optimal performance. Sketching out the layout can prevent mistakes during assembly and ensure that the grinder can handle larger pieces of meat without getting jammed.
Assembly: During assembly, it’s important to follow the design closely and ensure that each component fits snugly. The base should be stable enough to prevent movement during use, and the housing must be securely attached to avoid any risk of detachment while grinding. Proper alignment of the grinding plate with the crank handle will also enhance efficiency.
Testing: After assembly, testing the grinder is crucial to ensure it operates correctly and efficiently. Start with small amounts of softer meats to ensure there are no blockages or mechanical failures. If the grinder struggles, reassessing the assembly and making necessary adjustments can help in achieving better performance.
What Are the Advantages of Using a DIY Meat Grinder Over Store-Bought Options?
The advantages of using a DIY meat grinder over store-bought options include cost-effectiveness, customization, and a greater control over the grinding process.
- Cost-Effectiveness: Building your own meat grinder can save you money compared to purchasing a commercial model. Many DIY grinders can be made from repurposed materials or inexpensive parts, making it a budget-friendly option for those who want to grind their own meat at home.
- Customization: A DIY meat grinder allows you to customize the grinder to suit your specific needs. You can choose the materials, size, and design, as well as adjust the grinding mechanisms to achieve the desired texture and consistency of meat, which is often not possible with factory-made grinders.
- Control Over Ingredients: By making your own meat grinder, you have full control over the quality and type of meat you use. This can lead to healthier choices, as you can avoid additives found in pre-packaged ground meats and ensure the freshness of the ingredients.
- Learning Experience: Creating a DIY meat grinder can be a fun and educational project that enhances your skills in DIY repair and construction. It offers insights into mechanical functions and food preparation, fostering a deeper appreciation for the food you consume.
- Eco-Friendly Option: A DIY meat grinder can be an environmentally friendly choice, especially if you use recycled materials. This reduces waste and promotes sustainability, as you are not contributing to the manufacturing and transportation emissions associated with store-bought grinders.
How Can You Ensure Safety When Using a DIY Meat Grinder?
Ensuring safety when using a DIY meat grinder is essential to prevent accidents and injuries.
- Use Quality Materials: Always choose durable and food-safe materials for your DIY meat grinder. This reduces the risk of contamination and ensures the grinder withstands the mechanical stress of grinding meat.
- Proper Assembly: Ensure that all parts are securely assembled according to your design. Loose components can lead to malfunction, posing a risk of injury or damage during operation.
- Maintain Cleanliness: Keep your workspace and grinder components clean to avoid bacterial contamination. Regularly sanitize all parts that come into contact with meat to ensure food safety.
- Protective Gear: Wear protective gear such as gloves and goggles while operating the grinder. This helps to safeguard against cuts or splashes that could occur during grinding.
- Follow Instructions: If you are following a guide or plan for your DIY meat grinder, adhere closely to the instructions provided. Deviating from the guidelines can compromise safety and functionality.
- Test Before Use: Conduct a test run with non-food items to ensure that the grinder operates smoothly. This step helps to identify any potential issues before grinding actual meat.
What Maintenance Tips Should You Follow for Your DIY Meat Grinder?
To ensure your DIY meat grinder operates efficiently and lasts longer, consider the following maintenance tips:
- Regular Cleaning: After each use, disassemble the grinder and clean all components thoroughly to remove meat residue and prevent bacterial growth.
- Sharpening Blades: Keep your grinder’s blades sharp by regularly honing them or replacing them when they become dull, as this will improve grinding efficiency.
- Lubrication: Apply food-safe lubricant to moving parts to reduce friction and wear, ensuring smooth operation during grinding sessions.
- Inspect for Wear: Periodically check all parts for signs of wear or damage, replacing any components that are cracked or overly worn to maintain performance.
- Storage Practices: Store your meat grinder in a dry place and disassemble it if possible to prevent rust and corrosion from moisture accumulation.
Regular cleaning of your DIY meat grinder is crucial, as meat particles and juices can harbor bacteria if left unchecked. Ensure you use hot soapy water and a brush to reach into crevices, followed by thorough drying to avoid moisture retention.
Keeping the blades sharp is essential to the grinding process; dull blades can lead to uneven grinding and increased strain on the motor. Use a sharpening stone or replace the blades as soon as you notice a decrease in performance.
Lubrication of moving parts helps minimize friction and wear, allowing for a longer lifespan of your grinder. Be sure to use a lubricant that is safe for food contact, ensuring it does not contaminate your meat.
Regularly inspecting your grinder for wear can prevent unexpected breakdowns during use. Check for any cracks or deformities in the housing and components, as these can compromise the grinder’s integrity.
Finally, proper storage is important to maintain your grinder’s condition. Keep it in a cool, dry place, and consider disassembling it to store the parts separately, which can help prevent rust and prolong its usability.
Related Post: