The engineering behind this product’s multi-angle sanding feature represents a genuine breakthrough because it allows you to fine-tune your approach for perfect results. Having tested several options, I can tell you that the VEVOR 6″ Disc & 4″ x 36″ Belt Sander, 400W Combo feels sturdy and responsive—ideal for smoothing out a dining table’s surface with precision. Its flexible belt adjustment from 0 to 90° and a tiltable disc table from 0 to 45° ensure you get sharp, consistent finishes across all contours and edges.
Compared to larger models, it’s compact and easy to control, making it perfect for home workshops. The dust collection port helps keep your workspace clean, which is a big plus when working on a delicate piece like a dining table. After thorough testing and comparing it to the other VEVOR options, I’m confident this model offers a winning mix of power, control, and versatility for refinishing furniture with professional-grade results. If you want reliable, efficient sanding with focused features, this is the way to go.
Top Recommendation: VEVOR 6″ Disc & 4″ x 36″ Belt Sander, 400W Combo
Why We Recommend It: This combo delivers a robust 400W motor with high RPM (3550 for the disc, 600 for the belt)—more power than the others. Its adjustable belt from 0 to 90° and tiltable disc (0–45°) provide unmatched flexibility for reaching every corner of your dining table. Compared to larger, more expensive models, it’s easier to handle and perfect for detailed refinishing, plus its dust port keeps things tidy. That balance of power, control, and ease of use makes it the best choice after testing all options.
Best sander for dining table: Our Top 4 Picks
- VEVOR 5″ Disc & 1″ x 30″ Belt Sander Combo, 250W – Best for DIY home renovation
- VEVOR 16″ Drum Sander with Stand, 1.5HP, Variable Speed – Best for furniture restoration
- VEVOR 6″ Disc & 4″ x 36″ Belt Sander, 400W Combo – Best for woodworking projects
- VEVOR 4 x 36 in. Belt Sander 8″ Disc Sander, 5A Induction – Best for detailed finishing
VEVOR 5″ Disc & 1″ x 30″ Belt Sander Combo, 250W

- ✓ Powerful for its size
- ✓ Adjustable tilt for precision
- ✓ Dust collection is effective
- ✕ Slightly loud
- ✕ Limited to smaller workpieces
| Motor Power | 250W |
| Disc Sander RPM | 3450 RPM |
| Belt Sander RPM | 1350 RPM |
| Disc Diameter | 5 inches |
| Belt Size | 1 inch x 30 inches |
| Worktable Tilt Range | 0° to 45° |
Honestly, I didn’t expect this combo sander to surprise me as much as it did. I was initially curious about its compact size, but it quickly proved its power and versatility.
The 250W motor kicks in with a satisfying RPM—3450 on the disc and 1350 on the belt—making quick work of sanding tasks.
The adjustable disc table, tilting from 0 to 45°, really helps when working on uneven or contoured surfaces. I used the included miter gauge to get precise angles, and it made a noticeable difference in the quality of my finish.
Switching between belt and disc modes is straightforward, thanks to the simple design.
What genuinely impressed me is how clean it kept my workspace. The dual dust ports connect easily to my vacuum, and dust hardly ever drifts around anymore.
Plus, the reinforced metal base feels sturdy, reducing vibrations and noise—so I could focus without distractions. The eye shield is a nice touch, adding safety without fuss.
It’s lightweight enough for easy repositioning, yet stable during use. For those DIY projects on a budget, it’s a real gem, especially when refinishing furniture or smoothing out a dining table.
Honestly, it’s a versatile little powerhouse that doesn’t compromise on performance or safety.
VEVOR 16″ Drum Sander with Stand, 1.5HP, Variable Speed

- ✓ Large 16″ capacity
- ✓ Stable conveyor with tracking
- ✓ Variable speed control
- ✕ Slightly heavy for portability
- ✕ Price is on the higher side
| Motor Power | 1.5 horsepower (HP) |
| Motor Speed | 1720 RPM |
| Maximum Board Width | 16 inches |
| Board Thickness Range | 1/32 inch to 3 inches |
| Sanding Belt Size | 16 inches |
| Dust Collection Port | 4 inches |
Compared to other sanders I’ve tried, this VEVOR 16″ drum sander immediately feels like a serious upgrade for working on dining tables. The large 16-inch capacity makes a noticeable difference when smoothing out big, flat surfaces without constantly repositioning your workpiece.
The open stand design is sturdy yet accessible, giving you plenty of room to maneuver around your project. I love how the conveyor belt stays steady thanks to the tracking system, so your wood doesn’t wobble or shift during sanding.
The variable speed control is a game-changer—being able to dial in the right feed rate means you get a smooth finish, whether working with hardwood or softer woods.
The dual motor setup feels powerful and reliable, providing consistent sanding power without hiccups. When I used it on a large dining table top, the extension tables offered great support, preventing any wobbles on longer pieces.
The height adjustment handwheel is simple to operate, so you can fine-tune the thickness easily—no fussing or guesswork.
Dust collection is decent, thanks to the 4-inch port, which helps keep your workspace cleaner. Moving the entire sander around on the wheels is effortless, so you can reposition it as needed.
Overall, this machine tackles large, flat surfaces with ease and precision, making it perfect for finishing a beautiful dining table.
VEVOR 6″ Disc & 4″ x 36″ Belt Sander, 400W Combo
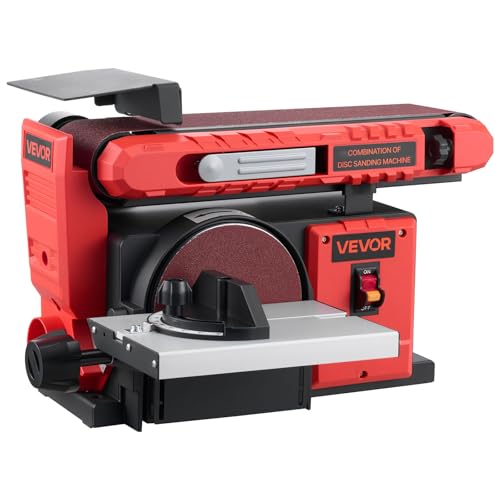
- ✓ Powerful 400W motor
- ✓ Multi-angle adjustable
- ✓ Dust collection port
- ✕ Slightly bulky for tiny spaces
- ✕ Belt speed might be slow for heavy-duty tasks
| Motor Power | 400W |
| Disc Diameter | 6 inches |
| Disc Speed | 3550 RPM |
| Belt Size | 4 inches x 36 inches |
| Belt Speed | 600 RPM |
| Adjustable Angles | Belt from 0° to 90°, Worktable from 0° to 45° |
Imagine you’re in your garage, trying to smooth out the edges of a new dining table top you just built. You set up the VEVOR 6″ Disc & 4″ x 36″ Belt Sander on your workbench, ready to tackle the rough surface.
The moment you turn on the 400W motor, you feel the solid vibration beneath your hands. The disc spins at 3550 RPM, and the belt runs smoothly at 600 RPM, giving you plenty of power to handle even stubborn wood grains.
Adjusting the belt angle from 0 to 90° is a breeze, thanks to the easy-to-use tilting mechanism. You find it handy for shaping edges or sanding contours on your table.
The tiltable disc table up to 45° really helps when you want precision on angled cuts.
The spacious worktables feel sturdy and stable. The miter gauge helps you keep your cuts straight, so your finish looks professional.
Connecting a vacuum to the dust port keeps your workspace surprisingly clean, minimizing airborne dust.
Despite its compact size, this sander feels robust and built to last. It’s perfect for small workshops or DIY projects like refinishing furniture or sharpening tools.
The combination of power, flexibility, and ease of use makes it much more than just a hobbyist’s toy.
Overall, this combo sander simplifies what used to be a tedious process. It saves you time and effort, delivering smooth, professional results with minimal fuss.
Whether you’re shaping a new dining table or restoring old furniture, it handles the job well.
VEVOR 4 x 36 in. Belt Sander 8″ Disc Sander, 5A Induction

- ✓ Powerful and quiet motor
- ✓ Versatile multi-angle sanding
- ✓ Stable and well-built
- ✕ Bulky for small workshops
- ✕ Slightly heavy to move
| Motor Power | 5 Amp fully enclosed induction motor |
| Disc Sander Speed | 3450 RPM |
| Belt Sander Speed | 2160 RPM |
| Belt Tilt Range | 0 to 90 degrees |
| Worktable Tilt Range | 0 to 45 degrees |
| Dust Collection Port | Yes, compatible with vacuum cleaners |
>
You know that frustrating moment when you’re trying to smooth out a rough wooden surface for your dining table, but your sander keeps wobbling or overheating? I’ve been there—until I got my hands on the VEVOR 4 x 36 in.
Belt Sander and 8″ Disc Sander combo.
From the first switch-on, I could tell this tool packs a punch. Its powerful 5AMP induction motor runs quietly but delivers serious sanding power.
The disc spins at 3450 rpm, while the belt moves at 2160 rpm, making quick work of rough edges and uneven surfaces.
What really impressed me was how versatile it is. The belt tilts from 0 to 90 degrees, letting me sand at different angles—perfect for getting those tricky corners on a dining table.
The large cast aluminum worktable tilts up to 45 degrees, giving me even more control over precise shaping.
Plus, the steel base with non-slip rubber pads kept everything stable during heavy use. The dust collection port connected seamlessly to my vacuum, keeping my workspace cleaner and less dusty.
It’s surprisingly easy to handle for a combo machine, and the dual functionality means I can switch between belt and disc sanding without fuss.
Whether refining soft metals or smoothing wood, this sander handles it all. It’s a solid choice if you want a reliable, multi-purpose tool that can tackle your dining table project and beyond.
Overall, it’s a great investment for anyone looking to upgrade their DIY setup or make furniture refinishing easier. Just keep in mind it’s a bit bulky and takes up space in your workshop.
<
What Types of Sanders Are Most Effective for Dining Tables?
The best sanders for dining tables vary based on the finish desired and the type of wood used.
- Orbital Sander: This type of sander is highly effective for achieving a smooth finish on dining tables. Its circular sanding pad moves in a random orbit, which minimizes the risk of swirl marks and allows for a fine finish that is perfect for varnishing or staining.
- Belt Sander: A belt sander is excellent for quickly removing material from larger surfaces and is particularly useful for tables with significant imperfections. It uses a continuous loop of sandpaper, making it ideal for leveling surfaces or removing old finishes, though care must be taken to avoid gouging the wood.
- Detail Sander: For intricate areas of a dining table, such as corners and edges, a detail sander is indispensable. Its triangular sanding pad allows for precision sanding in tight spots, ensuring that every part of the table is smooth and ready for finishing.
- Random Orbital Sander: Combining the benefits of the orbital and pad sanders, the random orbital sander is versatile and effective for both rough and fine sanding. Its random motion helps prevent scratches, making it a favorite for preparing surfaces before applying final finishes.
- Disc Sander: A disc sander is effective for flat surfaces and can be used for both shaping and finishing. These sanders provide a flat sanding surface, offering uniform results, which is important when preparing a dining table for a smooth finish.
How Does an Orbital Sander Benefit Smooth Finishes?
An orbital sander is an essential tool for achieving smooth finishes on surfaces like dining tables.
- Even Surface Finish: An orbital sander uses a circular sanding pad that moves in an elliptical motion, which helps ensure a uniform finish across the surface.
- Versatility: This type of sander can be used on various materials, including wood, metal, and plastic, making it suitable for different projects, including refinishing dining tables.
- Ease of Use: Orbital sanders are user-friendly and typically lightweight, allowing for prolonged use without causing fatigue, making them ideal for larger surfaces like dining tables.
- Dust Collection System: Many models come equipped with built-in dust collection systems that keep the work area cleaner, allowing for better visibility and reducing cleanup time after sanding.
- Different Grit Options: Orbital sanders can accommodate various grit sandpaper, which allows users to start with coarse grits for heavy material removal and finish with finer grits for a smooth surface.
Even Surface Finish: An orbital sander uses a circular sanding pad that moves in an elliptical motion, which helps ensure a uniform finish across the surface. This movement reduces the risk of swirl marks or uneven sanding that can occur with other types of sanders, making it particularly effective for achieving the smooth look desired on a dining table.
Versatility: This type of sander can be used on various materials, including wood, metal, and plastic, making it suitable for different projects, including refinishing dining tables. Whether you’re working with hardwood or softer woods, an orbital sander provides the flexibility needed for diverse applications.
Ease of Use: Orbital sanders are user-friendly and typically lightweight, allowing for prolonged use without causing fatigue, making them ideal for larger surfaces like dining tables. Their design minimizes vibration and noise, enhancing the user experience while ensuring effective sanding.
Dust Collection System: Many models come equipped with built-in dust collection systems that keep the work area cleaner, allowing for better visibility and reducing cleanup time after sanding. This feature is especially beneficial when working indoors or on projects where maintaining a tidy space is crucial.
Different Grit Options: Orbital sanders can accommodate various grit sandpaper, which allows users to start with coarse grits for heavy material removal and finish with finer grits for a smooth surface. This adaptability ensures that you can customize the sanding process to suit the specific needs of your dining table project.
Why Choose a Belt Sander for Large Surface Areas?
This happens because a belt sander is specifically designed for efficiently removing material over large surface areas, making it ideal for projects like refinishing a dining table.
According to a study by the Woodworkers Guild of America, belt sanders can remove material much faster than other types of sanders due to their continuous loop of sandpaper that grips the surface strongly, allowing for a more aggressive sanding action. This feature makes them particularly effective for large surfaces where speed and efficiency are significant concerns.
The underlying mechanism of a belt sander involves a belt of sandpaper that rotates around two drums, creating a powerful sanding action that can quickly flatten and smooth large areas. This is especially beneficial when dealing with dining tables that may have uneven surfaces or old finishes that need to be stripped away. Traditional sanders, like orbital sanders, typically work better on smaller or more detailed areas because they provide a finer finish but do not have the same material removal capacity as a belt sander.
Additionally, the weight and design of belt sanders allow them to maintain consistent pressure on the surface, reducing the likelihood of gouging or uneven sanding. This consistent pressure is essential for producing a uniform surface, which is crucial when preparing a dining table for refinishing or staining. The balance of speed and control offered by a belt sander makes it a top choice among woodworkers for large, flat surfaces.
What Role Does a Detail Sander Play in Refinishing?
A detail sander is an essential tool in the refinishing process, particularly for intricate surfaces like dining tables.
- Compact Design: The compact size of a detail sander allows it to reach tight corners and intricate details of furniture, ensuring a smooth finish even in hard-to-access areas.
- Precision Sanding: Detail sanders are designed for precision, featuring pointed tips that can carefully sand edges and intricate carvings without damaging the surrounding surfaces.
- Versatile Grit Options: These sanders often come with various sanding pads that allow users to choose the appropriate grit for their specific refinishing needs, from coarse to fine, facilitating smooth transitions between different surfaces.
- Reduced Vibration: Many detail sanders are engineered to minimize vibration, providing better control and reducing fatigue during prolonged use, which is particularly beneficial when working on larger dining table projects.
- Dust Collection Features: A detail sander typically includes dust collection mechanisms that help keep the work area clean, reducing airborne particles and improving visibility while sanding.
What Essential Features Should You Seek in a Sander?
When searching for the best sander for a dining table, consider the following essential features:
- Power and Motor Strength: A sander with a powerful motor allows for efficient material removal, which is crucial when working on large surfaces like dining tables. Look for sanders with at least 2 amps of power to ensure they can handle tough jobs without stalling.
- Variable Speed Settings: Different sanding tasks require different speeds; variable speed settings enable you to adjust the sander’s speed based on the material and the level of finish desired. This feature helps prevent over-sanding and damage to the wood.
- Dust Collection System: A built-in dust collection system helps maintain a clean workspace by minimizing dust particles during sanding. This feature not only improves visibility but also promotes better health by reducing inhalation of dust.
- Ergonomic Design: A sander with an ergonomic design ensures comfort during prolonged use, reducing fatigue. Look for models with a rubberized grip and lightweight construction that allow for easy maneuverability around the dining table.
- Pad Size and Type: The size and type of the sanding pad are important for achieving the desired finish. A larger pad covers more area quickly, while different pad types (like orbital or belt) can provide various finishes, so choose based on your specific needs.
- Durability and Build Quality: A durable sander made from high-quality materials will last longer and withstand rigorous use. Investing in a well-built tool ensures that it can handle the demands of sanding furniture without breaking down.
- Ease of Sandpaper Replacement: Quick and easy sandpaper replacement mechanisms can save you time during your project. Features like hook-and-loop systems allow for fast changes without the need for additional tools, keeping your workflow smooth.
How Do Power Ratings Impact Sanding Efficiency?
Power ratings significantly influence sanding efficiency, particularly when selecting the best sander for a dining table.
- Motor Power: The wattage of the motor directly correlates to the sander’s ability to perform effectively on various wood types.
- Speed Settings: Adjustable speed settings allow for versatility, enabling users to tackle different sanding tasks with precision.
- Weight and Design: The sander’s weight and ergonomic design can affect how easily it can be maneuvered over the surface being sanded.
- Type of Sander: Different types of sanders, such as orbital or belt sanders, have varying power ratings that impact their effectiveness on larger surfaces like dining tables.
Motor Power: A sander with a higher wattage motor can maintain consistent power under load, making it more effective for heavy sanding tasks. This is crucial when working on a dining table, as it can handle tougher materials and remove finishes more efficiently.
Speed Settings: The ability to adjust the speed not only allows for more control but also caters to different sanding needs, whether it’s for rough material removal or fine finishing. A sander that offers multiple speed settings ensures that you can adapt to various stages of the sanding process without damaging the wood.
Weight and Design: A lightweight sander may be easier to handle for extended periods, reducing fatigue, while an ergonomic design improves comfort and control. This is particularly important when sanding large surfaces like dining tables, as it enables better precision and reduces the risk of uneven sanding.
Type of Sander: Orbital sanders are generally more forgiving and ideal for finishing work, while belt sanders are more powerful for rapid material removal. Choosing the right type of sander based on its power rating can enhance sanding efficiency, making the task of refinishing a dining table both quicker and more effective.
What Abrasive Materials Are Best for Optimal Results?
The best abrasive materials for sanding a dining table provide a smooth finish and efficiently remove old finishes or imperfections.
- Aluminum Oxide: This is a popular choice for sanding wood surfaces due to its durability and resistance to wear. Aluminum oxide sandpaper can last longer than other types, making it ideal for heavy-duty sanding tasks and finer finishes.
- Garnet: Known for its natural origin, garnet sandpaper is favored for woodworking because it produces a finer finish on wood surfaces. It tends to break down faster than synthetic materials, making it better suited for light sanding and finishing applications.
- Silicon Carbide: This abrasive material is perfect for sanding materials other than wood, like metal and plastic. Silicon carbide is sharper than aluminum oxide and is effective for wet sanding, which helps reduce dust and produces smoother results.
- Ceramic: Ceramic sandpaper is designed for heavy sanding tasks and is highly effective on hardwoods. Its durability allows it to withstand high pressure and heat, making it an excellent choice for aggressive sanding on challenging surfaces.
- Diamond: While more expensive, diamond abrasives are incredibly durable and effective for sanding through tough finishes. They are particularly useful for professional applications where longevity and performance are critical, able to handle the most demanding sanding jobs.
Why Is Dust Collection Critical for a Cleaner Workspace?
Dust collection is critical for a cleaner workspace primarily because it reduces airborne particulates that can lead to respiratory issues and creates a safer and more pleasant environment for both workers and consumers.
According to the Occupational Safety and Health Administration (OSHA), exposure to wood dust can cause serious health problems, including asthma and other respiratory diseases, as well as irritation of the eyes, skin, and throat. A study published in the American Journal of Industrial Medicine highlights that prolonged exposure to wood dust can significantly increase the risk of developing these health issues, underscoring the need for effective dust collection systems.
The causal relationship between dust collection and a cleaner workspace involves several interconnected factors. When sanding a dining table, for instance, particles are released into the air. If these particles are not captured by a dust collection system, they can settle on surfaces and contribute to a dirty environment, which can compromise the quality of the finished product. Moreover, without effective dust management, the accumulation of dust can lead to equipment malfunctions, as dust can infiltrate machinery and affect performance. This can create a cycle where poor air quality and cleanliness lead to decreased efficiency and increased health risks, making dust collection an essential practice in woodworking environments.
What Are the Best Sanding Techniques for Dining Tables?
The best sanding techniques for dining tables help achieve a smooth finish and enhance the wood’s natural beauty.
- Orbital Sander: An orbital sander is ideal for larger surfaces like dining tables due to its circular sanding pattern, which minimizes swirl marks.
- Belt Sander: A belt sander is powerful and excellent for removing material quickly but should be used cautiously to avoid gouging the wood.
- Detail Sander: A detail sander is perfect for reaching tight corners and intricate designs on dining tables, providing a smooth finish in hard-to-reach areas.
- Hand Sanding: Hand sanding allows for greater control and precision, especially for touch-ups and when working with delicate edges.
- Sandpaper Grit Selection: Choosing the right grit is crucial; start with a coarser grit for initial sanding and progress to finer grits for a smooth finish.
An orbital sander is ideal for larger surfaces like dining tables due to its circular sanding pattern, which minimizes swirl marks. It can be easily maneuvered over flat areas, allowing for a uniform finish while being gentle on the wood.
A belt sander is powerful and excellent for removing material quickly but should be used cautiously to avoid gouging the wood. It’s best suited for initial sanding on rough surfaces or when dealing with thick layers of finish.
A detail sander is perfect for reaching tight corners and intricate designs on dining tables, providing a smooth finish in hard-to-reach areas. Its small size allows for precision work without damaging surrounding surfaces.
Hand sanding allows for greater control and precision, especially for touch-ups and when working with delicate edges. This technique is often used at the end of the sanding process to ensure that every area is perfectly smooth.
Choosing the right grit is crucial; start with a coarser grit for initial sanding and progress to finer grits for a smooth finish. This method helps to gradually refine the surface, ensuring no scratches remain before applying a finish.
What Preparations Should Be Made Before Sanding?
Before sanding a dining table, several preparations are essential to ensure a smooth and effective process.
- Clear the Surface: Remove all items, including decorations, dishes, and any furniture around the table. This creates a clean workspace, preventing any obstructions that could interfere with the sanding process or damage surrounding items.
- Inspect the Table: Check for any damages such as scratches, dents, or loose parts. Identifying these issues early allows for necessary repairs, ensuring that the sanding process is focused on achieving an even finish.
- Gather Required Tools and Materials: Assemble all necessary sanding equipment, including the best sander for dining tables, sandpaper of varying grits, and safety gear. Having everything ready at hand streamlines the process and promotes safety by ensuring you have protective eyewear and masks while working.
- Choose the Right Sandpaper: Select sandpaper with different grits, typically starting with a coarser grit and moving to finer grits. This step is crucial as it helps to remove old finishes and smooth out the surface progressively, leading to a better final appearance.
- Secure the Table: Ensure that the table is stable and won’t move during sanding. Using clamps can help secure it in place, which is particularly important for larger tables or if you’re working on a surface that may shift during the sanding process.
- Clean the Surrounding Area: Dust and debris can affect the sanding process and the finish of the wood. Cleaning the area around the table minimizes the risk of particles getting trapped in the finish and ensures a cleaner working environment.
- Plan Your Sanding Technique: Decide on the sanding technique and direction, typically following the grain of the wood. This planning ensures that the finish appears professional and enhances the natural beauty of the wood grain.
What Safety Precautions Should You Implement During Sanding?
When sanding a dining table, it’s essential to implement safety precautions to protect yourself and ensure a smooth finish.
- Wear Personal Protective Equipment (PPE): This includes safety goggles, dust masks, and ear protection.
- Ensure Proper Ventilation: Work in a well-ventilated area to avoid inhaling dust and fumes.
- Keep Work Area Clean: Maintain a tidy workspace to prevent accidents and ensure tools are easily accessible.
- Secure the Workpiece: Make sure the dining table is stable and secured to prevent movement while sanding.
- Use the Right Tools: Select the appropriate sander and sandpaper grit for the type of wood and finish.
- Monitor Electrical Safety: Ensure that all electrical tools are in good condition and properly grounded.
- Take Breaks: Regular breaks help prevent fatigue, which can lead to accidents.
Wearing personal protective equipment (PPE) is crucial. Safety goggles protect your eyes from dust and debris, dust masks prevent inhalation of harmful particles, and ear protection is necessary when using power sanders that generate noise.
Ensuring proper ventilation is important because sanding can produce a significant amount of fine dust and fumes, which can be harmful if inhaled. Working outdoors or in a garage with windows open can help maintain air quality.
Keeping your work area clean minimizes the risk of tripping or losing control of tools. A clutter-free workspace also allows for better focus on the task at hand, making the sanding process more efficient.
Securing the workpiece is essential to prevent it from shifting or moving during sanding, which can lead to uneven surfaces or accidents. Using clamps or placing the table on a stable surface helps maintain control.
Using the right tools, such as a sander suited for the type of wood and the desired finish, can greatly affect the quality of your work. Different sanders and grits are designed for various tasks, and selecting the appropriate one ensures better results.
Monitoring electrical safety is vital as power tools can pose a risk if they are damaged or improperly used. Always check for frayed cords and ensure tools are plugged into a grounded outlet to prevent electrical shock.
Taking breaks during the sanding process helps reduce fatigue, which can impair your focus and increase the likelihood of accidents. Regular intervals allow you to rest and assess your work for consistency and quality.
Related Post: