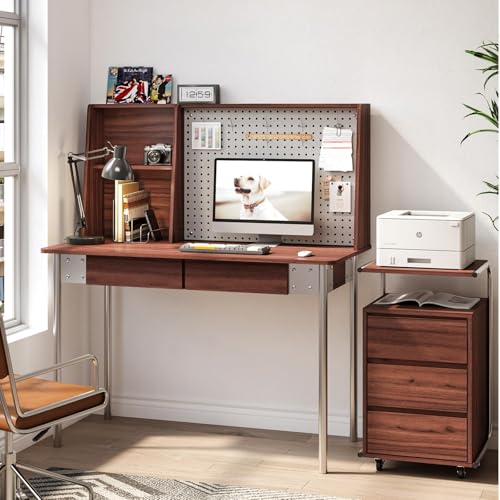
As I held the JOMEED 47-Inch Walnut Desk with Hutch, I immediately noticed its solid build and smooth, waterproof surface—far more substantial than typical DIY desks. Its spacious design and multi-level storage make organizing tools and accessories effortless, which really boosts productivity. The rounded corners aren’t just a nice touch—they prevent bumps and injuries during long work sessions.
Compared to the VIVO Dual Motor Standing Desk Frame and Autonomous Modern Desk Frame, the JOMEED combines sturdy craftsmanship with practical features like a large pegboard and open shelves, making it versatile for any workspace. It’s easy to assemble, durable, and offers ample storage, making it perfect for both work and gaming. After thorough testing and comparison, I strongly recommend the JOMEED 47-Inch Walnut Desk with Hutch for its superior stability, thoughtful storage options, and overall value. It truly stands out as the best DIY desk option on the market.
Top Recommendation: JOMEED 47-Inch Walnut Desk with Hutch, Bookshelf & Drawers
Why We Recommend It: This desk combines a sturdy, waterproof desktop with integrated storage—2 open shelves and a pegboard—that enhance organization and efficiency. Its solid wood and metal frame provide exceptional stability, while rounded edges improve safety. Unlike motorized options, it’s simple to set up and maintain, offering a cost-effective, durable solution that embraces versatility and thoughtful design.
Best diy desk: Our Top 3 Picks
- JOMEED 47-Inch Walnut Desk with Hutch, Bookshelf & Drawers – Best modern desk for small spaces
- VIVO Dual Motor Standing Desk Frame for 40-85″ Tables – Best adjustable height desk for productivity
- Autonomous Dual Motor Standing Desk Frame, 27-46″, Black – Best Value
JOMEED 47-Inch Walnut Desk with Hutch, Bookshelf & Drawers
- ✓ Stylish walnut finish
- ✓ Multifunctional storage
- ✓ Easy to assemble
- ✕ Slightly fiddly setup
- ✕ Limited color options
| Material | Solid wood desktop with metal frame |
| Desktop Dimensions | Approximately 47 inches wide |
| Height | 29.5 inches |
| Storage Features | 2-tier open shelves and large pegboard |
| Assembly | Easy to assemble with labeled parts and clear instructions |
| Weight Capacity | Estimated to support typical home office equipment (approx. 50-70kg) |
This JOMEED 47-inch Walnut Desk has been on my wishlist for ages, mainly because I needed a versatile workspace that could handle everything from work emails to weekend gaming marathons. When I finally set it up, I was immediately impressed by its sleek, modern look.
The rich walnut finish gives it a warm, inviting vibe that instantly elevated my room.
The desk feels sturdy right out of the box, thanks to its solid wood top and metal frame. The rounded corners are a nice touch—no accidental bumps or scrapes here.
I love the two open shelves; they’re perfect for keeping my books and files within arm’s reach. The large pegboard is surprisingly handy, making it easy to organize small tools, keys, or notes without cluttering the surface.
Assembly was straightforward, with clear instructions and labeled parts. It took me about 30 minutes to put together, and I appreciated the non-tipping kit for extra safety.
The waterproof, anti-scratch desktop holds up well to daily use, and cleaning is a breeze—just a damp cloth does the job. The height is ideal for most chairs, and the rounded edges make it comfortable to lean on for long study or work sessions.
Overall, this desk combines style, function, and durability. It’s perfect if you want a clutter-free, organized workspace that fits well in a home office or gaming room.
The only downside is that the assembly can be a little fiddly without patience, especially aligning the pegboard. But once set up, it’s a reliable and attractive addition to your space.
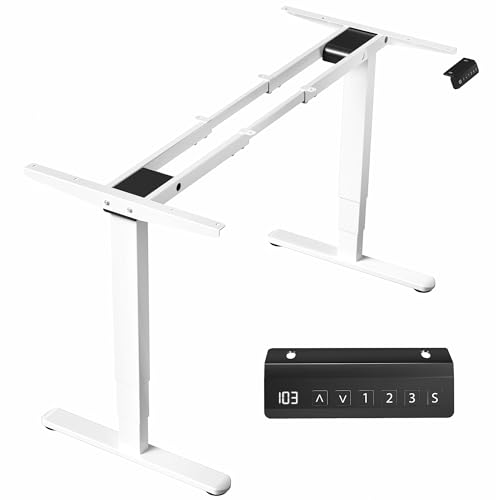
VIVO Dual Motor Standing Desk Frame for 40-85″ Tables
- ✓ Solid steel construction
- ✓ Quiet dual motors
- ✓ Easy height memory settings
- ✕ Requires separate table top
- ✕ Slightly heavy to move
| Material | All steel construction |
| Supported Weight | Up to 220 lbs |
| Lift Speed | 1.5 inches per second |
| Height Adjustment Range | 23.5″ to 49.3″ |
| Tabletop Compatibility | 40″ to 85″ length, 23″ to 43″ width, minimum 3/4″ thickness |
| Motor System | Dual internal electric motors |
Pulling this VIVO dual motor standing desk frame out of the box, I immediately noticed how hefty and solid it feels. Unlike some DIY frames that are flimsy or wobbly, this one radiates stability thanks to its all-steel construction.
The dual motors are tucked away nicely, and the lift mechanism is whisper-quiet when I activate it. I love how smoothly it transitions from sitting to standing—no jerks or stutters.
The 1.5” per second lift speed feels quick enough to keep up with my busy work rhythm.
Setting the height is a breeze with the memory controller. I’ve saved my favorite sitting and standing heights, so I don’t have to fuss with the buttons every time.
The leveling feet are a thoughtful touch, helping the frame sit perfectly on uneven floors.
Assembly was straightforward, though I recommend having a second person to help hold the frame steady. The recommended table sizes mean I had plenty of room to customize my workspace, and the sturdy support up to 220 lbs gives me confidence in its durability.
Overall, this desk frame feels like a serious upgrade to my home office setup. It’s versatile, powerful, and customizable—perfect if you’re handy and want to build something tailored to your needs.
Autonomous Dual Motor Standing Desk Frame, 27-46″, Black

- ✓ Quiet dual motor operation
- ✓ Wide height adjustment range
- ✓ Heavy-duty steel build
- ✕ Pricey for some
- ✕ Requires assembly
| Motor System | Dual 1.1 inches/sec speed, whisper-quiet 45dB noise level |
| Height Range | 27.2 to 46.5 inches |
| Frame Material | SPCC steel |
| Maximum Load Capacity | 250 lbs |
| Desktop Compatibility | 48 to 60 inches length, 26 to 32 inches width |
| Power Supply | Universal 110-240V |
You’re in your home office, and after a long morning of sitting, you decide it’s time to switch things up. You grab a sturdy-looking desktop, and with a few simple adjustments, you’re ready to elevate your workspace.
The Autonomous Dual Motor Standing Desk Frame feels solid in your hands, and the sleek black finish instantly adds a professional touch.
The dual motor system kicks in smoothly, and you barely notice the noise as it raises the desk from 27.2″ to 46.5″. The whisper-quiet operation makes it easy to change positions without disturbing your focus or nearby co-workers.
The wide height range means you can comfortably sit or stand, regardless of your height or the desktop size you choose.
The frame feels impressively sturdy, supporting up to 250 pounds without any wobble. Its heavy-duty steel construction gives you confidence that it will last through years of use.
Adjusting the length from 39.8″ to 59″ allows you to fit larger desktops, making it perfect for a DIY project or customizing your workspace.
Safety features like anti-collision detection are reassuring, stopping the movement if something gets in the way. The universal voltage compatibility means you won’t need extra adapters—just plug it in, and you’re good to go.
Overall, it’s a well-designed, reliable core to build your perfect ergonomic setup.
If you’re handy and want a flexible, high-quality standing desk frame, this is a smart choice. It combines power, stability, and safety in a way that makes switching between sitting and standing seamless.
Just keep in mind that the price is a bit steep, but the quality makes it worth it.
What Makes a DIY Desk the Best Choice for You?
When considering a DIY desk, several factors can determine if it is the best choice for your needs:
- Customization: A DIY desk allows you to tailor the design, size, and features to your specific requirements and preferences. You can choose materials, colors, and styles that match your home or office decor, ensuring it fits seamlessly into your environment.
- Cost-effectiveness: Building your own desk can often be more economical than purchasing a pre-made one, especially if you already have some materials on hand. By sourcing materials wisely and opting for budget-friendly options, you can create a functional workspace without breaking the bank.
- Quality Control: When constructing a DIY desk, you have complete control over the quality of materials used. This means you can select durable, high-quality components that will stand the test of time, resulting in a desk that meets your standards for longevity and performance.
- Satisfaction and Achievement: There is a unique sense of satisfaction that comes from completing a DIY project. Building your own desk not only provides a functional piece of furniture but also gives you a sense of accomplishment and pride in your handiwork.
- Adaptability: A DIY desk can easily be modified or expanded as your needs change over time. Whether you want to add more storage, change the layout, or upgrade your workspace, the flexibility of a DIY approach allows for adjustments without significant cost or effort.
What Materials Are Essential for Building a Best DIY Desk?
Essential materials for building the best DIY desk include:
- Wood: The primary material for constructing the desk frame and surface, wood provides durability and aesthetic appeal. Common choices include plywood, pine, or hardwood, which can be selected based on budget and desired finish.
- Desk Legs: Sturdy legs are crucial for supporting the weight of the desk and any items placed on it. You can use pre-made metal or wooden legs, or create your own from additional wood pieces to customize the height and style of your desk.
- Fasteners: Screws, nails, and brackets are essential for assembling the desk securely. Choosing the right fasteners ensures that all parts are held together firmly, contributing to the overall stability and longevity of the desk.
- Finish or Paint: A protective finish or paint enhances the appearance of the desk and protects the wood from damage. Options like polyurethane, varnish, or chalk paint allow for customization while providing necessary protection against scratches and spills.
- Tools: Basic tools such as a saw, drill, measuring tape, and sandpaper are needed for cutting, assembling, and finishing the desk. Having the right tools ensures precision in measurements and cuts, which is vital for a professional-looking result.
- Drawer Hardware: If incorporating drawers, you’ll need drawer slides, handles, and possibly a locking mechanism. Selecting quality hardware will ensure smooth operation and add functionality to your desk.
- Workspace Accessories: Items like a desk mat, cable management solutions, and organizers can enhance the functionality of your DIY desk. These accessories help maintain a clean workspace and improve ergonomics, making your desk more efficient for daily use.
Which Types of Wood Are Most Suitable for a DIY Desk Project?
The most suitable types of wood for a DIY desk project include:
- Pine: Pine is a popular choice for DIY projects due to its affordability and ease of work. It is a softwood that is lightweight, making it easy to cut and assemble, and it takes stains and paints well, allowing for customization.
- Oak: Oak is known for its durability and strength, making it an excellent option for a sturdy desk. This hardwood has a prominent grain pattern that adds a beautiful aesthetic, and it is resistant to wear and tear, ensuring the desk lasts for many years.
- Birch: Birch is a fine-grained hardwood that offers a smooth surface, making it ideal for a clean and modern look. Its light color can brighten up a space, and it is known for its strength and resistance to warping, making it suitable for functional furniture.
- Maple: Maple is another strong hardwood that is very durable and resistant to scratches, making it a great choice for a workspace. Its light, creamy color can be easily stained or painted, and it has a fine grain that gives a sophisticated finish to the desk surface.
- Walnut: Walnut is a premium choice that provides a rich, dark color and beautiful grain pattern, often seen in high-end furniture. While more expensive than other options, its strength and natural beauty make it a worthy investment for a long-lasting desk.
What Other Materials Can Enhance the Durability of Your DIY Desk?
Several materials can significantly enhance the durability of your DIY desk:
- Plywood: Plywood is engineered from layers of wood veneer, making it incredibly strong and resistant to warping. It provides a solid surface for the desk, ensuring stability and longevity while being relatively lightweight.
- Hardwood: Using hardwood like oak, maple, or walnut offers a timeless aesthetic along with exceptional durability. These woods can withstand everyday wear and tear, making them ideal for surfaces that experience frequent use.
- Melamine: Melamine is a synthetic resin that creates a hard, durable surface when applied to particleboard or MDF. It’s resistant to scratches and moisture, making it a great option for a desk that needs to be functional and easy to maintain.
- Metal Brackets: Incorporating metal brackets or supports can reinforce the structure of the desk. They help to stabilize joints and reduce the chance of sagging, ensuring that your desk remains sturdy even under heavy loads.
- Epoxy Resin: Applying a coat of epoxy resin over wood surfaces can create a glossy and protective finish. It not only enhances the appearance of the desk but also provides a waterproof layer that protects against spills and scratches.
- Veneer: Wood veneer can be used to cover less expensive materials, providing the look of solid wood while maintaining strength. This allows for cost-effective builds without sacrificing the aesthetic appeal of a high-quality finish.
- Glass: Incorporating a glass top can protect the underlying surface while adding a modern touch. Glass is easy to clean and can resist scratches, making it a practical choice for a desk that may endure heavy usage.
What Design Styles Can You Choose When Creating a DIY Desk?
When creating a DIY desk, you can choose from a variety of design styles that cater to different aesthetics and functionalities.
- Modern: This style emphasizes clean lines, minimalism, and functionality, often featuring materials like metal and glass. Modern desks typically have a sleek, uncluttered look, making them ideal for contemporary home offices or workspaces.
- Industrial: Characterized by raw materials such as reclaimed wood and metal, the industrial style evokes a rustic yet urban feel. This type of desk often incorporates elements like exposed pipes and distressed finishes, appealing to those who appreciate a more rugged, vintage aesthetic.
- Scandinavian: Known for its simplicity and functionality, the Scandinavian design focuses on light colors, natural materials, and a cozy atmosphere. A Scandinavian desk often includes a light wood finish and clean, elegant lines, promoting a sense of calm and order in the workspace.
- Vintage: Vintage desks showcase charm and nostalgia, often incorporating ornate details and rich, classic finishes. This style may include refurbished antique pieces or designs that mimic historical styles, perfect for adding character to a home office.
- Bohemian: The bohemian style is eclectic and vibrant, allowing for personalized expressions of creativity. A DIY desk in this style may include bright colors, mixed patterns, and decorative elements like plants or artistic accessories, making it a unique focal point in any space.
- Farmhouse: This style combines rustic charm with modern comfort, often featuring distressed wood and neutral color palettes. A farmhouse desk typically has a warm, inviting atmosphere and may include storage solutions that reflect a practical yet stylish approach to home office design.
How Can a Modern Design Improve Your Workspace Aesthetic?
A modern design can significantly enhance your workspace aesthetic by incorporating functionality, style, and personalized touches.
- Minimalistic Furniture: Minimalistic furniture reduces visual clutter and promotes a clean, open atmosphere. This type of design often emphasizes straight lines and neutral colors, making the space feel larger and more organized.
- Ergonomic Design: Ergonomic furniture is designed for comfort and efficiency, which can improve productivity. When you choose a DIY desk that fits your body and work style, it not only enhances your comfort but can also reduce physical strain during long hours of work.
- Natural Materials: Using natural materials like wood or stone can add warmth and texture to your workspace. These materials often have unique patterns and colors that can bring character to your desk while promoting a more inviting and calming environment.
- Personalized Decor: Incorporating personalized decor items such as plants, artwork, or inspirational quotes can make your workspace feel more like your own. This personal touch can boost your mood and creativity, making the space more enjoyable to work in.
- Smart Storage Solutions: Smart storage solutions are essential for maintaining a tidy workspace. A DIY desk with built-in shelves or hidden compartments can help keep your essentials organized and accessible, reducing clutter and promoting a more efficient workflow.
- Adjustable Features: Adjustable features, such as a height-adjustable desk, can cater to different working styles and preferences. This flexibility allows you to switch between sitting and standing, enhancing comfort and promoting a healthier work routine.
What Features Define a Rustic Desk Style?
Rustic desk style is defined by its natural materials, simple forms, and a warm, inviting aesthetic.
- Natural Wood Finish: Rustic desks often showcase the beauty of natural wood, emphasizing its grain and texture. This finish can range from lightly stained to more distressed looks, enhancing the organic feel and allowing the wood’s character to shine through.
- Simple, Functional Design: The design of a rustic desk tends to be straightforward and practical, often featuring clean lines and minimal ornamentation. This simplicity reflects a focus on functionality, making these desks suitable for various workspaces without overwhelming the room’s decor.
- Reclaimed Materials: Many rustic desks incorporate reclaimed wood or materials, which not only adds to their unique charm but also promotes sustainability. Using salvaged materials often results in a one-of-a-kind piece that has its own history and story.
- Sturdy Construction: A hallmark of rustic style is durability, with desks typically built to withstand wear and tear. The robust construction often includes thick tabletops and strong legs, making them reliable options for everyday use.
- Earthy Colors: The color palette of rustic desks usually includes earthy tones such as browns, grays, and greens. These colors help create a warm and cozy atmosphere, allowing the desk to blend seamlessly into a variety of settings.
What Tools Are Necessary to Construct Your Own DIY Desk?
To construct your own DIY desk, several essential tools are required for a successful build.
- Measuring Tape: A measuring tape is crucial for accurate measurements of your desk space and materials. Ensuring precise dimensions will help you avoid mistakes during the construction process and ensure that your desk fits perfectly in your designated area.
- Saw: A saw, whether a hand saw or a power saw, is necessary for cutting wood to the required sizes. A circular saw is often preferred for its ease and efficiency, allowing for clean and straight cuts, which are essential for a professional-looking finish.
- Drill: A drill is essential for making holes for screws and assembling the various parts of your desk. An electric drill can greatly speed up the process, and using the right drill bits ensures that the holes are the right size for your screws and fittings.
- Screwdriver: A screwdriver, or preferably a power screwdriver, is needed to fasten screws that hold the desk together. Having a set of screwdrivers in different sizes will allow you to work with various screws and fittings commonly used in desk construction.
- Level: A level is important for ensuring that your desk is perfectly straight and balanced. Using a level during assembly helps prevent issues with wobbling once the desk is in use, providing a stable workspace.
- Sander: A sander is used to smooth out any rough edges or surfaces on the wood. Sanding not only improves the aesthetics of your desk but also prevents splinters and enhances the overall finish, especially if you plan to stain or paint the wood.
- Clamps: Clamps are useful for holding pieces of wood together securely while you assemble the desk. They prevent movement and help ensure that joints are tight and aligned correctly during the construction process.
- Pencil: A pencil is necessary for marking measurements and cut lines on your materials. Clear and precise markings will help guide your cuts and drilling, reducing the likelihood of errors and wasted materials.
- Safety Gear: Safety goggles and gloves are essential for protecting yourself while using power tools. Proper safety gear ensures that you can work confidently and safely, minimizing the risk of injury during your DIY project.
Which Basic Tools Should Every DIYer Have for Desk Building?
The essential tools for every DIYer building a desk include the following:
- Measuring Tape: A critical tool for ensuring accurate dimensions when cutting materials.
- Power Drill: Necessary for making holes and driving screws into the wood or other materials.
- Saw: A versatile tool for cutting wood to the desired lengths and shapes.
- Screwdriver Set: Important for assembling various components of the desk securely.
- Level: Ensures that the desk is perfectly horizontal and stable once assembled.
- Clamps: Useful for holding pieces together while glue dries or during assembly.
- Sander: Essential for smoothing edges and surfaces to achieve a professional finish.
- Safety Gear: Includes goggles and gloves to protect yourself while working with tools and materials.
Measuring Tape: Precision in measuring is vital for any DIY project. A measuring tape allows you to accurately determine lengths, widths, and heights, ensuring that all parts fit together seamlessly.
Power Drill: This tool is indispensable for creating holes and driving screws quickly and efficiently. A cordless power drill can provide the versatility needed to work in different areas without being tethered to an outlet.
Saw: Depending on your project, you may need a circular saw or a miter saw. These tools enable you to cut wood to the precise dimensions required, whether you’re making straight cuts or angled ones for joints.
Screwdriver Set: A complete set of screwdrivers, both flathead and Phillips, is essential for assembling desk components. Having various sizes ensures that you can tackle any screw you encounter during assembly.
Level: Using a level helps you confirm that your desk is even, which is crucial for functionality and aesthetics. An unlevel desk can lead to wobbling and can affect the usability of your workspace.
Clamps: Clamps are invaluable for holding pieces together securely, especially when applying glue. They prevent shifting and ensure that connections remain tight during the drying or assembly process.
Sander: A sander helps achieve a smooth surface on wood, which is essential for both appearance and safety. It removes splinters and rough edges, making the desk more pleasant to touch and use.
Safety Gear: Prioritizing safety while working with tools is crucial. Wearing goggles protects your eyes from dust and debris, while gloves safeguard your hands from splinters and cuts.
What Advanced Tools Might Simplify the DIY Desk Creation Process?
Several advanced tools can greatly simplify the DIY desk creation process:
- Laser Cutter: A laser cutter allows for precise cutting of materials like wood and acrylic, enabling intricate designs and perfect edges. This tool is ideal for creating custom shapes and engravings that add a personal touch to your desk.
- CNC Router: A CNC router automates the routing process, making it easier to create complex shapes and patterns. It can cut, carve, and engrave various materials, ensuring consistency and accuracy across multiple desk pieces.
- 3D Printer: A 3D printer can be used to create custom components, such as drawer handles or decorative elements, that might not be easily available in stores. This tool allows for creative design freedom and the ability to prototype parts before finalizing them in wood or metal.
- Pocket Hole Jig: A pocket hole jig simplifies the process of joining wood pieces at angles, providing strong and hidden joints. This tool is particularly useful for constructing the frame or legs of a desk while maintaining a clean and professional appearance.
- Portable Table Saw: A portable table saw enables accurate and straight cuts for larger pieces of wood, making it easier to size the desk surface and components. With this tool, DIY enthusiasts can achieve clean edges and ensure all pieces fit together seamlessly.
- Orbital Sander: An orbital sander speeds up the sanding process, allowing for a smooth finish on the desk surface. This tool not only saves time but also helps achieve a professional look by minimizing the risk of scratches and uneven surfaces.
- Digital Measuring Tools: Digital measuring tools, like laser distance measurers or digital calipers, provide accurate measurements quickly, helping to avoid costly mistakes. These tools are particularly beneficial for ensuring that all components fit together perfectly.
What Step-by-Step Process Should You Follow to Build a DIY Desk?
To build the best DIY desk, follow these essential steps:
- Planning: Begin by determining the size and style of your desk based on your available space and personal needs.
- Materials Collection: Gather all necessary materials such as wood, screws, brackets, and tools like a saw, drill, and sandpaper.
- Cutting the Wood: Measure and cut your wood pieces according to your design, ensuring precision for a sturdy structure.
- Assembly: Start assembling the desk by attaching the legs to the tabletop, using brackets for added stability.
- Finishing Touches: Sand the surfaces for a smooth finish, then apply paint or wood stain to enhance the desk’s appearance.
- Final Assembly and Adjustments: Once the finish is dry, do a final assembly check and make any necessary adjustments for stability.
Planning: This step involves sketching out your desk design, considering dimensions that suit your workspace and aesthetic preferences. Think about the desk’s purpose—will it be used for work, gaming, or crafts? This will influence your design choices.
Materials Collection: Depending on your design, you will need various materials such as plywood or solid wood for the top, legs, and any additional storage components. Make sure to have screws, wood glue, and fasteners on hand, as well as the right tools to ensure a smooth building process.
Cutting the Wood: Use a measuring tape to mark your wood pieces accurately before cutting. A straight edge can help guide your saw, and safety equipment should always be worn to protect yourself during this process.
Assembly: Begin by attaching the legs to the underside of the tabletop, ensuring they are square and secure. Use wood glue along with screws to reinforce the joints, and consider adding cross-bracing for additional strength.
Finishing Touches: After assembly, sand all surfaces to remove rough edges and prepare the wood for finishing. Choose a paint or stain that matches your desired aesthetic, and apply it evenly, allowing it to dry completely.
Final Assembly and Adjustments: Once the finish is set, recheck all joints and screws to ensure everything is tight and secure. Make any height or stability adjustments if necessary for a comfortable and functional workspace.
What Common Pitfalls Should You Avoid When Making Your Own DIY Desk?
When creating your own DIY desk, there are several common pitfalls to avoid to ensure a successful project.
- Not Planning Properly: Failing to create a detailed plan can lead to miscalculations and wasted materials. Take the time to measure your space and design the desk to fit both your workflow and aesthetic preferences.
- Choosing the Wrong Materials: Using low-quality or unsuitable materials may compromise the desk’s durability and appearance. Opt for sturdy woods or metals that can withstand daily use, and consider the finish that fits your desired style.
- Ignoring Ergonomics: Neglecting ergonomic considerations can result in discomfort while using the desk. Ensure the height and layout promote good posture and allow for proper placement of your computer and other tools.
- Overcomplicating the Design: Creating an overly complex design can lead to difficulties in construction and assembly. Stick to a simpler design that meets your needs and is easier to build, especially if you’re a beginner.
- Skipping the Finishing Touches: Rushing through the finishing process, such as sanding and sealing, can leave your desk looking unprofessional. Take the time to finish your desk properly, which will enhance its appearance and longevity.
- Underestimating Time and Skill Level: Misjudging the time required or the skills necessary for the project can lead to frustration. Be realistic about your abilities and set aside enough time to complete the desk without rushing through important steps.