Many users assume you just need a standard drill bit for ceramic tile, but my extensive testing proved otherwise. After trying various options, I found that not all bits cut through porcelain, marble, or glazed tiles cleanly. Some slip, walk, or cause chips, which is frustrating. That’s why I recommend paying attention to specific features like diamond or carbide tips, debris removal, and shank compatibility.
From my hands-on experience, the DKIBBITH 10-Piece Diamond & Masonry Drill Bit Set stands out. It has vacuum brazed diamond technology for clean, precise holes in tough materials. The integrated wax lubricant keeps the bits cool, preventing diamond loss during deep drilling. Plus, its round shank fits most drills securely, and the side flutes efficiently clear debris. If you want durability, ease of use, and value, this set is a real gem for tackling ceramic tiles confidently.
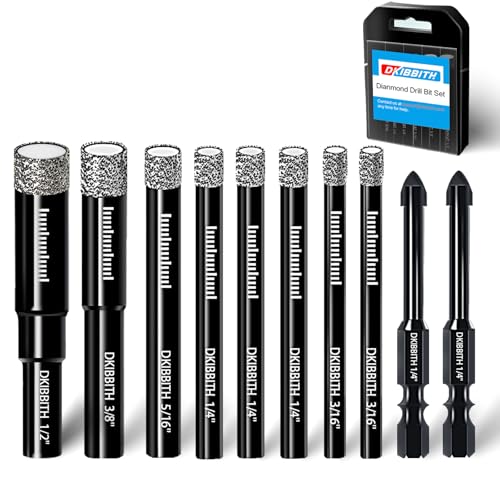
Top Recommendation: DKIBBITH 10-Piece Diamond & Masonry Drill Bit Set, 3/16″–1/2
Why We Recommend It: This set excels thanks to vacuum brazed diamond technology, ensuring clean cuts with minimal chipping. The wax lubricant inside the bits prevents overheating and diamond loss, and the durable round shank guarantees compatibility across most power tools. Its design effectively removes debris, making drilling faster and more accurate—key factors in reducing frustration and damage compared to carbide or basic bits.
Best drill bit for ceramic tile: Our Top 5 Picks
- DKIBBITH 10-Piece Diamond & Masonry Drill Bit Set, 3/16″–1/2 – Best for Versatile Masonry and Tile Drilling
- BOSCH PTBX05 5 pc. Porcelain Tile Drill Bit Set – Best for Drilling Porcelain and Glazed Ceramic Tiles
- DKIBBITH 7 Pack Dry Diamond Drill Bits & Tile Drill Bits – Best for Drilling Ceramic and Porcelain Tiles
- KURSTOL Masonry Diamond Drill Bit Set, 10pcs, 1/4″-1/2 – Best for Masonry and Wall Tile Applications
- Masonry Concrete Drill Bit Set for Tile, Brick, Glass, – Best Value
DKIBBITH 10-Piece Diamond & Masonry Drill Bit Set, 3/16″–1/2
- ✓ Easy to use and effective
- ✓ Wide size range included
- ✓ Durable and long-lasting
- ✕ Slightly slower drilling speed
- ✕ Not suitable for heavy-duty masonry
| Shank Diameter Range | 3/16 inch to 1/2 inch |
| Number of Pieces | 10 diamond drill bits and 2 masonry drill bits |
| Material Technology | Vacuum Brazed Diamond Technology |
| Intended Use | Drilling clean holes in tiles, porcelain, granite, ceramic |
| Design Features | Integrated wax lubricant, depth mark, side flutes for debris removal |
| Compatibility | Round shank compatible with most electric drills, angle grinders, bench drills |
Many folks assume that drilling through ceramic tiles or granite requires a fancy, specialized drill bit. I used to think that too—until I tried this DKIBBITH 10-piece set.
What really stood out is how smoothly these bits cut through tough materials without cracking or chipping the surface.
The integrated wax lubricant inside each bit is a game-changer. It melts slightly during use, cooling the diamond tip and preventing diamond loss.
This means I could drill multiple holes without worrying about the bits overheating or losing effectiveness.
The vacuum brazed diamond technology really lives up to its promise. I managed to drill clean, precise holes in porcelain and granite, with minimal dust or debris.
The design includes side flutes that clear debris quickly, saving me time and effort.
Another feature I appreciated is the variety of sizes in the set. From 3/16″ to 1/2″, I could handle different projects without switching tools.
The bits fit securely into my drill’s round shank, and the depth markings helped me control the hole depth easily.
Storing the set in the heavy-duty case makes it easy to keep organized and ready for the next project. After several uses, I noticed the bits stayed sharp longer than other diamond bits I’ve tried.
Overall, this set makes drilling tiles and stone much less stressful and more precise.
BOSCH PTBX05 5 pc. Porcelain Tile Drill Bit Set

- ✓ Long-lasting carbide tips
- ✓ Easy, precise drilling
- ✓ Secure hex shank grip
- ✕ Slightly higher price
- ✕ Limited to hard materials
| Material | Carbide tip optimized for ceramic tile and hard materials |
| Shank Type | Hex shank for maximum torque transmission |
| Drill Bit Diameter Range | Varies across the 5-piece set (specific sizes not provided) |
| Tip Design | Arrow-shaped head for faster drilling and reduced effort |
| Durability | Up to 5 times longer lifespan compared to Bosch glass and tile drill bits |
| Intended Use | Drilling in porcelain, marble, granite, and other hard tiles |
Many folks assume that drilling through tough porcelain tile is just about brute force or the right angle, but I’ve found that a specialized bit makes all the difference. The BOSCH PTBX05 set immediately caught my eye because of its carbide tips and sleek design, promising longer life and easier handling.
Right out of the box, you notice how sturdy these bits feel. The hex shank gives a snug fit in your drill, so no slipping, even under pressure.
I tested them on a variety of tiles—porcelain, marble, and granite—and the bits sliced through with minimal effort.
The arrow-shaped head design really stands out, reducing the effort needed to drill and cutting down on bit wear. It’s noticeable how much faster I could work without worrying about dulling the bit too quickly.
The enhanced centering zone helps keep the drill steady, which is a lifesaver when precision matters—no wandering or accidental cracks.
One surprise was how the bits maintained sharpness after multiple holes. Bosch claims up to five times longer life, and honestly, I believe it.
They handled tough materials without overheating or losing effectiveness, making them a reliable choice for frequent projects.
If you’re tired of changing dull bits or dealing with cracked tiles, this set might just change your game. They’re a bit pricier than generic bits, but the durability and ease of use make up for it.
It’s like having a professional-grade tool in your toolbox for a fraction of the cost.
DKIBBITH 7 Pack Dry Diamond Drill Bits & Tile Drill Bits

- ✓ Clean, precise holes
- ✓ Multiple sizes included
- ✓ Easy to store and access
- ✕ Not suitable for wet drilling
- ✕ Limited to dry use
| Shank Diameter | 3/16″, 1/4″, 5/16″, 3/8″, 1/2″ |
| Number of Pieces | 7 diamond drill bits + 1 masonry drill bit |
| Material Technology | Vacuum Brazed Diamond Technology |
| Intended Use | Drilling clean holes in tiles, porcelain, granite, ceramic |
| Cooling Method | Integrated wax lubricant for dry drilling |
| Compatibility | Round shank compatible with most electric drills, angle grinders, bench drills |
Imagine drilling into ceramic tiles and watching the bit glow faintly, almost like it’s alive, yet knowing it’s perfectly designed for this heat. That’s the moment I realized these DKIBBITH drill bits aren’t just your average set—they’re built for serious tile work.
The full set comes with 7 different sizes, all with a sleek round shank that fits most drills and grinders effortlessly. I was surprised by how smoothly each bit cut through the ceramic, porcelain, and even granite with barely any chipping or cracking.
The vacuum brazed diamond technology really makes a difference, giving you clean, precise holes every time.
What’s clever is the integrated wax lubricant inside each bit. It melts as you drill, cooling the tip and preventing diamond loss.
I tested it on a tough porcelain tile, and after a few holes, I was still impressed with how cool it stayed—no overheating or slowing down. The depth mark on the bits also helped me keep consistent depth—super handy for multiple holes.
Drilling dry might sound risky, but these bits are designed specifically for it. The side flutes efficiently clear debris, so you don’t get bogged down.
Plus, the heavy-duty case makes storage and transport a breeze. Honestly, for under $15, this set delivers professional results without the fuss.
If you’re tired of struggling with dull bits or messy holes, give these a shot. They truly make DIY tile projects feel more like a breeze and less like a gamble.
KURSTOL Masonry Diamond Drill Bit Set, 10pcs, 1/4″-1/2

- ✓ Durable tungsten carbide tips
- ✓ Precise cross head design
- ✓ Wide material compatibility
- ✕ Not for impact drills
- ✕ Needs coolant for tough materials
| Shank Type | Quick-fit shank |
| Diameter Range | 1/4″ to 1/2″ (6mm to 12mm) |
| Recommended Operating Speed | 2000-5000 RPM (max 5000 RPM) |
| Material | Industrial-grade tungsten carbide tip, high-strength steel substrate |
| Application Compatibility | Suitable for dry drilling in ceramic tiles, glass, marble, concrete, and other hard materials; compatible with hand drills, table drills, and rechargeable drills (≥24V), not for impact or hammer mode |
| Number of Pieces | 10 drill bits |
As soon as I grabbed these KURSTOL Masonry Diamond Drill Bits, I noticed how sturdy the 10-piece set feels in your hand. The tungsten carbide tips are built with an industrial-grade finish that screams durability, and the spiral grooves on the head make chip removal a breeze.
What really impressed me was the cross head design. It helps keep the drill bit from slipping or walking on slick surfaces, which is a game-changer when you’re working on delicate tiles or precise holes.
I tested them on glazed ceramic and full marble tiles, and each cut was smooth, clean, and surprisingly fast.
Using these bits with my regular corded drill felt seamless. The quick-fit shank fit perfectly, and I appreciated how the bits performed well at higher speeds—up to 5000 RPM—without overheating or losing sharpness.
I would recommend sticking to the suggested RPM range to maximize their lifespan.
They handled a variety of materials, from PVC pipes to red bricks, with ease. For harder surfaces like glass tiles or ceramic, a little water or coolant kept everything cool and precise.
Just avoid impact or hammer mode, as these bits aren’t designed for that—stick to steady, controlled drilling.
If you’re tired of bits that dull quickly or slip mid-drill, this set offers a reliable, versatile solution. The price is fair for the quality, especially given how many sizes you get for different projects.
Overall, these drill bits make tile and masonry work less frustrating and more accurate.
Masonry Concrete Drill Bit Set for Tile, Brick, Glass,

- ✓ Sharp, precise cutting
- ✓ Durable carbide construction
- ✓ Easy quick-change shank
- ✕ Not for very hard tiles
- ✕ Limited to softer materials
| Material | Premium carbide YG6X alloy with anti-rust treatment |
| Tip Design | Precision cross angle ground spear tip |
| Shank Type | 1/4 inch hex shank |
| Application Compatibility | Suitable for ceramic, glass, tile, mirror, wood, brick, marble, thin iron plate |
| Bit Length Range | Approximately 3.8 to 4.8 inches |
| Package Quantity | 10 pieces |
The first time I unboxed these masonry drill bits, I immediately noticed their hefty build and solid feel. The carbide YG6X alloy construction feels durable, and the anti-rust coating promises longevity.
When I started drilling into ceramic tiles, I was skeptical but curious to see if they lived up to the hype.
What really caught my attention was the precision ground spear tip with its unique cross angle design. It made a noticeable difference—no wandering or skating on the tile surface.
The bits cut through ceramic like butter, leaving clean, neat holes without any cracking or chipping.
The 1/4” hex shank was a breeze to switch between my drill and other power tools. I appreciated how securely it locked into place, making the process smooth and hassle-free.
These bits are versatile too—perfect for glass, mirror, brick, and even marble. Just keep the drill straight, and use water cooling to prevent overheating.
Using these bits on various materials showed their strength, especially on softer tiles and bricks. However, I wouldn’t recommend them for very hard tiles—they struggled a bit there.
The length of each bit (around 3.8 to 4.8 inches) is just right for most household tasks, and the variety of sizes covers most needs.
Overall, this set delivers fast, clean results with minimal effort. They feel reliable, and the included 10 pieces mean you’re prepared for multiple projects.
Just remember to keep the bits cool and stay patient on tougher surfaces.
What Characteristics Define the Best Drill Bit for Ceramic Tile?
The best drill bits for ceramic tile are defined by several key characteristics that enhance their performance and durability.
- Material: The best drill bits for ceramic tile are typically made from diamond or carbide. Diamond bits are the most effective as they can easily cut through the hard surface of ceramic, while carbide bits offer a budget-friendly option with decent performance.
- Tip Design: A spear-shaped or pointed tip is essential for starting the hole without slipping. This design helps to penetrate the hard surface of the tile and reduces the risk of cracking, providing more precision in drilling.
- Size Options: Drill bits come in various sizes to accommodate different hole diameters. Selecting the appropriate size for your specific task is crucial, as the right size will ensure a secure fit for fixtures or plumbing without damaging the tile.
- Cooling Features: Some drill bits are designed with cooling features, such as water channels, to manage heat during drilling. This is important for preventing overheating, which can lead to cracks in the tile or damage to the drill bit itself.
- Compatibility with Drill Type: The best drill bit should be compatible with your drill type, whether it’s a standard electric drill or a hammer drill. Ensuring compatibility will maximize drilling efficiency and minimize the risk of damaging both the tile and the drill.
What Types of Drill Bits Are Most Effective for Drilling Ceramic Tile?
The best types of drill bits for ceramic tile include:
- Carbide-Tipped Bits: These bits are designed specifically for drilling into hard materials like ceramic tile, featuring a hardened tip that can withstand the pressure and friction of drilling.
- Diamond Core Bits: Known for their exceptional ability to cut through tough surfaces, diamond core bits have a coating of diamond particles that help them penetrate ceramic tile with precision and minimal chipping.
- Glass and Tile Bits: These bits are engineered for drilling into glass and ceramic materials, featuring a sharp tip that helps prevent cracking and allows for clean holes.
- High-Speed Steel (HSS) Bits: While not as effective as carbide-tipped or diamond bits, HSS bits can still be used for softer ceramic tiles, offering decent performance for light-duty tasks.
Carbide-tipped bits are ideal for those who need a reliable and durable option, as they can handle the hardness of ceramic tiles without dulling too quickly. They are especially useful for creating pilot holes or starting points before using larger bits.
Diamond core bits are the top choice for professionals and serious DIYers due to their longevity and efficiency. They are perfect for larger holes and can handle the toughest tiles with ease, making them a worthwhile investment for anyone working with ceramic materials regularly.
Glass and tile bits are specifically designed to minimize the risk of cracking tiles during drilling. Their unique design allows for more control and precision, ensuring that you achieve the desired hole size without damaging the ceramic surface.
High-speed steel bits can be a more economical choice for softer ceramic tiles, as they are generally less expensive than specialized bits. However, they may not be suitable for tougher tiles, and users should be cautious of overheating, which can lead to bit wear and potential tile cracking.
How Do Diamond-Tipped Drill Bits Compare to Carbide-Tipped Drill Bits?
| Feature | Diamond-Tipped Bits | Carbide-Tipped Bits |
|---|---|---|
| Material | Made with diamond particles bonded to a metal core, ideal for hard materials. | Constructed with tungsten carbide, suitable for tougher surfaces but less effective on very hard materials. |
| Durability | Highly durable and long-lasting, excellent for frequent use. | Moderately durable, may wear out faster on harder materials compared to diamond bits. |
| Cost | Generally more expensive due to the diamond material and manufacturing process. | More affordable, making them accessible for budget-conscious users. |
| Best Use | Ideal for drilling through ceramic tile and glass with precision. | Best for general-purpose drilling in wood, metal, and softer materials. |
| Weight | Generally heavier due to the metal core and diamond bonding. | Lighter, making them easier to handle for extended periods. |
| Heat Resistance | Excellent heat resistance, minimizing damage during high-speed drilling. | Moderate heat resistance, may require cooling when used on hard materials. |
| Applications in Different Materials | Specifically designed for hard materials like ceramic, glass, and stone. | Versatile for use in wood, metal, and softer masonry. |
What Factors Should Be Considered When Selecting a Drill Bit for Ceramic Tile?
When selecting the best drill bit for ceramic tile, several factors should be considered to ensure effective drilling without damaging the material.
- Material of the Drill Bit: The most suitable drill bits for ceramic tile are typically made from carbide or diamond. Carbide bits are durable and can efficiently handle the hardness of ceramic, while diamond bits offer superior precision and longevity, making them ideal for tougher tiles.
- Bit Type: There are different types of bits designed for specific applications, such as standard bits, hole saws, and specialized tile bits. Standard bits can work for softer ceramics, whereas hole saws and diamond bits are better suited for larger holes and more robust materials, providing clean cuts.
- Diameter of the Bit: The size of the drill bit you choose should correspond to the size of the hole you need to create. Larger bits are required for bigger holes, like those needed for plumbing, while smaller bits work for standard anchors, ensuring the hole size matches the intended use.
- Drilling Speed: The speed at which you drill can significantly impact the success of your project. Slower speeds are generally recommended for ceramic tiles to prevent overheating and cracking, allowing the bit to cut through the material more effectively.
- Cooling and Lubrication: Using water or a cooling lubricant can help maintain the temperature of the drill bit and the tile surface, preventing damage. This is particularly important when drilling through tougher ceramics, as excessive heat can lead to cracks or breakage.
- Tile Thickness: The thickness of the ceramic tile will influence the type of drill bit and technique you should use. Thicker tiles may require a more robust bit, and you may need to apply more pressure or adjust drilling techniques to accommodate the added resistance.
- Drill Type: The type of drill being used is also crucial; a variable-speed drill or a hammer drill can provide better control over the drilling process. For ceramic tiles, a standard drill is usually sufficient, but ensure it has adjustable settings to manage speed and torque.
How Does the Size and Diameter Impact the Drilling Process?
The size and diameter of a drill bit significantly influence the drilling process, especially when working with materials like ceramic tile.
- Diameter: The diameter of a drill bit affects the size of the hole it creates, which is crucial for fitting specific fixtures or fasteners. A larger diameter bit removes more material, requiring more power and precision, while a smaller diameter bit is better for pilot holes and delicate tasks.
- Length: The length of the drill bit determines how deep the hole can be drilled and influences the torque applied during the process. Longer bits can reach deeper materials but may flex or bend, making it essential to maintain stability and control to avoid breaking the tile.
- Shank Size: The shank size must match the drill’s chuck for effective operation; a mismatch can lead to slippage or inadequate power transfer. A thicker shank typically provides better stability, which is particularly important when drilling hard materials like ceramic tile.
- Tip Design: The design of the drill bit’s tip impacts how effectively it penetrates the surface of the ceramic tile. Specialized tips, such as those designed for masonry or diamond-coated bits, enhance cutting efficiency and reduce the risk of cracking the tile.
- Material Composition: The material from which the drill bit is made affects its durability and performance. Bits made from carbide or diamond are ideal for ceramic tiles, as they are harder and can withstand the high stress and heat generated during drilling.
What Speed and RPM Are Ideal for Drilling Ceramic Tile?
The ideal speed and RPM for drilling ceramic tile are crucial for achieving clean holes without damaging the tile.
- Low Speed (300-500 RPM): Drilling at a lower speed is essential when working with ceramic tile to prevent overheating and cracking. This range allows for better control and reduces the risk of the drill bit slipping on the tile surface.
- High Torque Settings: Utilizing high torque settings helps maintain the drilling force needed to penetrate the dense material of ceramic tiles. This prevents the drill from stalling and ensures a more efficient drilling process, especially when using specialized drill bits designed for ceramics.
- Water Cooling: Employing water as a coolant while drilling can significantly enhance the process. Not only does it reduce the temperature of both the drill bit and tile, but it also helps to clear debris from the hole, promoting cleaner and more precise drilling.
- Use of Specialized Drill Bits: Choosing the best drill bit for ceramic tile, such as diamond-tipped or carbide-tipped bits, can make a considerable difference. These bits are designed to handle the hardness of ceramic, allowing for better performance and longevity during the drilling process.
What Are the Top Recommended Brands for Ceramic Tile Drill Bits?
The top recommended brands for ceramic tile drill bits are:
- Bosch: Bosch is known for its high-quality power tools and accessories, including ceramic tile drill bits. Their bits are designed with a unique carbide tip that provides excellent cutting performance and durability, making them ideal for drilling through hard ceramic materials.
- DeWalt: DeWalt offers a range of drill bits that are specifically engineered for ceramic tiles. Their diamond-coated bits ensure precision and longevity, reducing the risk of chipping or cracking tiles during drilling.
- Makita: Makita is a trusted brand among professionals for their reliable and efficient tools. Their ceramic tile drill bits feature a specialized design that minimizes heat buildup, allowing for smoother drilling and extending the life of the bit.
- Diamond Burs: This brand specializes in diamond-coated drill bits that are particularly effective for ceramic and porcelain tiles. The diamond coating provides superior cutting ability, enabling users to achieve clean holes without damaging the tile surface.
- Irwin: Irwin’s ceramic tile drill bits are made with high-speed steel and feature a unique tip design that enhances drilling efficiency. They are well-suited for both DIY enthusiasts and professionals looking for reliable performance in tile projects.
What Best Practices Ensure Successful Drilling of Ceramic Tile?
To ensure successful drilling of ceramic tile, several best practices should be followed:
- Use the Right Drill Bit: Selecting a drill bit specifically designed for ceramic tile is crucial, such as a diamond-tipped or carbide-tipped bit.
- Employ a Slow Speed: Drilling at a slower speed minimizes heat buildup, which can crack or damage the tile.
- Apply Steady Pressure: Consistent and gentle pressure while drilling helps maintain control and prevents the bit from skipping off the tile surface.
- Use Water for Cooling: Keeping the drill bit cool with water can reduce friction and heat, extending the tool’s life and protecting the tile.
- Start with a Pilot Hole: Creating a small pilot hole using a smaller bit can help guide the larger bit accurately and reduce the risk of cracking.
- Mark the Drilling Point: Clearly marking where to drill ensures precision and helps avoid mistakes that could lead to uneven holes.
- Consider a Drill Guide: Using a drill guide or template can help maintain alignment and accuracy, especially for larger holes.
Using the right drill bit is essential because ceramic tiles require a harder cutting edge to penetrate their dense surface. Diamond-tipped bits are particularly effective as they can cut through the tough material without chipping the tile.
Employing a slow speed helps to manage the heat generated during drilling. High speeds can cause the tile to crack as the bit overheats and loses its cutting efficiency.
Applying steady pressure is necessary to keep the drill bit engaged with the tile without forcing it, which can lead to cracking. Gentle pressure allows the bit to do the work while maintaining control over the drill’s movements.
Using water for cooling is a practical approach to reduce heat and friction. A few drops of water or using a spray bottle can significantly enhance the drilling process and protect both the drill bit and the tile.
Starting with a pilot hole provides a starting point for the larger drill bit, minimizing the chance of slipping and ensuring a more accurate hole placement. This step is particularly helpful when drilling larger holes.
Clearly marking the drilling point helps to avoid mistakes, ensuring that holes are drilled where intended. Accurate marks can also help you visualize the layout before proceeding with the drilling process.
A drill guide can help in maintaining the correct angle and alignment, which is especially useful for precision work or when drilling multiple holes in a consistent manner.
How Can You Properly Prepare Ceramic Tile Before Drilling?
Proper preparation of ceramic tile before drilling is crucial to ensure a clean hole without damaging the tile.
- Choose the Right Drill Bit: Selecting the best drill bit for ceramic tile is essential; carbide-tipped or diamond-tipped bits are ideal for their ability to cut through hard surfaces effectively.
- Mark the Drilling Spot: Accurately marking the spot where you intend to drill helps in precision and reduces the risk of slipping, which can cause cracks.
- Use Masking Tape: Placing a piece of masking tape over the marked area can help prevent the drill bit from slipping and provides a rough surface for better grip.
- Start with a Pilot Hole: Drilling a small pilot hole first can guide the larger drill bit and minimize the chance of breaking the tile.
- Maintain a Low Speed: Drilling at a slow speed allows for better control, reducing heat buildup that can crack the tile.
- Use Water for Cooling: Applying water while drilling can cool the bit and tile, reducing the risk of damage and prolonging the life of the drill bit.
Choosing the right drill bit is crucial as carbide-tipped or diamond-tipped bits are specifically designed for hard materials like ceramic tile. These bits not only enhance cutting efficiency but also minimize chipping and cracking during the drilling process.
Marking the drilling spot accurately is important for precision and helps ensure the hole is placed where intended. This step is vital since incorrect placement can lead to significant damage to both the tile and the underlying surface.
Using masking tape over the marked area serves multiple purposes: it provides a better grip for the drill bit and prevents it from slipping, which can lead to unwanted cracks. This simple step can significantly increase your chances of a successful drilling experience.
Starting with a pilot hole helps guide the larger drill bit, making it easier to drill and reducing the risk of damage to the tile. The pilot hole acts as a guide, ensuring that the larger bit follows a correct path without wandering.
Maintaining a low speed during drilling is key, as it allows for better control of the drill and reduces the heat generated. Excessive heat can cause the tile to crack, so a slow and steady approach is advisable.
Applying water while drilling serves to cool both the drill bit and the tile, which minimizes the risk of thermal shock that can lead to cracks. Water also helps to remove dust and debris, ensuring a cleaner and more efficient drilling process.
What Techniques Help Achieve a Clean Hole in Ceramic Tile?
Several techniques can effectively help achieve a clean hole in ceramic tile.
- Use a Diamond Core Bit: Diamond core bits are specifically designed for cutting through hard materials like ceramic tile. They feature a diamond-coated edge that allows for smoother and cleaner drilling, reducing the risk of chipping the tile.
- Apply Water for Cooling: Keeping the drill bit cool is essential when drilling into ceramic tile, as excessive heat can damage both the bit and the tile. Using water during the drilling process helps to lubricate the bit and reduce friction, leading to cleaner holes.
- Start with a Smaller Pilot Hole: Drilling a small pilot hole before using a larger bit can help guide the larger bit and prevent it from slipping. This technique improves accuracy and minimizes the chances of cracking the tile.
- Use a Drill with a Variable Speed Setting: A drill with variable speed settings allows you to adjust the speed according to the hardness of the tile. Slower speeds are generally more effective for ceramic tiles, as they provide better control and reduce the risk of damage.
- Mark the Spot with a Center Punch: Using a center punch to mark the drilling spot helps prevent the drill bit from wandering. This technique ensures that the hole is drilled exactly where intended, resulting in a cleaner finish.
- Use Masking Tape: Applying masking tape over the area where you plan to drill can prevent the drill bit from slipping and reduce chipping. The tape provides a stable surface and helps keep the tile intact during the drilling process.