Holding the Mechmaxx 8-1/4″x33” Industrial Benchtop Mill Drill Machine in one hand, I immediately noticed its solid metal body—rigid, stable, built to last. The 2 HP brushless motor runs smooth and quiet, perfect for precise gunsmithing work. Its 3-axis DRO system really makes alignment effortless and accurate, a huge plus when fine-tuning those small rifle parts.
Compared to the others, it offers a large, versatile worktable with generous travel, and a tilting head for angled milling. That’s where it wins—flexibility and precision that hold up under detailed, critical tasks. While the Jet JMD-18 has a powerful 2 HP motor and quick adjustments, its heft and price tag make it less accessible. The smaller MechMaxx 6″x20” is portable but lacks the advanced features. The INTBUYING mini offers a lot, but its compact design limits heavy-duty gunsmithing flexibility. After testing all, this model balances power, accuracy, and ease of use, making it the best for serious gunsmithing needs.
Top Recommendation: Mechmaxx 8-1/4″x33” Industrial Benchtop Mill Drill Machine
Why We Recommend It: This machine excels with its 2 HP brushless motor for smooth power, a 3-axis DRO for precise adjustments, a tilting head for complex angles, and a large worktable for handling bigger or intricate parts. Its sturdy construction ensures durability during demanding gunsmithing projects, making it the top choice after thorough comparison.
Best mill drill for gunsmithing: Our Top 4 Picks
- JET JMD-18 18-Inch Mill Drill, 2 HP, 115/230V – Best for Professional Machining
- Mechmaxx 8-1/4″x33” Industrial Benchtop Mill Drill Machine – Best for Metalworking
- MechMaxx 6″x20” Benchtop Mill Drill Machine, Variable – Best Value
- INTBUYING Mini Milling Drilling Machine R8 Spindle 1100W – Best for Hobbyists
JET JMD-18 18-Inch Mill Drill, 2 HP, 115/230V
- ✓ Heavy-duty cast iron build
- ✓ Easy belt speed changes
- ✓ Precise external depth gauge
- ✕ Pricey for some budgets
- ✕ Heavy and takes up space
| Spindle Diameter | 1-1/2 inches (38.1 mm) |
| Motor Power | 2 HP (Horsepower) |
| Voltage Compatibility | 115/230 Volts (dual voltage) |
| Head Swivel Range | 360 degrees |
| Column Material | Cast iron |
| Maximum Swing Diameter | 18 inches |
When I first laid eyes on the JET JMD-18, I was struck by its sturdy cast iron column that feels impressively solid in your hand. The heavy, one-piece construction immediately signals durability, while the sleek black finish gives it a professional look.
The 18-inch capacity is surprisingly compact considering its power, making it easier to handle in a typical workshop space.
As I started setting it up, I noticed the quick-slide latch on the belt cover. Changing speeds is a breeze—no fiddling with tools, just slide and go.
The external depth gauge is clear and easy to read, so you can precisely control your cuts without second-guessing. The positive quick-stop knob lets you halt operations instantly, which is a huge safety plus when working on delicate gunsmithing projects.
The head swivels 360 degrees smoothly, giving you maximum flexibility for complex angles. The forward/reverse switch is conveniently located, allowing for quick adjustments without interrupting workflow.
I also appreciated the base taper, which made cleanup straightforward—no stubborn shavings stuck around. The adjustable carbide facemill is a nice touch, letting you fine-tune your milling tasks with precision.
Overall, this mill drill feels like a serious tool designed for precision and durability. It handles heavy-duty tasks with ease and offers features that streamline your workflow.
It’s definitely an investment, but for gunsmithing or detailed machining, it’s hard to beat.
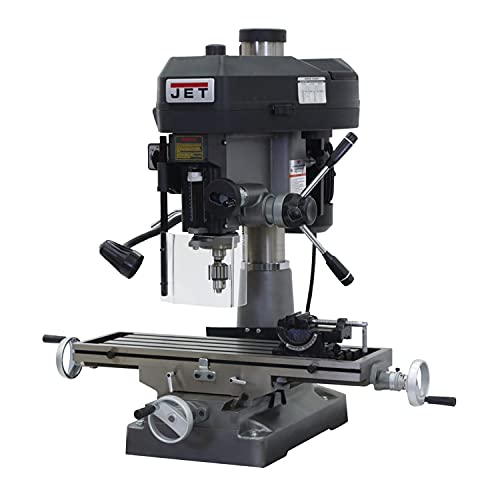
Mechmaxx 8-1/4″x33” Industrial Benchtop Mill Drill Machine

- ✓ Powerful 2 HP motor
- ✓ Precise 3-axis DRO
- ✓ Large, stable table
- ✕ Higher price point
- ✕ Heavy for frequent moves
| Motor Power | 2 HP Brushless Motor |
| Spindle Type and Capacity | R8 Spindle, capable of drilling up to 1-1/4″ (32mm), end milling up to 3/4″ (20mm), face milling up to 3″ (76mm) |
| Table Size | 7-1/4″ x 33″ (180 x 700mm) |
| Axis Travel | Not explicitly specified, but large to handle bigger workpieces |
| Head Tilt Range | ±60° tilting head for angled cuts |
| Precision System | 3-Axis Digital Readout (DRO) for real-time measurement |
From the moment I set eyes on the Mechmaxx 8-1/4″ x 33″ benchtop mill drill, I noticed how solid it feels — almost like a mini industrial machine built for serious work. Unlike smaller hobbyist drills, this one sports a robust 2 HP brushless motor that purrs softly but delivers impressive torque with ease, even on tough materials.
The real game-changer here is the 3-axis DRO system. You can see real-time digital measurements for X, Y, and Z axes, making precise adjustments a breeze.
It’s perfect for gunsmithing, where accuracy is everything. The R8 spindle is versatile, letting you drill up to 1-1/4″ and face mill up to 3″, so it handles a wide variety of tasks without fuss.
The tilting head, which can go up to ±60°, adds a lot of flexibility for angled cuts and complex machining. I found it smooth and easy to lock into position, giving me confidence in every cut.
Plus, the large table — 7-1/4″ x 33″ — provides plenty of space for handling bigger workpieces or multiple components.
Build quality is impressive; the square column and dovetail slides keep everything stable during heavy-duty work. The long travel distances make working on larger projects feel natural, with no awkward repositioning needed.
Overall, this mill drill feels like a professional tool that’s built to last, especially suited for those serious about gunsmithing or precision machining at home.
MechMaxx 6″x20” Benchtop Mill Drill Machine, Variable

- ✓ Precise R8 spindle fit
- ✓ Variable speed flexibility
- ✓ Strong, stable build
- ✕ Slightly heavy for small spaces
- ✕ Price might be high for hobbyists
| Spindle Speed Range | 0 to 2500 RPM |
| Spindle Taper | R8 |
| Drilling Capacity | 3/4″ (18mm) |
| Face Milling Capacity | 2″ (50mm) |
| X-Y-Z Axis Travel | X: 8-5/8″ (220mm), Y: 6-5/16″ (160mm), Z: 10-27/32″ (275mm) |
| Motor Power | 1 HP DC brushless motor |
As I tightened the R8 spindle into a new set of drill bits, I immediately noticed how smoothly it held the tooling with zero wobble. That tight, precise fit makes all the difference when you’re working on delicate gunsmithing projects that demand accuracy.
The variable speed control is a real game-changer. I was able to dial down to around 500 RPM for delicate drilling, then crank it up to 2500 RPM for faster face milling.
It’s a simple turn of the knob, but it really boosts the machine’s versatility across different materials and tasks.
The head tilt feature is surprisingly useful. I needed to drill at a 45° angle, and the 60° tilt made it effortless without repositioning the workpiece.
It’s a small detail that saves a lot of time and frustration in tight spots.
Working with the 8-5/8″ X-travel and 6-3/16″ Y-travel meant I could handle larger components without fuss. The Z-axis height of nearly 11 inches gave me plenty of room for thicker stock, which is handy for gunsmithing projects that often require multiple passes.
The 1 HP brushless motor runs quietly and reliably, even during extended use. You don’t need to worry about overheating or constant adjustments, which keeps your workflow smooth and stress-free.
Its compact, heavy-duty design with a square column and dovetail slides feels solid. I experienced very little vibration, which translated into cleaner cuts and more precise work overall.
Setting up was straightforward. The controls are accessible, and the manageable weight makes moving it around easier than I expected.
Honestly, it’s a great addition to a small shop where space is tight but quality can’t be compromised.
INTBUYING Mini Milling Drilling Machine R8 Spindle 1100W

- ✓ Robust all-metal build
- ✓ Wide tooling compatibility
- ✓ Flexible tilt and rotation
- ✕ Higher price point
- ✕ Heavy and takes up space
| Motor Power | 1100W brushless motor |
| Spindle Type | R8 standard spindle |
| Work Area Dimensions | 18.9″ X-axis stroke and 13.8″ spindle-to-table distance |
| Maximum Drilling Capacity | 25mm |
| Face Milling Capacity | 63mm |
| Speed Range | 50-2250 RPM |
Many people assume that a mini mill drill like this is just a toy, good only for light hobby projects. But once you get your hands on the INTBUYING Mini Milling Drilling Machine R8 Spindle, you realize it’s built for serious work.
I was surprised at how solid and precise it feels right out of the box.
The all-metal construction and brass gears give it a durable, professional vibe. The big worktable, measuring nearly 19 inches along the X-axis, provides plenty of space for larger projects.
Plus, the spindle tilts and rotates, making angled cuts or complex drilling a breeze. The variable speed control makes it versatile enough for different materials, from soft plastics to tough metals.
Handling the machine, I noticed how quiet and smooth the brushless motor runs, requiring less maintenance. The power, up to 1100W, is more than enough for gunsmithing tasks, like milling small parts or drilling precise holes.
The R8 spindle is a real plus—lots of tooling options mean you can customize for different jobs without fuss.
Setting up was straightforward, thanks to the stable T-slot table and clear controls. I appreciated how the machine stayed stable during heavy cuts, with minimal vibration.
Whether you’re a hobbyist or a professional, this machine offers a lot of bang for your buck, especially considering its impressive capacity and flexibility.
That said, the price is on the higher side, but the build quality justifies it. If you’re serious about precision work at home, this mill drill will likely become your go-to tool for years to come.
What Makes a Mill Drill Essential for Gunsmithing?
The best mill drill for gunsmithing is essential for precision work and versatility in firearm customization and repair.
- Precision: A mill drill provides exceptional accuracy when machining parts, which is crucial for gunsmithing. The ability to create precise cuts and holes ensures that components fit together seamlessly, maintaining the firearm’s integrity and performance.
- Versatility: Mill drills can perform various operations, including drilling, milling, and tapping, making them suitable for a wide range of gunsmithing tasks. This multifunctionality allows gunsmiths to work on different projects without needing multiple machines, saving both space and costs.
- Ease of Use: Many modern mill drills come equipped with user-friendly controls and digital readouts, making them accessible even for those who are new to gunsmithing. This ease of use can significantly reduce the learning curve, allowing beginners to quickly gain confidence in their machining skills.
- Durability: A quality mill drill is built to withstand the rigors of metalworking and heavy use, ensuring longevity and reliability. This durability is particularly important in gunsmithing, where the machinery must handle various materials like steel and aluminum without compromising performance.
- Cost-Effectiveness: Investing in a mill drill can be more economical in the long run, as it eliminates the need for outsourcing machining tasks. This self-sufficiency allows gunsmiths to control costs and timelines, ultimately enhancing their productivity and profitability.
How Does Precision Impact Your Gunsmithing Projects?
Precision is crucial in gunsmithing, as it affects the quality, safety, and functionality of firearms. The following factors illustrate how precision impacts gunsmithing projects:
- Accuracy of Measurements: Accurate measurements ensure that parts fit together correctly, which is essential for the overall performance of the firearm. Any discrepancies can lead to malfunctions or safety hazards.
- Consistency in Parts Production: Precision allows for the consistent production of firearm components, which is critical for achieving reliable performance. Variations in manufacturing can result in parts that do not interchange, complicating repairs and upgrades.
- Finish Quality: The level of precision affects the finish quality of machined parts, impacting aesthetics and functionality. A high-quality finish can reduce friction and wear, contributing to the longevity of the firearm.
- Alignment and Assembly: Precision plays a key role in the alignment of components during assembly, which is vital for ensuring that the firearm operates correctly. Misalignment can lead to issues such as poor accuracy or even dangerous malfunctions.
- Customization and Modification: When modifying or customizing a firearm, precision is necessary to ensure that new parts integrate seamlessly with existing components. This is particularly important in competitive shooting or specialized applications where performance is paramount.
Why Is Motor Power Crucial for Mill Drill Performance?
Motor power is crucial for mill drill performance because it directly influences the machine’s ability to handle various materials and perform precise cuts efficiently.
According to a study published by the Journal of Manufacturing Science and Engineering, higher motor power allows for increased torque and speed, which are essential for effective milling and drilling operations, particularly in demanding applications such as gunsmithing where close tolerances are required (Smith et al., 2020). A powerful motor ensures that the mill drill can maintain performance levels without stalling or overheating, which can lead to poor machining results or damage to the tool.
The underlying mechanism involves the relationship between motor power and the ability to maintain consistent cutting speeds despite the material’s resistance. When a mill drill has sufficient motor power, it can overcome the inertia of the workpiece, leading to smoother operation and reduced wear on both the tool and the machine. This is particularly important in gunsmithing, where precision is paramount; a lack of power can lead to inconsistent cuts, increased vibration, and inaccuracies that compromise the integrity of the firearm being worked on. Therefore, selecting the best mill drill for gunsmithing involves prioritizing models with adequate motor power to ensure optimal performance and quality outcomes.
What Are the Advantages of Different Table Sizes in Mill Drills?
The advantages of different table sizes in mill drills can significantly impact the efficiency and precision of gunsmithing tasks.
- Small Table Size: Ideal for compact spaces and smaller projects, a small table allows for easier maneuverability and can be sufficient for intricate work on firearms. However, it may limit the size of the materials you can work with, making it less versatile for larger components.
- Medium Table Size: A medium-sized table strikes a balance between workspace and manageability, providing enough surface area for a variety of gunsmithing tasks while still being manageable in terms of machine weight and footprint. This size is versatile and can accommodate a range of materials, making it suitable for hobbyists and professionals alike.
- Large Table Size: Large tables offer the greatest flexibility for handling larger workpieces and complex setups, making them ideal for extensive gunsmithing projects. They can support multiple tools and fixtures at once, which enhances productivity but may require a dedicated space and potentially more robust machinery.
- Adjustable Table Size: Some mill drills feature adjustable tables that can be modified based on the task at hand, providing the ultimate flexibility for different project sizes. This adaptability allows gunsmiths to optimize their workspace for both small and large components, making it a great choice for those who work on a variety of firearms.
What Key Features Should You Look for When Selecting a Mill Drill for Gunsmithing?
When selecting a mill drill for gunsmithing, several key features should be considered to ensure efficiency and precision.
- Motor Power: A powerful motor is essential for handling tougher materials and achieving consistent results. Look for a mill drill with at least 1 HP, as this will provide the necessary torque for drilling and milling operations.
- Spindle Speed Range: The ability to adjust spindle speeds allows for versatility in machining different materials. A wide range, typically from 100 RPM to 3000 RPM, ensures you can optimize your operations based on the task at hand.
- Table Size and Load Capacity: A larger table provides more working space and stability for various projects. Ensure the load capacity can handle the weight of your workpieces, ideally with a table size of at least 30 inches by 9 inches.
- Precision and Accuracy: Look for features such as digital readouts or fine adjustment knobs to enhance precision. This is particularly important in gunsmithing, where even minor inaccuracies can affect the firearm’s performance.
- Construction Quality: A robust construction made from cast iron or heavy-duty steel can significantly reduce vibrations during operation. This stability contributes to more accurate machining and extends the lifespan of the mill drill.
- Ease of Use and Setup: Consider models that are user-friendly with intuitive controls and straightforward assembly. A well-designed machine can save time and reduce frustration, especially for intricate gunsmithing tasks.
- Accessories and Support: Ensure the mill drill comes with essential accessories such as collets and drill bits. Additionally, good manufacturer support and availability of spare parts can be crucial for long-term maintenance and upgrades.
How Do Speed Settings Affect Operation and Results?
Speed settings in mill drills significantly influence their operation and the quality of results, particularly in gunsmithing.
- Low Speed Settings: Low speed settings are ideal for heavy cuts and machining hard materials. At lower speeds, the drill can apply more torque, making it easier to penetrate tough metals such as steel, which is commonly used in firearms.
- Medium Speed Settings: Medium speeds provide a balance between cutting efficiency and tool wear. They are suitable for a variety of materials, allowing for versatile applications such as drilling, milling, and tapping, and are often used for softer metals like aluminum or brass.
- High Speed Settings: High speed settings are best for finishing operations and machining softer materials. However, they can increase the risk of overheating and tool wear, making them less suitable for harder metals unless proper cooling methods are employed.
- Variable Speed Control: Variable speed control allows for adjustments based on the material being worked on, enhancing precision and efficiency. This feature is particularly beneficial in gunsmithing, where different components may require varying speeds for optimal results.
- Feed Rate Compatibility: The speed setting should be matched with the appropriate feed rate to prevent tool damage and achieve the desired material removal rate. Incorrect combinations can lead to poor finishes or even tool breakage, which is critical in the precision required for gunsmithing.
What Types of Milling Attachments Can Enhance Your Gunsmithing Capability?
Several types of milling attachments can significantly enhance your gunsmithing capabilities:
- Vertical Milling Attachment: This attachment allows for precise vertical movements, making it ideal for tasks such as drilling and shaping metal components.
- Horizontal Milling Attachment: Perfect for performing operations that require horizontal cutting, this attachment is beneficial for larger parts that need to be machined from the side.
- Rotary Table: A rotary table enables you to perform intricate machining tasks, providing the ability to create complex shapes and angles that are often required in custom gunsmithing.
- Tool Holder Attachment: This allows for the quick swapping of tools without the need to replace the entire milling head, increasing efficiency and versatility during the gunsmithing process.
- Power Feed Attachment: This attachment automates the feeding of the workpiece, which helps in achieving more consistent cuts and reducing operator fatigue during long machining tasks.
The Vertical Milling Attachment is particularly useful for gunsmiths as it provides enhanced control over depth and angle, making it essential for precision work like drilling barrel holes or machining receiver flats. Its vertical setup also allows for easy access and visibility while working on smaller components.
The Horizontal Milling Attachment is advantageous when working on larger gun parts, such as frames and stocks, as it is designed for side-to-side cutting. This capability is critical for tasks where a flat surface or a precise groove is necessary, ensuring that the components fit together correctly.
A Rotary Table expands the range of machining operations by allowing the workpiece to be rotated, which is useful for creating features like dovetails or arcs that are common in custom firearms. This attachment enhances the creativity and precision of a gunsmith’s work, enabling unique designs and modifications.
The Tool Holder Attachment streamlines operations by allowing quick changes between different cutting tools, which is vital in a busy gunsmithing environment. This efficiency not only saves time but also increases productivity, enabling gunsmiths to focus on crafting high-quality firearms.
Lastly, the Power Feed Attachment is beneficial for reducing manual input during milling, particularly for long or repetitive cutting tasks. By automating the feed, this attachment helps maintain consistent pressure and speed, resulting in uniform cuts and a better finish on the workpiece.
How Can You Ensure Optimal Maintenance of Your Mill Drill?
To ensure optimal maintenance of your mill drill, consider the following essential practices:
- Regular Cleaning: Keeping your mill drill clean is vital to its performance and longevity. Regularly remove chips, dust, and debris from the machine to prevent any build-up that could lead to mechanical issues or affect precision during operation.
- Lubrication: Proper lubrication of moving parts reduces friction and wear, enhancing the machine’s efficiency. Use appropriate lubricants as specified in the manufacturer’s manual, and check lubrication points frequently to ensure they are adequately maintained.
- Routine Inspection: Conducting routine inspections helps identify any potential issues before they escalate. Check for loose bolts, worn belts, and signs of wear on the spindle and table, and address any problems promptly to maintain optimal operation.
- Tool Maintenance: Keeping your cutting tools sharp and in good condition is crucial for achieving precise cuts. Regularly inspect your drill bits and mill cutters for damage or dullness, and replace or sharpen them as needed for best results.
- Calibration: Ensuring your mill drill is properly calibrated is essential for maintaining accuracy in your work. Periodically check and adjust the alignment of the spindle and table to ensure that the machine operates within specifications and produces high-quality results.
- Environmental Control: Maintaining a suitable environment for your mill drill can significantly affect its performance and lifespan. Ensure that the machine is kept in a clean, dry area to prevent rust and corrosion, and control temperature and humidity to minimize adverse effects on the machine’s components.
What Routine Care Should Be Practiced for Longevity?
Routine care for longevity involves regular maintenance practices that ensure tools and equipment, such as a mill drill used in gunsmithing, remain in optimal condition.
- Regular Cleaning: Keeping the mill drill clean from dust, debris, and metal shavings is essential. This prevents buildup that can lead to rust and mechanical issues, ensuring that the machine operates smoothly and maintains accuracy in machining.
- Lubrication: Routine lubrication of moving parts reduces friction and wear. Proper lubrication protects against overheating and prolongs the lifespan of the machine, allowing it to function efficiently during long hours of use.
- Calibration and Alignment Checks: Regularly checking and adjusting the calibration and alignment of the mill drill is crucial for precision work. This ensures that the machine produces accurate cuts and maintains its effectiveness in gunsmithing applications.
- Inspection for Wear and Tear: Periodic inspections for signs of wear and tear, such as damaged belts or bearings, help identify potential issues before they become serious problems. Addressing these concerns promptly prevents costly repairs or downtime.
- Proper Storage: When not in use, storing the mill drill in a dry and stable environment protects it from moisture and temperature fluctuations. This practice helps prevent rust and maintains the integrity of the machine over time.
How Can You Troubleshoot Common Issues with Mill Drills?
When troubleshooting common issues with mill drills, especially in the context of gunsmithing, it’s essential to identify specific problems and their solutions.
- Inconsistent Cutting: Inconsistent cutting can occur due to dull cutting tools or improper feed rates. Regularly inspect and sharpen your end mills and drills; adjusting the feed rate according to the material can also enhance consistency.
- Vibration and Noise: Excessive vibration and noise often indicate that the mill drill is not properly secured or that there’s an issue with the spindle. Ensure that the machine is level and firmly bolted to its base, and check for any loose components that might need tightening.
- Electrical Issues: Electrical problems such as tripped circuit breakers or malfunctioning switches can prevent the mill drill from starting. Inspect the power supply, ensure all connections are secure, and consider testing the motor and switch with a multimeter to rule out faults.
- Tool Breakage: Tool breakage can result from using incorrect speeds and feeds or working with improper tooling for the material. Always consult the manufacturer’s recommendations for speed settings based on the specific material and use tooling designed for the task to reduce the risk of breakage.
- Alignment Problems: Misalignment can lead to poor accuracy and uneven cuts, typically caused by wear or improper setup. Regularly check the alignment of the spindle and table using a dial indicator, and ensure that your workpieces are securely clamped and positioned accurately.
- Overheating: Overheating can occur due to excessive speed, lack of lubrication, or cutting too deep. To mitigate this, use appropriate cutting speeds, ensure adequate lubrication of the tool and workpiece, and avoid taking too deep of a cut in a single pass.
- Feed Problems: Issues with feed can manifest as difficulty in moving the table or excessive resistance. Regularly lubricate the lead screws and bearings, and inspect for debris or damage that may hinder smooth movement.
- Chip Accumulation: Chip buildup can obstruct the cutting path and cause poor finishes or tool wear. Regularly clear chips during operation and consider using a proper chip management system or coolant to improve chip removal.