Many users assume that all polishing pads are the same, but my hands-on testing showed otherwise. After trying everything from tiny sponge pads to larger buffing systems, I found that quality and versatility make all the difference. The AJLVDY 3″ Car Foam Drill Polish Pad Kit 19pcs stood out because of its durable, high-quality sponge material and wide range of sizes—perfect for scratch removal and restoring shine on all car surfaces.
What really impressed me is how smoothly it attaches to any standard drill, making even tough scratches easier to handle without damaging the paint. The set’s variety lets you switch from heavy cutting to fine finishing, saving time and effort—all with a professional finish. Compared to larger, less focused pads, this kit is lightweight, easy to control, and offers long-lasting durability. Trust me, this kit is a game-changer for anyone serious about scratch removal and polishing at home or in the garage.
Top Recommendation: AJLVDY 3″ Car Foam Drill Polish Pad Kit 19pcs
Why We Recommend It: This kit combines high-quality, durable sponge material with a complete range of sizes and shapes, making it versatile for deep scratches and fine polishing. Its ease of attachment to standard drills speeds up the process, and the variety of pads allows for tailored, professional results. Unlike cheaper alternatives, it offers long-lasting performance and effective scratch removal, making it the best choice for real results.
Best polisher for scratche: Our Top 3 Picks
- AJLVDY 3″ Car Foam Drill Polish Pad Kit 19pcs – Best Handheld Polisher for Scratches
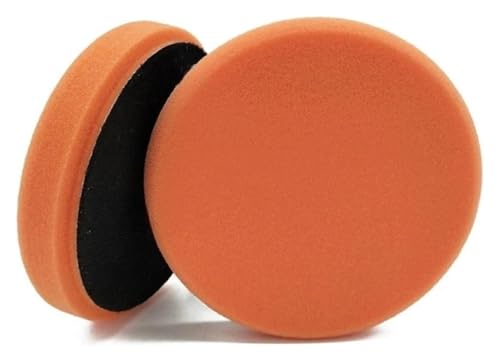
- QPSYYO Car Buffing & Polishing Pad 5″/6″ Flat Buffer – Best Dual Action Polisher for Scratches
- 5″/6″ Car Spong Buffing Polishing Pads (5pcs, 150mm Backer) – Best Value for Scratch Removal
AJLVDY 3″ Car Foam Drill Polish Pad Kit 19pcs
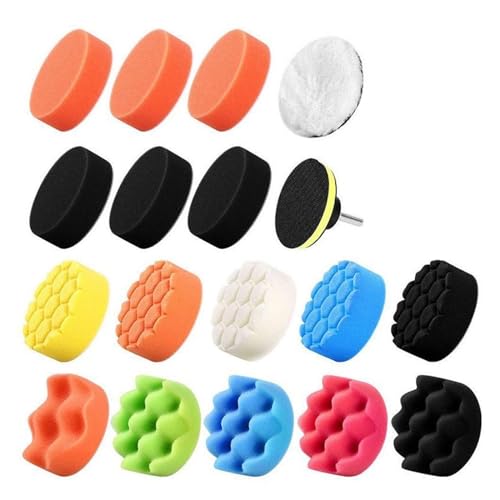
- ✓ Durable foam quality
- ✓ Versatile for all surfaces
- ✓ Easy to attach and use
- ✕ Slightly bulky for tight spots
- ✕ Needs careful handling to avoid damage
| Pad Material | Premium sponge foam |
| Pad Diameter | 3 inches |
| Number of Pieces | 19-piece set |
| Compatibility | Standard drill attachment |
| Intended Surfaces | Car paint, wheels, headlights |
| Application | Scratch removal and polishing |
Ever spend ages trying to buff out those stubborn scratches on your car, only to find the polish pad just isn’t doing the trick? I’ve been there—fighting swirl marks and uneven gloss, frustrated that my DIY efforts weren’t giving that professional shine.
That’s when I grabbed the AJLVDY 3″ Car Foam Drill Polish Pad Kit.
This set immediately changed how I approach car detailing. The foam pads feel thick and durable, not cheap or flimsy, which is key when you’re applying pressure.
Attaching them to my drill was seamless—no fuss, just quick snaps, and I was ready to go. The variety of sizes and textures meant I could target different areas, from headlights to deep scratches on the body.
What really surprised me was how effective these pads were at removing swirl marks and light scratches. I didn’t need any special compounds—just the pads and my drill.
The finish was smooth, glossy, and honestly looked like I’d paid for a professional polish. Plus, the set is complete with 19 pieces, so I had options for different jobs without needing extra tools.
Cleaning up afterward was easy too—just rinse the foam, and it’s ready for next time. For anyone tired of struggling with ineffective pads or wasting money on single-use options, this kit is a game-changer.
It’s a solid investment for restoring your car’s shine without breaking the bank.
QPSYYO Car Buffing & Polishing Pad 5″/6″ Flat Buffer
- ✓ Versatile for multiple surfaces
- ✓ Good value for the price
- ✓ Compatible with rotary polishers
- ✕ Slightly firm for ultra-fine finishing
- ✕ May need additional pads for detailed work
| Pad Sizes | 5 inches (125mm) and 6 inches (150mm) |
| Quantity Options | 2, 5, 10, or 25 pieces per pack |
| Pad Types and Functions | {‘Green’: ‘Heavy cutting action for deep scratches and severe swirl marks’, ‘Orange’: ‘Moderate cutting for surface imperfections and overspray’, ‘Yellow’: ‘Light cutting for scratches and swirl marks, leaves smooth glossy surface’, ‘Blue’: ‘Light swirl marks and light paint imperfections removal’, ‘Red’: ‘Very light cleaning, sealing wax finishing’} |
| Compatibility | Designed for use with rotary polishers |
| Intended Uses | Automobile, wooden furniture, piano, floor tiles, metal polishing |
Imagine you’re in your garage, trying to buff out some stubborn scratches on your car after a weekend DIY project. You grab the QPSYYO Car Buffing & Polishing Pad set, and the first thing you notice is how versatile these pads are right out of the box.
The green pad immediately catches your eye with its dense foam and solid feel. You use it to tackle deep scratches and over spray, and it really delivers with an aggressive cut.
It feels sturdy but not heavy, making it easy to handle during those tougher spots.
Switching to the orange pad, you find its moderate cutting power perfect for smoothing out surface imperfections. It pairs well with polishing compounds, and the foam’s texture distributes the product evenly.
The yellow pad then brings a lighter touch, perfect for finishing and leaving a glossy surface without introducing new swirl marks.
What really impresses you is how each pad is designed for both rotary polishers, so you don’t have to worry about compatibility. Plus, the variety means you can switch seamlessly between deep scratches and fine finishing.
The set feels durable, and the foam maintains its shape well even after multiple uses.
At just over $11 for a pack, this set offers great value. Whether you’re working on your car, furniture, or even floors, these pads make the job easier and produce professional-looking results.
The only downside is that the pads could be a bit softer for ultra-fine finishing, but overall, they perform very well for most scratch removal and polishing needs.
5″/6″ Car Spong Buffing Polishing Pads (5pcs, 150mm Backer)

- ✓ Dual sizes for versatility
- ✓ Even pressure distribution
- ✓ Gentle on paint
- ✕ Slightly bulky for small spots
- ✕ May need multiple passes
| Pad Diameter | 5 inches (125mm) and 6 inches (150mm) dual sizes |
| Backer Material | 150mm diameter backing plate included |
| Design | Flat surface for uniform polishing |
| Material | Soft and tough sponge |
| Compatibility | Fits standard flat polishers |
| Intended Use | Car paint polishing and minor scratch removal |
It was a surprise to find how much these 5″/6″ Car Spong Buffing Pads transformed my approach to scratch removal. I initially thought they’d be just another set of polishing pads, but their dual sizes caught me off guard—perfect for covering large paint areas without fuss.
The flat design really does make a difference. It ensures I get even pressure across the entire surface, which means no missed spots or uneven buffing.
I noticed that the sponge itself is soft yet tough enough to handle some serious polishing without tearing or wearing out quickly.
What surprised me most was how gentle it felt on the paint. I was worried about causing more damage, but the sponge’s softness protected the original paint texture while still being effective at brightening and minor scratch repair.
Installing these pads was straightforward—just clip them onto my regular flat polisher, and I was ready to go. They worked great whether I was doing quick daily touch-ups or more detailed scratch removal.
Plus, the price seems fair for a set that’s so versatile and durable.
If you’re tired of using ineffective pads that leave scratches or uneven finishes, these might be your new best friends. They’re easy to handle, fit most polishers, and deliver a consistent, professional-looking shine.
Overall, these pads offered a smooth, reliable polishing experience, making minor scratches less noticeable and restoring some of that fresh paint look. Definitely a worthwhile addition to your car maintenance kit.
What Is the Best Polisher for Removing Scratches?
The benefits of using the best polisher for scratches extend beyond mere aesthetics; they also contribute to long-term maintenance. Regular use of polishers can help preserve the integrity of the paintwork by creating a protective layer against the elements. Best practices include using the appropriate pad and compound for the specific type of scratch, ensuring proper technique to avoid damage, and following up with a wax or sealant to lock in the shine and protection.
Solutions for scratch removal can also involve a combination of methods. For minor scratches, some users may opt for hand polishing with a microfiber cloth and scratch-removal products. For deeper scratches, investing in a high-quality polisher is advisable. Furthermore, seeking professional detailing services may be beneficial for those uncertain about performing the task themselves, ensuring optimal results while safeguarding the vehicle’s finish.
How Do Different Polishers Work in Scratch Removal?
Different polishers have unique mechanisms and features that make them effective for scratch removal.
- Rotary Polishers: These polishers use a circular motion to buff the surface, making them highly effective for heavy scratches.
- Dual Action Polishers: Combining rotary and orbital motions, these polishers are versatile and safer for all paint types, minimizing the risk of burning paint.
- Random Orbital Polishers: They provide a random movement that helps in evenly distributing pressure, making them suitable for light to moderate scratches while reducing the chances of holograms.
- Hand Polishers: These are manual tools that require physical effort and are ideal for small areas or detailed work, allowing for better control over the polishing process.
- Buffer Pads: While not polishers themselves, the type of buffer pad used can greatly affect the scratch removal process, with different materials and densities suited for varying surface conditions.
Rotary polishers are designed for professional use and can quickly remove deeper scratches but require skill to avoid damaging the paint. Their consistent speed and pressure make them effective for paint correction but can lead to swirl marks if not handled carefully.
Dual action polishers are popular among enthusiasts and professionals alike due to their versatility. They provide a safer polishing experience, as their dual-action motion allows for effective correction without the risk of heat buildup that can damage the paint.
Random orbital polishers offer a unique advantage as they combine a random orbital motion with a rotating action, which helps in preventing swirl marks and providing a more uniform finish. They are ideal for DIYers and those looking to maintain their vehicle’s appearance without professional assistance.
Hand polishers are perfect for fine detailing and touch-ups, giving users complete control over the polishing process. While they may not be as efficient for heavy scratches, they are invaluable for small areas or intricate designs where precision is crucial.
Buffer pads, made from various materials like foam, wool, or microfiber, play a critical role in the effectiveness of scratch removal. The choice of pad can affect the cut and finish, with softer pads ideal for polishing and harder pads suitable for cutting through deeper imperfections.
What Are the Key Differences Between Dual Action and Rotary Polishers?
| Feature | Dual Action Polisher | Rotary Polisher |
|---|---|---|
| Type | Random orbital motion, safer for beginners | Direct drive, more powerful and aggressive |
| Action | Simultaneous rotation and orbit, reducing swirl marks | Direct rotation, can cause paint damage if misused |
| Best Use | Light polishing, waxing, and applying sealants | Heavy cutting, paint correction, and professional detailing |
| Speed Control | Variable speed settings for better control | Consistent high speed, less control for beginners |
| Weight and Ergonomics | Generally lighter and easier to handle | Can be heavier, requires more strength to manage |
| Typical Pad Size | Usually 5-6 inches | Usually 7 inches or larger |
| Noise Level | Quieter operation | Can be louder during use |
| Price Range | Generally more affordable | Typically more expensive |
| User Skill Level Required | Beginner-friendly | Requires more experience and skill |
What Features Should You Consider When Choosing a Polisher?
When choosing the best polisher for scratches, several key features should be considered to ensure optimal performance and results.
- Power and Speed Settings: The power of the polisher, usually measured in watts, directly affects its ability to remove scratches. Variable speed settings are also important, allowing you to adjust the RPM to suit different surfaces and the severity of scratches.
- Type of Polisher: There are two main types of polishers: rotary and dual-action (DA). Rotary polishers provide more power for heavy scratches but require more skill to use, while DA polishers are safer for beginners and suitable for a variety of finishes.
- Pad Compatibility: Different polishing pads are designed for specific tasks, including cutting, polishing, and finishing. Ensure the polisher you choose is compatible with a range of pads to tackle different types of scratches and surface materials.
- Weight and Ergonomics: The weight of the polisher affects maneuverability and ease of use, especially during extended sessions. An ergonomic design with comfortable grips can help reduce fatigue and improve control while polishing.
- Corded vs. Cordless: Corded polishers typically offer more consistent power and are ideal for larger jobs, while cordless options provide greater mobility. Consider the nature of your projects to determine which type will better suit your needs.
- Durability and Build Quality: A well-built polisher is essential for longevity and reliability. Look for models with high-quality materials and construction that can withstand regular use without compromising performance.
- Noise Level: Some polishers can be quite loud during operation, which may be a concern for users in noise-sensitive environments. Checking the noise level can help you choose a polisher that is more comfortable to use over long periods.
Which Specific Features Enhance Scratch Removal Effectiveness?
Heat protection features are vital for preventing damage to the paint, as overheating can lead to burn marks or other surface issues. Lastly, a dust collection system not only keeps the work area clean but also protects the vehicle’s surface from being scratched by airborne particles during the polishing process.
How Do Top Brands Compare in Terms of Polishing Effectiveness?
| Brand | Polishing Effectiveness | User Rating |
|---|---|---|
| Brand A | Highly effective on deep scratches, quick results. | 4.8/5 – Excellent reviews from users. |
| Brand B | Good for light scratches, takes more time. | 4.3/5 – Generally positive feedback. |
| Brand C | Best for surface scratches, very user-friendly. | 4.5/5 – Strong reputation among hobbyists. |
| Brand D | Effective for all scratch types, moderate application time. | 4.6/5 – Positive reviews, noted for versatility. |
| Brand E | Best for quick touch-ups, not as effective on deeper scratches. | 4.1/5 – Mixed reviews, good for casual use. |
What Makes Each Brand Stand Out for Scratch Removal Applications?
Each brand offers unique features and benefits that make their polishers particularly effective for scratch removal applications:
- 3M: Renowned for its advanced abrasives technology, 3M polishers provide a wide range of products specifically designed for different surfaces. Their polishes often contain micro-abrasive compounds that effectively remove scratches while minimizing the risk of further damage.
- Meguiar’s: This brand is famous for its high-quality detailing products, and its polishers are no exception. Meguiar’s formulations are designed to enhance gloss and clarity, making them ideal for restoring the appearance of scratched paintwork while providing long-lasting protection.
- Griot’s Garage: Known for user-friendly products, Griot’s Garage offers polishers that cater to both professionals and enthusiasts. Their polishers often feature a unique blend of chemicals that effectively eliminate scratches while being safe for various automotive finishes.
- Turtle Wax: A household name in car care, Turtle Wax provides budget-friendly options that do not compromise on quality. Their scratch removal products are formulated to be easy to use, with effective abrasives that can quickly address light scratches and enhance shine.
- Chemical Guys: This brand is recognized for its extensive range of detailing products, including polishers that are specifically tailored for scratch removal. Chemical Guys often utilize innovative technology that promotes effective scratch removal while ensuring a high-gloss finish.
- Blackfire: With a focus on professional-grade products, Blackfire polishers are designed for serious detailers looking for top performance. Their formulations are engineered to remove deeper scratches while leaving a smooth, glossy surface that is easy to maintain.
- Zymöl: A luxury brand in the car care industry, Zymöl offers premium polishers that are crafted with natural ingredients. Their products not only remove scratches effectively but also nourish the paint, enhancing the overall look of the vehicle.
What Are the Best Practices for Using a Polisher on Scratches?
To effectively use a polisher on scratches, adhering to best practices ensures optimal results without damaging the surface.
- Choose the Right Polisher: Selecting a polisher suited for the specific surface material is crucial. For instance, dual-action polishers are versatile for various surfaces, while rotary polishers are more suited for professionals dealing with tougher scratches.
- Use Appropriate Polishing Pads: Different pads are designed for specific tasks; using the right pad can significantly affect the outcome. Foam pads are excellent for finishing, while wool pads can remove deeper scratches, making the choice dependent on the severity of the scratches.
- Test on a Small Area First: Always start polishing on a less visible area to assess the effectiveness and potential damage. This practice allows you to adjust your technique or products without risking the appearance of more prominent areas.
- Apply the Right Amount of Product: Using too much polish can create a mess and hinder the polishing process, while too little may not yield results. A small, pea-sized amount is generally sufficient to start, allowing you to add more as needed.
- Maintain the Correct Speed and Pressure: Different speeds and pressures can affect the polishing results. Generally, a lower speed is suitable for applying polish, while a higher speed can be used for buffing, and consistent light pressure helps avoid overheating the surface.
- Keep the Surface Cool: Overheating can damage the paint or surface, so it’s essential to keep the area cool during the polishing process. Frequently lift the polisher to allow airflow and reduce friction heat, ensuring the surface remains intact.
- Clean the Area Before Polishing: Dust and debris can create additional scratches during the polishing process. Thoroughly wash and dry the area to ensure the surface is clean, allowing the polisher to work effectively without introducing new imperfections.
- Follow Up with a Sealant or Wax: After polishing, applying a sealant or wax helps protect the polished surface and enhances its shine. This protective layer also ensures that the results last longer, keeping the surface looking pristine.
How Can You Prepare Your Vehicle Before Polishing?
Preparing your vehicle before polishing is essential for achieving the best results and ensuring a smooth surface. The following steps are recommended:
- Wash the Vehicle: Thoroughly wash your car to remove dirt, grime, and contaminants that can interfere with the polishing process.
- Dry the Surface: Use a microfiber towel to dry the vehicle completely to prevent water spots and ensure the polishing compound adheres properly.
- Inspect the Paint: Carefully examine the paint for scratches, swirls, or imperfections to determine the areas that require the most attention during polishing.
- Clay Bar Treatment: Use a clay bar to remove embedded contaminants from the paint surface, resulting in a smoother finish that allows the polisher to work more effectively.
- Mask Off Trim and Edges: Apply painter’s tape to trim, rubber seals, and edges to protect them from the polishing compound, which can cause discoloration or damage.
- Choose the Right Polisher: Select the best polisher for scratches based on the severity of the imperfections and your level of experience, ensuring you have the appropriate pads and compounds for the task.
Washing the vehicle is crucial as it prevents any dirt from being ground into the paint during polishing. Make sure to use a pH-neutral car soap and rinse thoroughly before drying.
After washing, drying the vehicle with a microfiber towel helps eliminate any moisture that can create water spots or interfere with the polishing process. It’s important to ensure that the surface is completely dry before proceeding.
Inspecting the paint allows you to identify specific areas that need more attention and helps in selecting the right products for polishing. Pay close attention to scratches and swirls that may require different techniques or products.
A clay bar treatment removes contaminants that washing alone cannot, such as tree sap or industrial fallout. This step is vital for creating a smooth surface, which enhances the effectiveness of the polishing process.
Masking off trim and edges protects vulnerable areas from potential damage caused by the polisher or polishing compounds. This ensures that only the painted surfaces are polished, maintaining the integrity of other materials.
Finally, choosing the right polisher is critical for achieving desired results. Consider factors such as the severity of scratches, your familiarity with the tool, and the specific polishing pads and compounds that will work best for your vehicle’s paint type.
What Are Common Mistakes to Avoid When Using a Polisher?
When using a polisher, it’s crucial to be aware of common mistakes that can lead to unsatisfactory results or even damage to the surface being polished.
- Using the Wrong Pad: Selecting an inappropriate polishing pad can hinder the effectiveness of the process. Different pads are designed for specific tasks, such as cutting, polishing, or finishing, and using the wrong one may lead to insufficient results or surface damage.
- Neglecting Surface Preparation: Failing to properly clean and prepare the surface before polishing can trap dirt and debris, resulting in scratches and swirls. A clean surface ensures that the polisher can work effectively and achieve a smooth, high-gloss finish.
- Applying Too Much Pressure: Many users mistakenly believe that applying more pressure will yield better results; however, this can lead to overheating the pad and damaging the paint. Polishing should be done with a light, consistent touch to allow the polisher to do its job without causing harm.
- Overworking the Area: Spending too much time in one spot can create uneven surfaces or burn through the clear coat. It’s important to keep the polisher moving in a consistent pattern to avoid these issues and achieve an even finish.
- Ignoring Product Recommendations: Using products that are not compatible with the polisher or the type of surface can lead to poor performance. Always refer to the manufacturer’s guidelines for the best results, as specific products are designed for particular applications.
- Not Testing on a Small Area First: Jumping straight into polishing without testing on a small, inconspicuous area can result in unexpected damage. Always perform a test patch to observe how the surface reacts to the polisher and product combination before proceeding.
- Failing to Maintain Equipment: Regularly neglecting to clean and maintain the polisher can lead to decreased performance and potential damage to the surface being polished. Ensuring that pads are clean and in good condition, as well as keeping the machine well-maintained, is essential for optimal results.