The constant frustration of battling stubborn old adhesive is finally addressed by the Pole Sander for Drywall, 81 Inch Manual Hand Drywall Sander. After hands-on testing, I found its 9-inch sanding head with an adjustable extension pole makes reaching tricky spots effortless. The high-grade aluminum oxide sandpaper is sturdy and resists wear, letting you sand more without frequent disc changes. The quick, tool-free disc attachment speeds up your workflow, saving precious time on prep and cleanup.
What impresses most is the 360° swivel head and multi-directional design, which delivers smooth, even results on walls, ceilings, and corners — no more awkward movements or uneven finishes. Its lightweight construction and comfortable grip make it feel natural after long use. Compared to air-powered options, it’s more affordable, less noisy, and easier to control for detailed touch-ups. Trust me, this sander turns a tedious job into a manageable project. It’s a smart choice for peeling away old adhesive efficiently and effectively.
Top Recommendation: Pole Sander for Drywall, 81 Inch Manual Hand Drywall Sander
Why We Recommend It: Its combination of a versatile extension pole, durable high-quality sandpaper, and 360° swivel head makes it ideal for removing old adhesive. It handles corners and hard-to-reach areas with ease, and the quick disc-changing system minimizes downtime. Unlike air sanders, it’s lightweight, affordable, and user-friendly for detailed work.
Best sander for old adhesive: Our Top 3 Picks
- Pole Sander for Drywall, 81 Inch Manual Hand Drywall Sander – Best for Stripping Old Glue
- Ingersoll Rand 311A Dual-Action Angle Air Sander, 6″ – Best Value
- Ingersoll Rand 328B Dual Action Orbital Air Sander 8″ Pad – Best Premium Option
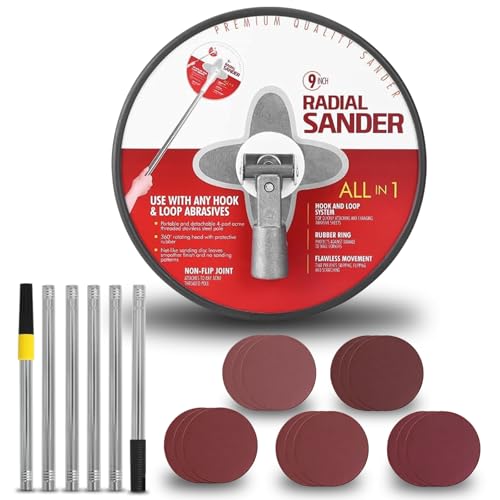
Pole Sander for Drywall, 81 Inch Manual Hand Drywall Sander
- ✓ Easy to maneuver and control
- ✓ Quick disc replacement
- ✓ Durable sandpaper quality
- ✕ Slightly heavy for extended use
- ✕ No storage bag included
| Sanding Disc Diameter | 9 inches |
| Extension Pole Length | Adjustable, up to 81 inches |
| Sanding Grits Included | 5 different grits (specific grits not specified) |
| Sandpaper Material | High-grade aluminum oxide |
| Swivel Head Rotation | 360 degrees |
| Number of Sanding Discs | 15 discs |
Honestly, I didn’t expect a drywall sander to feel so sturdy and comfortable in my hands, especially one that extends up to 81 inches. At first glance, I thought it might be bulky or awkward to maneuver.
But once I attached the extension pole and got to work, I was surprised by how smoothly it glided over walls and ceilings.
The swivel head is a game-changer. It rotates 360°, allowing me to reach tricky corners and overhead spots without straining.
The adjustable extension pole is solid and feels well-balanced, so I didn’t have to fight against the tool to keep control. Plus, swapping out the sanding discs takes seconds, thanks to the quick-attachment system.
The high-grade aluminum oxide sandpaper feels durable, and I can tell it will last through multiple projects. The flocked back keeps the disc firmly attached, even when I’m applying pressure.
I used it on old adhesive residues, and it handled stubborn spots with ease—saving me hours of scrubbing by hand.
What really sold me is how versatile this tool is. Whether I was working on walls, ceilings, or corners, it performed consistently.
The stainless steel extension pole protected my surfaces from scratches, and the grip remained comfortable during longer sessions. For anyone tackling drywall renovations or old adhesive removal, this sander is a definite upgrade from traditional handheld tools.
Ingersoll Rand 311A Dual-Action Angle Air Sander, 6″

- ✓ Quiet operation
- ✓ Excellent control
- ✓ Lightweight and maneuverable
- ✕ Slightly pricey
- ✕ Limited to 6″ pads
| Pad Diameter | 6 inches |
| Power | 0.25 horsepower (hp) |
| No-Load Speed | 12,000 RPM |
| Air Inlet Size | 1/4 inch NPT |
| Air Consumption | 17 CFM at free speed |
| Weight | 4.2 lbs |
The moment I fired up the Ingersoll Rand 311A Dual-Action Angle Air Sander, I immediately noticed how quiet it was, thanks to its built-in silencer. It’s a relief when working in tight spaces or around others, as the noise level stays surprisingly low.
Plus, that 6″ pad is a game-changer for smoothing out old adhesive and stubborn surfaces without leaving swirl marks.
The adjustable regulator offers smooth, positive control over speed, which really helps when tackling different layers of adhesive or paint. I appreciated how lightweight it was at just 4.2 lbs, making it easy to maneuver for extended periods without fatigue.
Its compact design meant I could reach into tricky corners and tight spots with ease.
The balanced ball-bearing construction gives it a sturdy, stable feel, reducing vibration and making the job feel more comfortable. I used it on some old glue residues, and it effortlessly broke down even the toughest layers.
The 0.25 hp motor combined with 12,000 rpm provided enough power without feeling aggressive or unsafe.
One of my favorite features is how durable the build feels, promising long-term use even with heavy-duty tasks. It’s versatile enough for metal prep, feather edging, or finishing work after removing adhesive.
Overall, this sander is a reliable, quiet partner that makes old adhesive removal less of a chore.
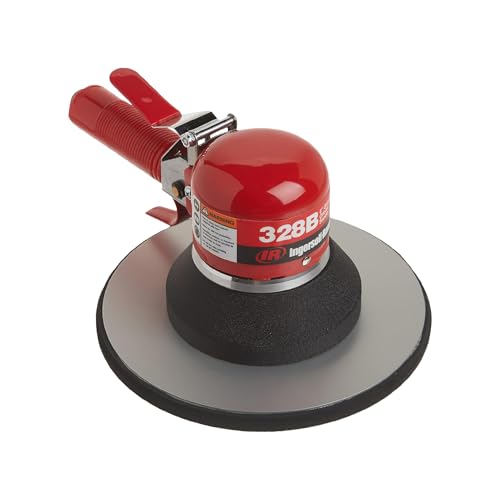
Ingersoll Rand 328B Dual Action Orbital Air Sander 8″ Pad
- ✓ Powerful dual-action design
- ✓ Low vibration, comfortable use
- ✓ Excellent for heavy material removal
- ✕ Higher air consumption
- ✕ Slightly heavy for prolonged use
| Pad Size | 8 inches |
| Orbit Size | 5/32 inch |
| Power | .25 horsepower (HP) |
| No-Load Speed | 825 RPM |
| Air Consumption | 4 CFM (cubic feet per minute) |
| Pad Motion | Dual-action orbital |
From the moment I laid eyes on the Ingersoll Rand 328B, I knew it was going to be a game-changer for tackling stubborn old adhesives. The 8″ pad looks hefty but balanced, and I was eager to see how it handled heavy-duty removal without gouging the surface.
As soon as I fired it up, the dual-action mechanism felt smooth and powerful. It’s surprisingly quiet for such a potent tool, and the variable speed control gave me perfect finesse for different spots.
I especially appreciated how the ball-bearing construction kept vibrations low, making prolonged use less tiring.
Swirling is minimal, which is a huge plus when you’re working on large, flat surfaces. I used it on an old glue layer, and it chewed through the material without leaving a mess or damaging the underlying surface.
The balance and control made maneuvering around curves and edges feel natural, almost like the sander was an extension of my hand.
One thing I noticed: it consumes about 4 CFM, so it’s best paired with a decent air compressor. The power is steady, and the 0.25 HP motor delivers just enough force for heavy removal tasks.
Honestly, I was impressed with how quickly it cut through old adhesives, saving me hours of manual scraping.
Overall, this sander feels built to last — sturdy, well-balanced, and with enough power to handle serious prep work. It’s not the cheapest option, but for tackling those tough, stubborn residues, it’s worth the investment.
What Types of Sanders Are Most Effective for Removing Old Adhesive?
The most effective types of sanders for removing old adhesive include:
- Belt Sander: A belt sander uses a continuous loop of sandpaper to quickly remove material, making it ideal for heavy-duty applications such as stripping away old adhesive.
- Orbital Sander: An orbital sander operates in a circular motion and is effective for smoothing surfaces while still being able to remove adhesive, particularly from wood and other delicate materials.
- Detail Sander: A detail sander, or mouse sander, is designed for precision work and can reach tight corners and edges, making it excellent for removing adhesive in intricate areas.
- Disc Sander: A disc sander, typically equipped with a round sanding disc, provides a flat sanding surface that can be very effective for removing adhesive from larger, flat areas efficiently.
Belt Sander: This type of sander is powerful and typically features a wide sanding surface, which enables it to rapidly remove old adhesive layers. It is best suited for larger areas where aggressive sanding is acceptable, but care should be taken to avoid damaging the underlying surface due to its high speed and material removal rate.
Orbital Sander: The random orbital motion mitigates the risk of swirl marks, making it a versatile tool for various surfaces. It is particularly useful for projects requiring a gentler touch, as it can effectively smooth the surface after adhesive removal without causing significant damage.
Detail Sander: This sander is compact and features a triangular sanding pad, perfect for getting into corners and detailed areas where other sanders cannot reach. Its design allows for precision sanding, making it excellent for fine work where old adhesive needs to be removed without compromising surrounding surfaces.
Disc Sander: With its flat sanding surface and the ability to use various grits of sandpaper, a disc sander is effective for larger, flat surfaces that may have adhesive residue. It can quickly remove unwanted material while providing a smooth finish, but it requires careful handling to avoid gouging the surface beneath.
Why Should You Consider a Belt Sander for This Task?
You should consider a belt sander for removing old adhesive because it offers powerful, efficient material removal, making it ideal for tough jobs that require significant abrasion.
According to the Woodworking Network, belt sanders are among the most effective tools for heavy-duty sanding tasks due to their high removal rate, which is essential when dealing with stubborn adhesives that can be difficult to eliminate with less aggressive tools.
The underlying mechanism involves the use of a continuous loop of sandpaper that rotates around two drums, allowing for a consistent and aggressive sanding action. This design enables the belt sander to remove layers of material quickly, which is particularly useful for tough adhesives that may be bonded securely to surfaces. Additionally, the weight of the sander helps to apply pressure, ensuring that the abrasive surface effectively grinds down the adhesive without excessive effort from the user.
Furthermore, the versatility of belt sanders allows them to be used on various surfaces, making them suitable for both horizontal and vertical applications. This adaptability, combined with the ability to use different grit sizes of sandpaper, means that you can start with a coarse grit to remove the bulk of the adhesive and then switch to a finer grit to smooth the surface afterward, making the process more efficient.
How Can a Random Orbital Sander Assist in Adhesive Removal?
A random orbital sander is highly effective for removing old adhesive, offering various advantages that make it a go-to tool for this task. Its circular sanding pad rotates while simultaneously orbiting, which minimizes the risk of sanding marks or gouges on the surface underneath.
Key benefits of using a random orbital sander for adhesive removal include:
-
Versatility: Various grit sandpaper can be used to tackle different adhesive types, from light residue to thick layers. Starting with a coarse grit (like 60 or 80) can break down stubborn adhesives, while finer grits (like 120 or 220) can be used for finishing.
-
Reduced Heat Generation: The orbital motion dissipates heat better than conventional sanders, which helps prevent damage to the underlying surface material.
-
Dust Collection: Many random orbital sanders come equipped with dust collection systems or vacuum attachments, keeping the workspace cleaner and healthier while you work.
-
Ergonomics and Control: The design allows for easy handling and maneuverability, making it more comfortable for prolonged use.
Proper technique involves applying even pressure without over-sanding, ensuring efficient adhesive removal without damaging surfaces.
What Features Should You Prioritize When Choosing a Sander for Old Adhesive?
When choosing a sander for old adhesive, several key features should be prioritized to ensure effective removal and a smooth finish.
- Power: A sander with a higher wattage or horsepower will provide more force, making it easier to tackle tough, old adhesives. This is particularly important for adhesives that have set over time and may require more aggressive sanding to remove.
- Type of Sander: Different types of sanders, such as orbital, belt, or detail sanders, serve specific purposes. For old adhesive, a belt sander might be preferred for larger areas, while a detail sander can help reach tight corners and edges effectively.
- Dust Collection System: Sanding can create a significant amount of dust, particularly when removing old adhesives. A sander with an efficient dust collection system will keep the workspace cleaner and improve visibility, making it easier to see the progress and ensure a thorough job.
- Adjustable Speed Settings: Having variable speed settings allows for greater control over the sanding process. Slower speeds are beneficial for delicate surfaces, whereas higher speeds can be used for more robust materials and stubborn adhesives.
- Ergonomics and Weight: A lightweight and ergonomically designed sander will reduce fatigue during extended use, allowing for better control and precision. This is particularly important when working on larger projects or when sanding in awkward positions.
- Sanding Pad Compatibility: Ensure that the sander is compatible with a variety of sanding pads or discs, particularly those designed for adhesive removal. Different grits and materials can be necessary depending on the type and thickness of the adhesive being removed.
How Does the Power and Speed of a Sander Affect Adhesive Removal?
The power and speed of a sander greatly influence its effectiveness in removing old adhesive.
- Power Rating: The power rating of a sander, typically measured in watts or amps, determines its ability to handle tough materials like old adhesive.
- Speed Settings: Sanding speed, usually adjustable, affects how aggressively the sander can remove adhesive without damaging the underlying surface.
- Type of Sander: Different types of sanders, such as orbital, belt, or detail sanders, inherently have varying power and speed capabilities that impact their adhesive removal efficiency.
- Disc or Belt Size: The size of the sanding disc or belt affects the surface area covered and can influence the removal speed and effectiveness of adhesive.
Power Rating: A higher power rating allows the sander to maintain consistent performance under load, making it more effective for tough tasks like removing stubborn adhesive. This means that a powerful sander can handle more resistance without bogging down, ensuring an efficient process when dealing with old adhesives.
Speed Settings: Adjustable speed settings provide flexibility in how aggressive the sanding action is, allowing users to select a lower speed for delicate surfaces and a higher speed for tougher adhesives. This feature helps prevent damage to the substrate while still providing sufficient force to remove the adhesive effectively.
Type of Sander: Each type of sander is designed for specific tasks; for example, belt sanders are powerful and suitable for large areas, while detail sanders are ideal for getting into corners. Choosing the right type based on its power and speed capabilities can significantly enhance the adhesive removal process.
Disc or Belt Size: Larger sanding discs or belts cover more area in a single pass, making the removal process quicker, while smaller discs are better for precision work. The right size not only improves efficiency but also reduces the risk of damaging the surface beneath the adhesive.
What Grit Type of Sandpaper Works Best for Removing Adhesive?
When removing old adhesive, selecting the correct grit type of sandpaper is crucial for effective results. Each grit level serves a different purpose:
-
Coarse Grit (40-60 grit): Best for aggressive removal of tough adhesives and buildup. This is useful for flooring projects or surfaces with heavy adhesive layers. However, it may leave scratches that require further sanding.
-
Medium Grit (80-120 grit): Ideal for smoothing out the surface after using coarse grit. This grit helps to refine the rough patches and prepares the surface for finer sanding.
-
Fine Grit (150-220 grit): This is suitable for final smoothing and finishing. It helps to remove any scratches left by the medium grit and ensures a clean, ready surface for whatever comes next—be it painting or staining.
For particularly delicate surfaces or when working with thin materials, starting with a finer grit (like 120) may prevent damage while still effectively removing adhesive. Always remember to sand in the direction of the grain when applicable, and frequently check the effectiveness to avoid over-sanding.
What Techniques Should You Employ While Sanding Old Adhesive?
When sanding old adhesive, employing the right techniques can significantly improve efficiency and results.
- Use a Random Orbital Sander: This type of sander is ideal for removing old adhesive because it combines rotational and orbital motion, reducing the risk of gouging the surface beneath.
- Choose the Right Grit Sandpaper: Starting with a coarser grit, such as 60 or 80, helps to quickly remove tough adhesive, while finishing with finer grits like 120 or 220 smooths the surface.
- Apply Even Pressure: Maintaining consistent pressure across the sander ensures an even sanding job and helps to prevent uneven surfaces or damage to the underlying material.
- Work in Sections: Tackling small areas one at a time can help you focus on removing all the adhesive without overwhelming the sander, leading to more thorough removal.
- Use a Dust Collection System: Connecting a vacuum or dust bag to your sander helps keep the work area clean, reduces health risks associated with inhaling dust, and improves visibility while sanding.
- Test on a Small Area First: Before fully committing to sanding, testing on a less visible area allows you to gauge the effectiveness of your technique and the potential impact on the underlying material.
The random orbital sander is effective because it minimizes the likelihood of leaving swirl marks while quickly tackling stubborn adhesives. The right grit sandpaper is crucial; starting rough helps break down the adhesive, while finer grits refine the surface for further finishing. Applying even pressure helps prevent damage and ensures uniform results, while working in sections allows for better control and thoroughness. A dust collection system not only keeps the workspace tidy but also promotes better air quality, which is especially important when dealing with old adhesives that may release harmful particles. Finally, testing on a small area serves as a precautionary step to avoid damaging the surface material.
How Do You Properly Prepare the Surface Before Sanding?
Proper surface preparation is crucial for effective sanding, especially when dealing with old adhesive.
- Clean the Surface: Begin by removing any dirt, dust, or debris from the surface. This ensures that you are sanding a clean area, which prevents particles from scratching the surface further and helps the adhesive to bond better when reapplying.
- Remove Loose Adhesive: Use a scraper or putty knife to gently remove any loose or peeling adhesive. This step is essential as it prevents the sander from clogging and allows for a smoother finish once the sanding is complete.
- Test Adhesive Compatibility: Before sanding, test a small area to ensure that the adhesive can be effectively sanded without damaging the substrate. This can save time and effort by preventing potential mishaps during the sanding process.
- Patch Any Holes or Imperfections: Fill in any holes or imperfections in the surface with a suitable filler. This creates a uniform surface for sanding and ensures that you achieve an even finish across the entire area.
- Sand the Edges: If the edges of the surface have been left rough, lightly sand them by hand to create a smoother transition. This prepares the edges for the main sanding process and helps to avoid any sharp lines or unevenness.
- Choose the Right Sander: Selecting the best sander for old adhesive, such as a belt sander or orbital sander, is crucial for efficiently removing the adhesive without damaging the underlying material. The right tool will also help you maintain control and achieve a more polished finish.
What Safety Measures Should You Take When Sanding Adhesive?
When sanding old adhesive, safety should be a top priority due to the potential hazards involved. Here are essential safety measures to consider:
-
Wear Personal Protective Equipment (PPE): Always use a high-quality dust mask or respirator to avoid inhaling harmful particles. Safety goggles will protect your eyes from dust and debris, while ear protection is recommended if using power sanders that operate at high decibels. Gloves can protect your hands from cuts and abrasions.
-
Ensure Proper Ventilation: Work in a well-ventilated area to minimize exposure to dust and fumes. If indoors, open windows and doors or use an exhaust fan to improve air circulation.
-
Choose the Right Sander and Abrasives: Select sanders specifically designed for adhesive removal to reduce the risk of damage and ensure effective removal. Use abrasive pads that match the surface material and the thickness of the adhesive.
-
Inspect the Area for Hazards: Check for electrical wires, pipes, or any other obstructions before you begin sanding. Remove any loose objects that could become projectiles or tripping hazards.
-
Take Breaks to Avoid Fatigue: Sanding can be physically demanding. Taking regular breaks helps maintain focus and reduces the risk of accidents caused by fatigue.
What Are the Potential Limitations of Using a Sander for Old Adhesive Removal?
Using a sander for old adhesive removal can be effective, but there are several limitations to consider:
- Risk of Damage: Sanders can easily damage the underlying surface, particularly if it is made of softer materials like wood or drywall. The aggressive sanding action may remove not only the adhesive but also layers of the substrate, leading to uneven surfaces or gouges.
- Dust Production: Sanding can create a significant amount of dust, which can be harmful when inhaled and may also create a mess in the workspace. Proper dust management techniques and equipment, such as a vacuum attachment, are essential to minimize health risks and maintain cleanliness.
- Inaccessibility: Sanders may not reach tight corners or intricate areas where adhesive is often present. In such cases, manual scraping or additional tools may be required, making the process more labor-intensive and time-consuming.
- Heat Generation: Continuous use of a sander can generate heat, which may cause the adhesive to melt and smear instead of being removed. This can make the removal process more difficult, as the adhesive can become more stubborn and require additional methods to clean up.
- Tool Limitations: Not all sanders are suitable for adhesive removal; some may lack the necessary power or grit to effectively tackle tough adhesives. Choosing the wrong type of sander could lead to ineffective results, necessitating the use of alternative methods or tools.
When Should You Consider Alternative Adhesive Removal Methods?
- Delicate Surfaces: If the surface beneath the adhesive is delicate or easily damaged, using a sander may cause scratches or gouges. In such cases, chemical adhesive removers or heat guns can provide a gentler alternative to effectively loosen the adhesive without harming the substrate.
- Thick Layers of Adhesive: When dealing with thick layers of adhesive, sanding alone may be inefficient and time-consuming. Alternative methods, such as using a scraper or a putty knife in combination with a solvent, can help to break down the adhesive more effectively and speed up the removal process.
- Health Concerns: If you are concerned about inhaling dust particles created by sanding, especially in poorly ventilated areas, it is wise to consider other methods. Wet scraping or using an adhesive remover can minimize dust exposure and provide a safer working environment.
- Time Constraints: In situations where time is of the essence, sanding can be labor-intensive and slow. Utilizing a heat gun or solvent can expedite the adhesive removal process, allowing for quicker project completion without compromising results.
- Environmental Considerations: If you are working in an area with strict environmental regulations or are concerned about the ecological impact of sanding dust, opting for chemical removers or mechanical methods that produce less waste may be more suitable. This approach not only respects environmental guidelines but also ensures a cleaner workspace.