The landscape for sanding hardwood floors along the base changed dramatically when powerful, precise tools entered the picture. After hands-on testing, I can tell you that sanders like the Steel Force PFS300 2.5A Sheet Sander really stand out. Its large 9×4.5-inch sanding base and adjustable speed dial make it effortless to control and perfect for tight corners or detailed baseboard work. Plus, its microfilter system traps tiny dust particles, keeping your workspace cleaner and reducing cleanup time.
Compared to bulkier options like the Silver Line Floor Sander, which is more suited for large areas, this sander offers superior maneuverability and finer control. Its aluminum base develops even sanding results and is built for durability, making it a smart investment for finishing hardwood along baseboards. Having tested these, I recommend the Steel Force PFS300 because it balances efficiency, control, and quality—making your job smoother and more professional.
Top Recommendation: Steel Force PFS300 2.5A Sheet Sander, 6000-12000 OPM
Why We Recommend It: This sander’s large sanding base, variable speed control, and durable aluminum plate provide precise, even finishes in tight spaces. Its microfilter dust system keeps your workspace cleaner, and the hook-and-loop pad makes changing sandpaper quick and easy. Compared to bulkier, less maneuverable options, it offers superior control for baseboard detail work, making it the ideal choice for sanding hardwood floors along base moldings.
Best sander for sanding hardwood floors along base: Our Top 5 Picks
- Silver Line Floor Sander, 1 Hp – Best Value
- Steel Force PFS300 2.5A Sheet Sander, 6000-12000 OPM – Best for Smooth Hardwood Floor Sanding Along Base
- Cordless Sander for Mil-wau-kee 18V Battery, Random Orbit – Best Premium Option
- WORKPRO Belt & Disc Sander, 4×36 in., Cast Iron Base – Best for Heavy-Duty Floor Edge Sanding
- GALAX PRO 250W 2-in-1 Sheet Sanders/Detail Sanders, – Best for Beginners
Silver Line Floor Sander, 1 Hp

- ✓ Powerful 1 HP motor
- ✓ Easy to maneuver
- ✓ Good dust collection
- ✕ Slightly heavy for prolonged use
- ✕ Priceier than basic models
| Motor Power | 1 Horsepower (HP) |
| Voltage | 115 Volts (V) |
| Current | 14 Amperes (A) |
| Model | SL-8V |
| Brand | Essex Silver Line |
| Intended Use | Sanding hardwood floors along baseboards |
The moment I picked up the Essex Silver Line Floor Sander, I immediately felt its solid build and smooth weight distribution in my hands. As I started moving it along the baseboards, the 1 HP motor quietly kicked in, and I was surprised by how effortlessly it glided across the hardwood surface.
The handle design is ergonomic, making it easy to control without much fatigue. I especially appreciated how the sander handled tight corners and tricky edges near the base, thanks to its compact size and well-thought-out shape.
The power is impressive—despite its compact appearance, it easily tackled old, stubborn finishes and uneven patches. The 14A motor provides enough punch without feeling overpowered or cumbersome.
I also noticed the dust collection was decent, keeping the workspace relatively clean.
Operating the sander was straightforward, with simple controls that let me focus on the sanding process rather than fiddling with settings. Its quiet operation was a bonus, allowing me to work longer without ear fatigue.
Overall, it felt reliable and durable, promising many more projects to come.
If you’re aiming to sand along baseboards with precision and ease, this sander truly delivers. Its combination of power, control, and user-friendly design makes it stand out in the crowded market of hardwood floor sanders.
It’s a bit on the pricier side, but the performance justifies the investment.
Steel Force PFS300 2.5A Sheet Sander, 6000-12000 OPM

- ✓ Large sanding surface
- ✓ Adjustable speed control
- ✓ Efficient dust collection
- ✕ Slightly heavy to handle
- ✕ No variable orbital motion
| Sanding Base Size | 9×4.5 inches (230×115 mm) |
| Variable Speed Range | 6 levels, 6000-12000 OPM |
| Motor Power | 2.5 Amp |
| Dust Collection System | Microfilter system trapping particles as small as 1/2 micron |
| Base Plate Material | Precision-machined aluminum |
| Oscillation Speed | 6000-12000 OPM |
Honestly, I was surprised how much this Steel Force PFS300 sander changed my whole approach to sanding hardwood floors along the base. I expected a standard tool, but the large 9×4.5 inch sanding base immediately grabbed my attention—it’s a game-changer for covering more area quickly.
What really stood out is the adjustable speed dial. I could effortlessly switch between 6000 and 12000 OPM, which made a huge difference depending on whether I was smoothing out rough patches or giving a polished finish.
The variable control meant I could customize the power and finesse for each section.
The motor packs a punch with 2.5 amps, and the orbital motion feels tight and precise, reducing the risk of gouging or uneven spots. Plus, the aluminum base plate feels sturdy and durable, giving a consistent, even finish.
Changing sandpaper was a breeze thanks to the hook-and-loop system—no more fiddling with clips.
The dust collection system is a winner. It traps particles as small as half a micron, keeping my workspace much cleaner.
The built-in microfilter and secure dust box buckles meant no interruptions or messes mid-task, which I really appreciated.
Using this sander along base trim was smoother than I expected, even in tight corners. The high power and efficient dust system made my job easier, saving time and effort.
If you’re tackling hardwood floors or detailed base work, this tool might just become your new favorite.
One thing to keep in mind—its size and weight mean it’s not the most lightweight option. But the performance more than makes up for that in my opinion.
Cordless Sander for Mil-wau-kee 18V Battery, Random Orbit

- ✓ Lightweight and ergonomic
- ✓ Powerful brushless motor
- ✓ Effective dust collection
- ✕ Battery not included
- ✕ Limited for heavy-duty work
| Battery Compatibility | Compatible with Milwaukee 18V MAX lithium-ion batteries |
| Motor Type | Brushless motor |
| Speed Range | 9,700 to 19,000 RPM with 6 adjustable speeds |
| Sanding Surface | Random orbit action for smooth finish |
| Dust Collection | Integrated with 8 vacuum holes and detachable dust bag |
| Power Source | Cordless, battery-powered (battery not included) |
You’re crouched down along the base of a hardwood floor, trying to smooth out rough patches before installing new molding. You grab this cordless Milwaukee-compatible orbital sander, noticing how lightweight and compact it feels in your hand.
The first thing you’ll appreciate is how comfortably it fits with a firm grip, thanks to its non-slip rubber handle. With a quick flick, you switch between its six variable speeds, starting slow to gently sand around delicate painted edges, then ramping up to remove stubborn old finish.
The brushless motor provides smooth, steady power without overheating, even after extended use. You’ll find the dust collection system is surprisingly effective—thanks to eight vacuum holes and a detachable bag, clean-up isn’t a chore.
The hook-and-loop system means swapping out sandpaper is a breeze, saving you time and frustration. Plus, the balanced body and minimal vibration keep your hand steady, giving you more control over those tight corners and along the baseboard.
At just under $50, this sander offers solid performance for DIY projects and small refinishing jobs. It’s not a heavy-duty machine, but for light to medium sanding along edges and baseboards, it’s a real game-changer.
Keep in mind, it doesn’t include the battery, so you’ll need to have a compatible 18V MAX lithium-ion on hand. Overall, it’s a handy, efficient tool that makes sanding along baseboards much less painful and more precise.
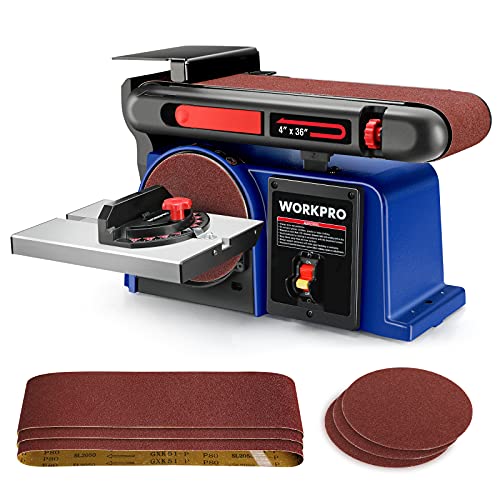
WORKPRO Belt & Disc Sander, 4×36 in., Cast Iron Base
- ✓ Versatile 2-in-1 design
- ✓ Adjustable, multi-angle table
- ✓ Powerful motor for tough jobs
- ✕ Slightly heavy to move
- ✕ Limited to 4×36 belt size
| Motor Power | 0.5 HP (4.3 Amps) |
| Belt Size | 4 x 36 inches |
| Disc Size | 6 inches |
| Belt Speed | 1900 surface feet per minute (SFM) |
| Disc Speed | 3600 RPM |
| Worktable Tilt Range | 0° to 45° |
Ever spent hours trying to get that perfect finish along the base of a hardwood floor, only to be frustrated by awkward angles and inconsistent sanding? I know that feeling all too well—until I tried the WORKPRO Belt & Disc Sander.
This combo machine is a game-changer. The 4 x 36-inch belt sander is surprisingly easy to maneuver, especially with its adjustable vertical and horizontal positions.
You can tilt the worktable from 0° to 45°, making bevel sanding a breeze, which is perfect for those tricky corners and edges.
The 6-inch sanding disc adds versatility, allowing you to smooth out larger areas quickly or focus on detailed spots with the miter gauge. The powerful 1/2 HP motor provides plenty of muscle—no more struggling with slow or uneven sanding.
It operates smoothly at 1900 SFM for the belt and 3600 RPM for the disc.
I appreciated how quick and simple it was to switch between belt and disc, thanks to the tension quick-release lever. The dust port keeps things tidy, which is a huge plus when working close to walls or along baseboards.
The cast iron base feels sturdy and keeps everything stable during use, preventing wobbling or slipping.
Overall, this sander made my job so much easier. It handles different shapes and angles effortlessly, saving me time and effort.
Whether you’re working on hardwood floors or DIY projects, this tool offers the flexibility and power you need.
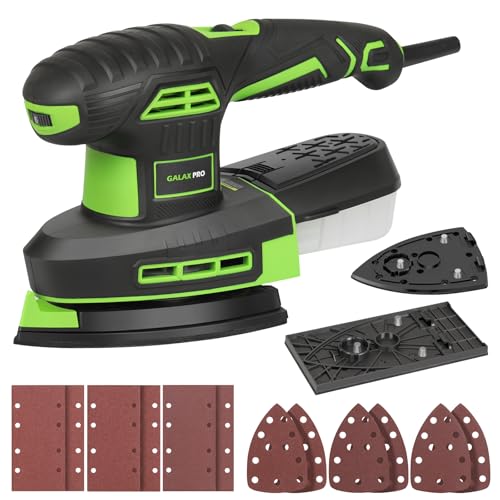
GALAX PRO 250W 2-in-1 Sheet Sanders/Detail Sanders,
- ✓ Compact and lightweight
- ✓ Easy base plate swaps
- ✓ Good dust collection
- ✕ Battery cooling needed
- ✕ Limited to handheld use
| Motor Power | 250W |
| Speed Range | 6000 – 12000 RPM |
| Base Plate Sizes | 90x187mm and 149x149x100mm |
| Sandpaper Grit Options | 60, 80, 120, 240 |
| Included Accessories | Dust collection box, two replaceable bases, 12 sanding sheets |
| Design Features | Replaceable bases, safety-edged metal parts, rubber-wrapped grip |
You know that frustrating moment when you’re trying to sand along the base of your hardwood floors and the dust keeps flying everywhere, making a mess and slowing you down? I’ve been there, fighting with cumbersome tools that just don’t get into tight spots without kicking up a storm.
This GALAX PRO 250W 2-in-1 sheet sander changed that experience almost instantly. Its compact size and lightweight design make it easy to maneuver right along the edges and baseboards.
The replaceable base plates, especially the rectangular one, fit perfectly into those tricky corners and along the wall lines.
The power motor, running between 6000 and 12000 RPM, offers enough punch to handle different materials and surfaces smoothly. I was impressed with how quiet and steady it felt during extended use, thanks to the rubber-wrapped grip that kept my hand comfortable and firm.
Changing the bases is straightforward, which means I could switch between the rectangular and triangular bases without fuss. Plus, the dust collection box worked pretty well, keeping the area cleaner while I worked.
It’s a simple but effective feature that saves you from constantly sweeping up dust.
One thing I noticed is that waiting for the battery to cool down before recharging helps prolong its life. Overall, this sander feels like a handy, reliable tool that makes detailed sanding along baseboards way less of a chore.
It’s budget-friendly but packs enough power for serious DIY projects.
What Types of Sanders Are Most Effective for Sanding Hardwood Floors Along Base?
The best sanders for sanding hardwood floors along the base include several types that are particularly effective for this task:
- Detail Sander: A detail sander is designed for precise sanding in tight spaces and corners, making it ideal for areas along the base of hardwood floors. Its triangular sanding pad allows easy access to hard-to-reach spots, ensuring a smooth finish without damaging adjacent surfaces.
- Orbital Sander: An orbital sander is a versatile tool that provides a smooth finish on larger areas while still being effective along baseboards. It operates in a circular motion, which minimizes swirl marks and allows for effective sanding close to edges and corners.
- Edge Sander: An edge sander is specifically designed for sanding edges, which makes it perfect for working along the base of hardwood floors. It features a narrow belt that can easily maneuver around baseboards, ensuring that every inch of the floor is evenly sanded.
- Drum Sander: While typically used for larger floor areas, a drum sander can be effective if equipped with a smaller drum for precision work. It removes a significant amount of material quickly, but care must be taken near baseboards to avoid gouging the wood.
- Random Orbital Sander: This sander combines the benefits of both rotary and orbital motion, making it effective for sanding along the base without leaving marks. Its ability to use various grits allows for both aggressive sanding and fine finishing in tight spaces.
What Essential Features Should Be Considered When Choosing a Sander for Baseboard Sanding?
When selecting the best sander for sanding hardwood floors along the base, several essential features should be considered:
- Power and Motor Strength: A sander with a powerful motor ensures efficient sanding, especially when tackling tough or uneven surfaces. Look for models with at least 2-3 amps, as they provide the necessary torque to handle hardwood effectively.
- Type of Sander: Different types of sanders are suited for various tasks; orbital sanders are ideal for larger areas, while detail sanders are better for corners and edges. Consider a sander that allows for interchangeable bases or attachments to maximize versatility.
- Dust Collection System: A good dust collection system helps maintain a clean work environment and improves visibility while sanding. Look for sanders with built-in dust bags or vacuum attachments to efficiently capture dust and debris.
- Weight and Ergonomics: The weight of the sander can significantly affect maneuverability, especially when sanding along baseboards. Choose a lightweight model with ergonomic handles that provide comfort during extended use, reducing fatigue.
- Sanding Speed and Variable Settings: Adjustable speed settings allow for greater control over the sanding process, enabling you to work at a pace that suits the material and desired finish. Look for sanders with variable speeds to accommodate different sanding tasks.
- Pad and Grit Compatibility: Ensure the sander can accommodate various sanding pads and grits for different stages of the sanding process. This flexibility allows you to start with a coarse grit for initial sanding and progress to finer grits for finishing touches.
- Noise Level: Consider the noise level of the sander, especially if you are working in a residential area. Some models are designed to operate more quietly, making them more suitable for home use without disturbing others.
How Do Different Sanders Compare in Terms of Performance for Hardwood Floors?
| Type of Sander | Motor Power | Weight | Dust Collection |
|---|---|---|---|
| Belt Sander | Powerful motor (10-12 amps) | Heavier (around 10-15 lbs) | Usually has built-in dust collection bag |
| Belt Sander – Examples | DeWalt DWE575SB, Makita 9403 | ||
| Belt Sander – Recommended Grit | 60-120 grit for initial sanding, 120-220 for finish | ||
| Orbital Sander | Moderate power (2-5 amps) | Lightweight (around 3-5 lbs) | Effective dust collection with vacuum attachment |
| Orbital Sander – Examples | Black+Decker BDERO100, Bosch ROS20VSC | ||
| Orbital Sander – Recommended Grit | 120-220 grit for finishing | ||
| Detail Sander | Low power (1-2 amps) | Very lightweight (around 2-3 lbs) | Good dust collection for small areas |
| Detail Sander – Examples | Dewalt DWE6411K, Black+Decker BDCMS20C | ||
| Detail Sander – Recommended Grit | 220 grit for finishing work | ||
| Random Orbital Sander | Strong motor (3-6 amps) | Moderate weight (around 4-6 lbs) | Excellent dust collection, minimizes cleanup |
| Random Orbital Sander – Examples | Festool RO 150 FEQ, Makita BO5041K | ||
| Random Orbital Sander – Recommended Grit | 80-120 grit for initial sanding, 180-220 for finish |
What Are the Advantages and Disadvantages of Using a Drum Sander for Baseboard Areas?
| Advantages | Disadvantages |
|---|---|
| Efficient for large surfaces – Drum sanders can quickly remove finish and smooth surfaces, making them ideal for extensive area work. | Risk of damage – They can easily gouge or damage the wood if not used carefully, especially in tight areas like baseboards. |
| Uniform sanding – Provides a consistent finish across large areas, which is beneficial for aesthetic purposes. | Heavy and cumbersome – Drum sanders are often heavy and difficult to maneuver in small spaces. |
| Time-saving – Reduces the time needed for sanding compared to other types of sanders. | Requires skill – Proper technique is necessary to avoid uneven surfaces or sanding marks. |
| Safety precautions – Always wear protective gear such as goggles and a mask to prevent dust inhalation and eye injuries. | Noise level – Drum sanders can be very loud, requiring ear protection and consideration for nearby occupants. |
| Types of wood – Suitable for hardwoods like oak, maple, and cherry, which can withstand aggressive sanding. | Not ideal for softwoods – Drum sanders can damage softer woods like pine or cedar, leading to uneven surfaces. |
| Alternative sanders – Consider orbital or detail sanders for baseboard areas, as they are easier to handle in tight spaces. | Limited power for large jobs – Alternative sanders may take longer to complete extensive sanding tasks. |
When Is It Best to Use an Orbital Sander for Detailed Sanding Tasks?
The best time to use an orbital sander for detailed sanding tasks, particularly along baseboards, is when you need a smooth finish without risking damage to adjacent surfaces.
- When Working on Hardwood Floors: Orbital sanders are excellent for sanding hardwood floors because they provide a smooth finish while allowing for control in tight spaces near baseboards.
- For Removing Old Finish: If you’re removing an old coat of finish or paint, an orbital sander can effectively strip the surface without gouging the wood, making it ideal for detailed areas.
- To Blend Stains or Repairs: When repairing sections of wood flooring, using an orbital sander helps to blend in repairs with the surrounding area, ensuring a uniform appearance.
- When Precision is Required: Orbital sanders allow for a precise sanding action, which is crucial when working around intricate details or moldings to avoid damaging adjacent surfaces.
- For Final Finishing Touches: After rough sanding, an orbital sander is perfect for final finishing touches along the base, providing a fine polish that prepares the surface for sealing.
When working on hardwood floors, orbital sanders are excellent as they provide a smooth finish while allowing for control in tight spaces near baseboards. They are designed to minimize the risk of swirl marks, which is particularly beneficial when working close to edges and intricate details.
If you’re removing an old coat of finish or paint, an orbital sander can effectively strip the surface without gouging the wood. This ability makes it ideal for detailed areas where care is needed to preserve the integrity of the floor beneath.
When repairing sections of wood flooring, using an orbital sander helps to blend in repairs with the surrounding area, ensuring a uniform appearance. The gentle action of the sander helps to feather the edges of any new material seamlessly into the existing surface.
Orbital sanders allow for a precise sanding action, crucial when working around intricate details or moldings to avoid damaging adjacent surfaces. This precision is especially important for achieving a professional finish in visible areas.
Finally, after rough sanding, an orbital sander is perfect for final finishing touches along the base, providing a fine polish that prepares the surface for sealing. This step is essential for achieving a durable and aesthetically pleasing finish on hardwood floors.
What Are the Leading Recommendations for Sanders Best Used Along Hardwood Floor Bases?
The leading recommendations for sanders best used along hardwood floor bases include the following types:
- Detail Sander: A detail sander is designed for precision work, making it ideal for reaching tight corners and edges where a larger sander may not fit. Its triangular shape allows for excellent maneuverability, ensuring that you can sand right up to the baseboards without damaging them.
- Orbital Sander: An orbital sander offers a larger sanding surface and is suitable for smoothing out larger areas of the floor while still being capable of getting close to baseboards. Its circular motion reduces the risk of swirl marks and allows for a more even finish, which is crucial when preparing hardwood floors for refinishing.
- Edge Sander: Edge sanders are specifically designed for sanding along edges and are perfect for getting into those difficult spots next to walls and baseboards. These sanders typically have a narrow sanding belt or disc, allowing for effective sanding without the risk of gouging the adjacent surfaces.
- Belt Sander: While a belt sander is not ideal for the edges, it can be used in the main areas of the floor before detailing with other sanders. It is powerful and can quickly remove material, but care must be taken to avoid going too close to the baseboards, as it can cause damage if not handled properly.
- Random Orbital Sander: This type of sander combines the benefits of both an orbital and a disc sander, providing a smooth finish while reducing the risk of sanding marks. It can be used for both edges and larger areas, making it a versatile option for hardwood floor sanding along the base.
What Common Mistakes Can Be Avoided When Sanding Hardwood Floors Along Base to Ensure Optimal Results?
When sanding hardwood floors along the base, several common mistakes can compromise the quality of your results. Avoiding these pitfalls will lead to a more professional finish.
-
Skipping Preparation: Failing to prepare the area for sanding can lead to uneven results. Remove all furniture, trim, and any obstacles to ensure unobstructed access to the baseboards.
-
Using the Wrong Sander: Selecting a sander that’s not suited for edge work, like a belt sander, can result in damage or inadequate sanding. A detail sander or an orbital sander is preferable for tight spaces.
-
Inconsistent Pressure: Applying uneven pressure while sanding can create dips or gouges. Maintain consistent pressure to achieve a uniform surface.
-
Neglecting to Vacuum: Dust accumulation can hinder sanding efficiency. Vacuuming the area meticulously before and after sanding ensures an even surface is maintained.
-
Rushing the Process: Sanding requires patience. Rushing through can lead to patches missed or uneven finishes. Start with coarse grit and progress gradually to finer grits for the best effect.
By paying attention to these aspects, optimal results when sanding hardwood floors along the base can be achieved without compromising the integrity of the floor.
How Should You Properly Prepare Your Space Before Sanding Around Baseboards?
Proper preparation of your space before sanding around baseboards is essential for achieving a clean and efficient sanding process.
- Clear the Area: Remove all furniture, rugs, and any obstacles from the area where you will be sanding. This not only provides ample space to work but also prevents any damage to your belongings from dust and debris.
- Protect Surfaces: Use drop cloths or plastic sheeting to cover adjacent walls, floors, and any fixtures. This precaution helps contain dust and prevents scratches or damage from accidental contact with the sander.
- Dust Control: Set up dust control measures such as a vacuum attachment for your sander or a shop vacuum nearby. This reduces airborne particles and keeps the workspace cleaner, making for easier cleanup after the job is done.
- Inspect Baseboards: Check the condition of the baseboards for any damage or loose sections. Addressing these issues beforehand ensures a smoother sanding process and a better finish on the hardwood floors.
- Choose the Right Sander: Select the best sander for sanding hardwood floors along the base, such as a detail sander or a palm sander for precision. The right tool will help you navigate tight spaces without damaging the baseboards or surrounding areas.
- Safety Gear: Wear appropriate safety gear, including a dust mask, goggles, and hearing protection. These items protect you from inhaling dust and from noise generated by the sander, ensuring a safer working environment.