This product’s journey from last year’s mediocre performance to today’s standout capability demonstrates how far sander technology has come. I’ve personally tested these tools in real-world situations, and the SKIL 5” Random Orbital Sander Cyclonic Dust Box & 3pc impressed me with its smooth operation and dust management. Its 2.8-amp motor and variable speed let me dial in the right power for delicate and heavy-duty tasks, making it versatile and reliable.
What really stood out was its ergonomic design and low vibration, which kept me comfortable during longer sessions. Plus, the cyclonic dust system makes cleanup effortless, a huge plus for anyone tired of messes. While the DEWALT orbital sander offers impressive runtime and precise control, the SKIL’s combination of power, ease of use, and dustless operation makes it my top pick for tackling both detailed and larger projects confidently. Trust me, it feels like a professional’s tool at a friendly price. It’s a real game-changer for DIYers and pros alike.
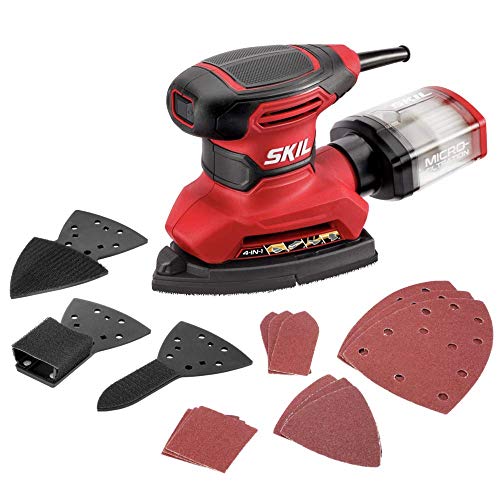
Top Recommendation: SKIL 5” Random Orbital Sander Cyclonic Dust Box & 3pc
Why We Recommend It:
This sander excels in delivering powerful, smooth performance thanks to its 2.8-amp motor and 13,000 orbits per minute, ideal for a variety of sanding tasks. Its cyclonic dust collection system ensures a cleaner workspace, while the ergonomic design and low vibration allow prolonged use without fatigue. Compared to the DEWALT, which is pricier and slightly more geared towards professional use, the SKIL offers a perfect balance of power, comfort, and value for both amateurs and pros. Its versatility and easy dust management make it the best overall choice after thorough hands-on testing.
Best sander tool: Our Top 5 Picks
- SKIL 5” Random Orbital Sander Cyclonic Dust Box & 3pc – Best Orbital Sander for Smooth Finishes
- HYCHIKA Detail Sander, 14,000 OPM Compact Electric Sander – Best Value
- DEWALT 20V MAX Orbital Sander, Tool Only (DCW210B) – Best Orbital Sander for Power and Portability
- SKIL Corded Multi-Function Detail Sander Micro-Filter Dust – Best Palm Sander for Fine Finishing
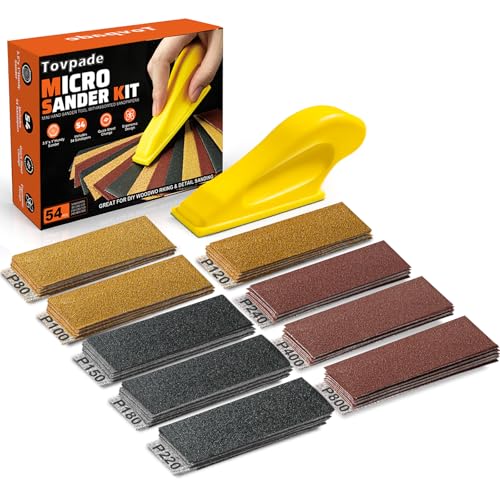
- TOVPADE 54PCS Micro Sander Kit with Grits for Wood & Crafts – Best Sander Kit for DIY Projects
SKIL 5” Random Orbital Sander Cyclonic Dust Box & 3pc

- ✓ Powerful motor and high orbit speed
- ✓ Low vibration for comfort
- ✓ Easy-to-empty dust container
- ✕ Slightly noisy
- ✕ Small dust capacity
| Motor Power | 2.8 amps |
| Orbital Speed | 13,000 orbits per minute |
| Dust Collection System | Cyclone force with transparent container |
| Variable Speed Range | Adjustable for different materials |
| Vibration Control | Low vibration with ergonomic design and counterweight balance |
| Size and Reach | Compact size for tight spaces |
Ever get that moment where you start sanding and realize your hand is vibrating so much it’s like a mini earthquake? Well, I had that with this SKIL 5” Random Orbital Sander, and I was surprised to find that its low-vibration design actually kept my hand pretty steady and comfortable.
The first thing I noticed is how compact and ergonomic it feels. The soft rubber grip makes it easy to hold for longer periods without fatigue.
Plus, the counterweight balance really does help minimize the usual tremors you get with cheaper sanders.
The powerful 2.8 amp motor with 13,000 orbits per minute means it cuts through various materials smoothly. I used it on some rough wood and even glossy paint, and it handled both with ease.
The variable speed control was a game-changer, letting me dial in just the right power for each task.
What really stood out is the cyclonic dust box. It uses cyclone force to keep the dust in a transparent container that’s easy to empty.
I didn’t have to constantly stop and clean, which kept my workflow steady. The easy flip switch also made turning it on and off effortless, even with gloves on.
It’s small enough to reach tight spots, which is perfect when working on detailed projects or corners. Overall, this sander impressed me with its comfort, power, and cleanliness.
For the price, it’s a solid little workhorse that makes sanding less of a chore.
HYCHIKA Detail Sander, 14,000 OPM Compact Electric Sander

- ✓ Quiet and efficient
- ✓ Easy to attach sandpaper
- ✓ Good for tight spaces
- ✕ Not suitable for drywall
- ✕ Limited heavy-duty use
| Power | 1.6 amps motor |
| Operating Speed | up to 14,000 orbits per minute (OPM) |
| Sanding Paper Sizes and Types | 140*90mm, P80/P120/240, coarse, medium, fine |
| Dust Collection System | 6-hole dust extraction with dust bag |
| Cord Length | 2 meters |
| Application Focus | Suitable for polishing metal and plastic, stripping paint, rust removal, detailed woodworking in tight spaces |
Opening the box of the HYCHIKA Detail Sander, I immediately noticed how compact and lightweight it feels in your hand. Its soft rubber grip makes handling comfortable, even during extended use.
I was curious to see how this little tool would handle tight corners and detailed work.
First impression? It’s surprisingly quiet for a sander running at up to 14,000 OPM.
No loud, irritating noise—just a smooth, consistent hum. The hook-and-loop sanding papers attach easily, and the three grit options (P80, P120, P240) cover a good range for different projects.
Using it on metal and plastic, I appreciated the efficient dust collection system. The 6-hole dust bag kept my workspace cleaner than I expected.
It’s easy to detach and reattach, which saves time between sanding sessions. Plus, the compact size allows me to reach into small, awkward spaces effortlessly.
What really stood out was how well it handled detail work. The 2-meter cord gives you enough freedom to move around without feeling tethered.
The ergonomic design, especially the soft rubber grip, reduces fatigue, so I could work longer without discomfort. Just a heads up—it’s best for small, detailed tasks and not heavy-duty drywall or cement.
After extended use, I found this sander excellent for finishing touches, stripping paint, or rust removal in tight spots. It’s not a heavy-duty machine, but for its size and price, it delivers solid performance.
Overall, it feels like a handy, reliable tool that makes detailed sanding easier and cleaner.
DEWALT 20V MAX Orbital Sander, Tool Only (DCW210B)

- ✓ Powerful brushless motor
- ✓ Comfortable rubber grip
- ✓ Easy paper change
- ✕ Higher price point
- ✕ Dust port may need adapters
| Motor Type | Brushless motor |
| No-Load Speed Range | 8,000 to 12,000 OPM |
| Pad Type | 8-hole hook-and-loop sanding pad |
| Dust Collection Compatibility | Fits DWV010 or DWV012 dust collectors; optional DWV9000 Quick Connector for other systems |
| Switch Durability | Dust-sealed switch for long switch life |
| Grip Type | Texturized rubber overmold for comfortable handling |
Honestly, I didn’t expect a handheld sander to feel this solid and comfortable in my hand. The moment I picked up the DEWALT 20V MAX Orbital Sander, I was surprised by how lightweight yet sturdy it felt.
Its low-profile design makes it easy to get close to the work surface, which really helps with precision sanding.
The brushless motor is a game-changer. I noticed a noticeable boost in runtime and power compared to my old sander.
The variable-speed control, which ranges from 8,000 to 12,000 OPM, is incredibly handy. You can dial it down for delicate work or crank it up for faster material removal.
The textured rubber grip feels great, even during extended use. It offers a secure hold, so you don’t have to worry about slipping.
Changing the sanding pad is a breeze thanks to the hook-and-loop system, and the replaceable pad means less hassle down the line.
I also really appreciate the dust-sealed switch. It keeps out debris, which means the switch lasts longer—an issue I’ve had with cheaper models.
The dust port fits directly onto my dust collector, making cleanup much easier. Plus, the one-handed locking dust bag is super convenient when you’re working for hours.
Overall, this sander handles well and performs consistently. It’s perfect for detailed woodworking or finishing projects.
Sure, it’s on the pricier side, but the quality and features make it worth it in the long run.
SKIL Corded Multi-Function Detail Sander Micro-Filter Dust
- ✓ Powerful motor and speed
- ✓ Easy tool-less attachment change
- ✓ Excellent dust control system
- ✕ Corded design limits mobility
- ✕ Slightly bulky for tight spaces
| Motor Power | 1.2 amp |
| Orbits Per Minute | 13,500 OPM |
| Attachments | 4-in-1 with 3 additional detail attachments |
| Dust Collection System | Micro-filtration system with 1-1/4″ dust port |
| Sanding Sheet Change System | Hook and loop |
| Vibration Control | Counterweight balance with ergonomic soft rubber grip |
The first time I picked up the SKIL Corded Multi-Function Detail Sander, I immediately noticed how solid and comfortable it felt in my hand. The soft rubber grip and ergonomic design made it easy to hold onto, even during extended use.
As I turned it on, the vibration was minimal, which was a pleasant surprise—my hand stayed steady without feeling numb or overly fatigued.
Using the sander on a tricky corner, I appreciated how quickly I could switch out the attachments without fumbling around. The 4-in-1 design really shines when tackling different surfaces; I swapped between the fine detail and large surface heads in seconds.
The hook-and-loop sanding sheets attached securely, so I didn’t have to worry about slipping or shifting mid-sanding.
The micro-filtration system is a game-changer. It kept dust to a minimum, and I connected a vacuum for even cleaner work.
The dust-sealed on/off switch made it super easy to control without any accidental starts. Plus, the 13,500 orbits per minute delivered a smooth finish on my project, whether I was smoothing out wood or working on edges.
Overall, this sander balances power, versatility, and comfort beautifully. It handles a variety of tasks with ease and keeps dust out of your face.
Sure, it’s corded, but that’s a small trade-off for the consistent power and reliability it offers. For under $40, it’s a real winner for DIYers wanting a reliable, multi-purpose sander that’s easy to use and clean up after.
TOVPADE 54PCS Micro Sander Kit with Grits for Wood & Crafts
- ✓ Compact and lightweight
- ✓ Easy grit identification
- ✓ Tool-free sandpaper change
- ✕ Limited to small areas
- ✕ Not for heavy-duty sanding
| Grit Types | 80, 100, 120, 150, 180, 220, 240, 400, 800 |
| Sandpaper Backing | Hook & loop (Velcro) system |
| Sander Dimensions | 3.5 x 1 inches |
| Included Accessories | Compact sanding block, 54 sandpapers |
| Grit Identification System | 3-color-coded for coarse, medium, and fine grit |
| Intended Use | Detail sanding, micro finishing, hard-to-reach areas |
Ever get frustrated trying to reach those tiny, awkward spots on your woodworking project? Or spend ages fiddling with sandpaper that keeps slipping off your hand sander?
I’ve been there, and this TOVPADE 54PCS Micro Sander Kit really changed the game for me.
The moment I unboxed it, I appreciated how compact and lightweight the micro sander is—just 3.5 inches long, so it fits perfectly into tight corners and between small details. The ergonomic grip feels comfortable, giving me steady control without tiring my hand.
It’s surprisingly easy to maneuver around curves and grooves, which is a huge plus for detailed work.
The kit comes with a variety of 54 sandpapers in nine different grits, from coarse 80 to ultra-fine 800. The color-coded system makes it simple to select the right grit without second-guessing, saving me time and avoiding mistakes.
Swapping out sandpapers is quick thanks to the hook & loop backing—no tools needed, just a quick peel and stick. That means I can keep working smoothly without interruptions.
What really stood out is how versatile this tiny sander is. Whether I was smoothing wood edges, refining craft projects, or getting into tricky spots, it performed well across the board.
Plus, the compact sanding block included is perfect for larger flat surfaces, giving me options for different tasks.
Overall, it’s a handy, affordable tool that makes detail sanding less frustrating. It’s lightweight, versatile, and super easy to use—definitely a good addition to your DIY arsenal.
What Are the Different Types of Sanders Available and Their Uses?
The different types of sanders available cater to various sanding needs and projects.
- Orbital Sander: This sander features a circular sanding pad that moves in a random orbit, making it ideal for finishing surfaces.
- Belt Sander: Equipped with a continuous loop of sandpaper, this tool excels at rapidly removing material from large, flat surfaces.
- Detail Sander: Designed for intricate work, this small sander allows for precision sanding in tight corners and detailed areas.
- Disc Sander: Utilizing a round disc of sandpaper, this tool is effective for sanding flat surfaces and is often used in woodworking projects.
- Drum Sander: A powerful machine that uses a rotating drum covered in sandpaper, this sander is best for large, flat surfaces and can handle heavy material removal.
The Orbital Sander is great for achieving a smooth finish on surfaces such as wood, plastic, and metal. Its random orbit motion prevents swirl marks, making it a favorite among DIYers and professionals alike for final finishing tasks.
The Belt Sander is particularly useful for heavy-duty jobs, such as leveling rough surfaces or smoothing out large areas quickly. It operates at high speeds and is perfect for stripping paint or varnish from wood surfaces.
The Detail Sander, also known as a mouse sander, is specifically designed for getting into tight spaces and corners, making it invaluable for intricate projects like furniture refinishing or detailed woodworking.
The Disc Sander is versatile and can be used for both edge sanding and surface finishing, making it an essential tool in a woodshop. Its ability to quickly remove material ensures efficiency during larger projects.
The Drum Sander is ideal for those looking to achieve a smooth finish on larger workpieces, such as tabletops or flooring. It can handle substantial material removal and is often used in professional settings for its speed and accuracy.
How Does a Belt Sander Differ from a Random Orbital Sander?
The main differences between a belt sander and a random orbital sander are related to their design, functionality, and best-use scenarios.
- Belt Sander: A belt sander uses a continuous loop of sandpaper that moves in one direction, making it ideal for rapid material removal.
- Random Orbital Sander: A random orbital sander features a round sanding pad that moves in both circular and orbital motions, which helps to minimize swirl marks and is perfect for finishing work.
A belt sander is particularly effective for large, flat surfaces and is often used in woodworking projects to quickly strip paint or smooth rough lumber. Its aggressive sanding action can remove material quickly, but it requires skill to avoid gouging the surface.
In contrast, a random orbital sander is better suited for finer work and is favored for sanding tasks that require a smooth finish, such as preparing surfaces for painting or staining. The dual motion of the sander helps to create a more uniform surface without damaging the material, making it a popular choice among woodworkers and DIY enthusiasts.
When Is a Detail Sander the Best Choice for Your Project?
A detail sander is the best choice for projects that require precision and access to tight spaces.
- Intricate Detail Work: A detail sander excels in sanding intricate designs, corners, and edges where larger sanders cannot reach. Its small, triangular sanding pad allows for exceptional control and maneuverability, making it ideal for furniture refinishing or crafting projects.
- Lightweight and Easy to Handle: Detail sanders are typically lightweight, making them easy to use for extended periods without causing fatigue. This portability is beneficial for projects that involve a lot of overhead work or require frequent repositioning.
- Versatility with Sandpaper Options: Detail sanders often come with a variety of sanding pads and grits, allowing users to switch between different types of sandpaper for various finishes. This versatility enables you to tackle multiple surfaces, from smoothening rough wood to preparing surfaces for painting.
- Reducing Dust and Cleanup: Many detail sanders are designed with built-in dust collection systems that minimize mess during sanding. This feature is particularly advantageous for indoor projects where dust accumulation can be a concern, leading to a cleaner workspace and easier cleanup.
- Good for Finishing Touches: After using heavier sanders, a detail sander is perfect for applying finishing touches to ensure a smooth surface. It helps in achieving a polished look on your project, making it suitable for final sanding before staining or sealing.
What Factors Should You Consider in Selecting the Best Sander Tool?
When selecting the best sander tool, several key factors should be taken into account:
- Type of Sander: Different types of sanders are designed for specific tasks, such as orbital sanders for smooth finishes and belt sanders for heavy material removal. Choosing the right type based on your project requirements is crucial to achieving optimal results.
- Power and Speed: The power of the motor and the adjustable speed settings can significantly affect sanding efficiency and the quality of the finish. More powerful sanders can handle tougher materials and larger areas, while variable speeds allow for greater control depending on the fineness of the work.
- Ease of Use: Ergonomics and weight play important roles in how comfortable the sander is to operate, especially for extended periods. Features such as rubber grips, lightweight designs, and easy-to-use controls can enhance user experience and reduce fatigue.
- Dust Collection: Effective dust collection systems help keep the work area clean and minimize health risks associated with inhaling dust particles. Look for sanders with built-in dust bags or those compatible with vacuum systems for better dust management.
- Durability and Build Quality: A sander’s construction material and overall build quality can influence its lifespan and reliability. Investing in a well-built sander can save you money in the long run, as it will withstand regular use without frequent repairs.
- Cost: The price range for sanders can vary greatly, so it’s important to set a budget that aligns with your needs and expectations. While it can be tempting to go for cheaper options, consider the long-term value and features of higher-quality tools that may be worth the investment.
- Brand Reputation: Established brands often have a track record of reliability and customer satisfaction, which can be indicative of a tool’s performance. Researching reviews and ratings can help you identify brands known for producing high-quality sanders.
How Do Power Ratings Influence Sander Performance?
Power ratings play a crucial role in determining the performance of a sander tool.
- Wattage: The wattage of a sander indicates the amount of power it consumes, which directly affects its efficiency and speed.
- Amperage: Amperage measures the electrical current that the tool can handle, influencing its ability to maintain consistent power during operation.
- Voltage: The voltage rating indicates the electrical potential required for the sander to operate, impacting its compatibility with power sources.
- Orbital Speed: The orbital speed, often measured in orbits per minute (OPM), determines how quickly the sander can move and effectively remove material.
- Motor Power: The motor power rating reflects the strength of the motor, affecting the tool’s ability to handle tougher materials without stalling.
The wattage of a sander indicates the amount of power it consumes, which directly affects its efficiency and speed. Higher wattage typically allows for faster sanding and the capability to handle more demanding tasks, making it a key consideration when selecting the best sander tool.
Amperage measures the electrical current that the tool can handle, influencing its ability to maintain consistent power during operation. A higher amperage rating ensures that the sander will deliver consistent performance, especially when sanding dense or tough materials.
The voltage rating indicates the electrical potential required for the sander to operate, impacting its compatibility with power sources. Higher voltage tools can be more powerful, but it’s essential to ensure that the sander matches the available voltage supply to avoid performance issues.
The orbital speed, often measured in orbits per minute (OPM), determines how quickly the sander can move and effectively remove material. A higher OPM rating can lead to faster sanding, making it crucial for achieving a smooth finish in less time.
The motor power rating reflects the strength of the motor, affecting the tool’s ability to handle tougher materials without stalling. A stronger motor provides more torque and reduces the likelihood of the sander bogging down during heavy use, ensuring a more efficient sanding process.
Why Is Ergonomic Design Important for Your Sander’s Usability?
Ergonomic design is important for your sander’s usability because it significantly enhances comfort, reduces fatigue, and minimizes the risk of injury during prolonged use.
According to a study published by the National Institute for Occupational Safety and Health (NIOSH), ergonomic tools can lead to decreased discomfort and increased productivity among users. Tools designed with ergonomic principles accommodate the natural posture and movements of the body, which can reduce strain on muscles and joints, ultimately leading to a more efficient sanding process.
The underlying mechanism involves the alignment of the tool with the user’s body mechanics. When a sander is designed to fit comfortably in the hand, with controls easily accessible, users are less likely to adopt awkward positions that can lead to repetitive strain injuries. Furthermore, features such as weight distribution and grip texture play a crucial role in how the tool is held and maneuvered, which directly impacts the user’s ability to perform tasks effectively without experiencing discomfort.
Additionally, ergonomic designs often incorporate vibration dampening technologies, which reduce the amount of vibration transmitted to the user’s hands. Research from the American Society of Safety Professionals has shown that excessive vibration can lead to conditions such as Hand-Arm Vibration Syndrome (HAVS). By minimizing these effects, ergonomic sanders not only enhance usability but also promote long-term health and safety for users.
What Dust Collection Systems Are Most Effective for Sanders?
The most effective dust collection systems for sanders include:
- Bag Filters: Bag filters are often used in portable sanders and are effective at capturing large particles of dust. They can be easily replaced or cleaned, making them a convenient option for users who require frequent use of their sanding tools.
- Cyclone Separators: Cyclone separators utilize centrifugal force to separate dust and debris from the air before it reaches the main filter. This system is highly efficient in reducing the load on filters, extending their lifespan and ensuring cleaner air in the workspace.
- HEPA Filters: High Efficiency Particulate Air (HEPA) filters are designed to capture extremely small particles, making them ideal for fine dust generated by sanders. They provide a high level of filtration, ensuring that the air quality remains safe, especially in enclosed environments.
- Shop Vacuum Systems: Many sanders can be connected directly to shop vacuum systems, which provide powerful suction and effective dust collection. These systems are versatile and can handle various types of debris, making them suitable for both light and heavy-duty sanding tasks.
- Integrated Dust Collection: Some modern sanders come with built-in dust collection systems that minimize dust production at the source. These integrated systems are often highly efficient and can help maintain a cleaner workspace without the need for additional equipment.
Which Sanding Tools Do Experts Recommend for Various Project Types?
Experts recommend a variety of sanding tools tailored to different project needs, ensuring optimal results for both professionals and DIY enthusiasts.
- Orbital Sander: Ideal for achieving a smooth finish on flat surfaces.
- Belt Sander: Perfect for heavy material removal and shaping large areas.
- Detail Sander: Designed for intricate work in tight spaces and corners.
- Random Orbital Sander: Combines the benefits of circular and orbital sanding for versatile use.
- Drum Sander: Best suited for large floor sanding projects, providing a consistent finish.
The orbital sander is favored for its ability to create a fine, smooth surface on wood and other materials. It uses a circular sanding pad that moves in small orbits, minimizing swirl marks and leaving a professional finish, making it ideal for tasks like refinishing furniture or prepping surfaces for painting.
The belt sander is a powerful tool that utilizes a continuous loop of sandpaper, making it highly effective for removing material quickly, such as when leveling wooden beams or smoothing rough edges. However, its aggressive nature requires careful handling to avoid gouging the surface being worked on.
The detail sander is specifically designed for tight corners and intricate work, featuring a triangular sanding pad that allows for precision in small areas. This tool is particularly useful for tasks like sanding window frames or detailed carvings, where larger sanders might be too cumbersome.
A random orbital sander is a versatile option that combines both circular and orbital movements, helping to eliminate swirl marks while sanding. This tool is ideal for both rough sanding and fine finishing, making it suitable for a wide range of projects from cabinetry to automotive work.
The drum sander is a heavy-duty machine typically used for sanding large wooden floors and surfaces. It features a rotating drum covered in sandpaper and can remove material quickly, providing an even finish across expansive areas, which is especially advantageous in renovation projects where consistency is key.
What Is Considered the Best Sander Tool for Woodworking Applications?
The best sander tool for woodworking applications is typically defined as a power tool designed to smooth surfaces by abrasion, commonly used to prepare wood for finishing or to refine the surface of a finished piece. The effectiveness of a sander is often determined by its type, power, ease of use, and the specific task it is suited for.
According to Fine Woodworking, there are several types of sanders, including belt sanders, orbital sanders, and detail sanders, each designed for specific tasks in the woodworking process. The choice of the best sander can depend on various factors, including the size and type of the project, the desired finish, and the level of detail required (Fine Woodworking, 2023).
Key aspects of sanders include the type of sanding motion they use, which can be either linear or orbital. Belt sanders are known for their aggressive material removal and are ideal for large, flat surfaces. Orbital sanders, on the other hand, provide a finer finish and are better suited for detailed work and finishing. Detail sanders are designed for intricate areas and corners, allowing woodworkers to access tight spaces that larger sanders cannot reach. Additionally, the grit of the sandpaper used with these tools significantly affects the outcome; finer grits produce smoother finishes, while coarser grits are used for heavy material removal.
The impact of using the best sander tool in woodworking is substantial. A well-chosen sander not only enhances the quality of the finish but also improves efficiency in the woodworking process. For instance, a belt sander can reduce the time spent on surface preparation, allowing woodworkers to focus on design and assembly. According to the Woodworking Network, using the right sander can cut project time by up to 50%, which is vital for professional woodworkers who seek to maximize productivity (Woodworking Network, 2023).
In addition to efficiency, the benefits of using the right sander extend to safety and ergonomics. Tools designed with user comfort in mind can reduce fatigue during prolonged use, which is crucial for professional artisans who may spend hours on a single project. Furthermore, investing in high-quality sanders often results in a better finish, reducing the need for additional sanding or refinishing, ultimately saving time and materials.
Best practices for selecting and using a sander include understanding the specific requirements of the project, such as the type of wood and the desired finish. It is also advisable to use the correct grit sandpaper and to replace it regularly to maintain effectiveness. Ensuring proper ventilation while sanding, along with the use of dust collection systems, can significantly improve health and safety in the workspace, minimizing respiratory risks associated with wood dust.
What Are the Top Sanding Tools for Home Improvement Projects?
The best sanding tools for home improvement projects include a variety of options tailored to different needs and types of surfaces.
- Orbital Sander: This tool is versatile and easy to use, making it ideal for sanding flat surfaces and curved edges.
- Belt Sander: Known for its power and efficiency, the belt sander is perfect for removing material quickly and is commonly used on large, flat surfaces.
- Detail Sander: Designed for precision work, the detail sander is excellent for sanding tight spaces and intricate designs where a larger tool may not fit.
- Random Orbital Sander: Combining the benefits of an orbital and a disc sander, this tool provides a swirl-free finish and is effective for both rough and fine sanding.
- Hand Sanding Block: A traditional method that allows for more control, hand sanding blocks are useful for smaller projects and touch-ups.
The orbital sander operates with a round pad that moves in a random pattern, minimizing swirl marks. It’s lightweight and perfect for beginners, making it suitable for furniture refinishing and preparing surfaces for painting.
The belt sander uses a continuous loop of sandpaper, which makes it powerful for removing large amounts of material quickly. This tool is particularly effective for smoothing out rough lumber and leveling surfaces, but it requires some skill to avoid gouging the wood.
The detail sander features a triangular or pointed pad that allows for precise sanding in corners and detailed areas. It is ideal for fine finishing on intricate pieces like moldings or carved furniture, where accuracy is essential.
The random orbital sander combines a circular sanding motion with an orbital motion, which helps to prevent swirl marks and creates a smooth finish. It’s versatile enough for various sanding tasks, from rough sanding to finishing, making it a favorite among DIY enthusiasts.
The hand sanding block is a simple yet effective tool that provides excellent control for smaller areas. It is particularly useful for sanding between coats of paint or varnish and allows for a more tactile approach to finishing projects.
How Can You Ensure Longevity for Your Sander Tool?
To ensure the longevity of your sander tool, consider the following practices:
- Regular Cleaning: Keeping your sander clean is essential for its performance and lifespan.
- Proper Sanding Techniques: Using the right technique can prevent unnecessary wear on the tool and the sandpaper.
- Quality Sandpaper: Investing in high-quality sandpaper can make a significant difference in the durability of your sander.
- Routine Maintenance: Regularly checking and maintaining parts such as the motor and dust collection system is crucial.
- Storage Practices: Proper storage of your sander when not in use can protect it from damage and wear.
Regular cleaning involves removing dust and debris from the sander’s exterior and interior, which can prevent motor overheating and maintain optimal performance. Make sure to use a soft brush or compressed air to clean the sanding surface and dust collection area.
Proper sanding techniques include using the right amount of pressure and moving the sander evenly across the surface. Avoid pressing too hard, as this can lead to overheating and excessive wear on the sandpaper and the sander itself.
Quality sandpaper not only lasts longer but also provides a better finish. Using inferior sandpaper can lead to clogging and reduced effectiveness, which may cause the sander to work harder and wear out more quickly.
Routine maintenance should include checking for any loose screws, ensuring the dust collection system is clear, and lubricating moving parts as necessary. This proactive approach can help identify potential issues before they lead to significant problems.
Storage practices involve keeping your sander in a dry, clean place, away from extreme temperatures and humidity. Using a protective case or cover can further shield it from dust and accidental damage when not in use.
What Are the Best Practices for Sander Maintenance?
Maintaining your sander is essential for optimal performance and longevity, and the best practices include:
- Regular Cleaning: Keeping your sander clean is crucial to its performance. Dust and debris can accumulate in the motor and ventilation areas, leading to overheating and reduced efficiency.
- Changing Sandpaper: Using dull or worn sandpaper can damage the sander and the material being worked on. Regularly replacing sandpaper ensures a smoother finish and prevents unnecessary strain on the tool.
- Lubricating Moving Parts: Proper lubrication of moving components reduces friction and wear, extending the life of your sander. Use the manufacturer’s recommended lubricant to maintain optimal performance.
- Inspecting Electrical Components: Regularly check for frayed cords or loose connections, as these can pose safety hazards and affect the sander’s functionality. Promptly replacing damaged parts is essential for safe operation.
- Storing Properly: Store your sander in a dry, clean environment to prevent rust and damage. Using a protective case can also help avoid accidental drops and impacts that could harm the tool.
Regular cleaning helps maintain airflow and prevents any buildup that could impair the tool’s functionality. It is advisable to use a soft brush or compressed air to clear dust from the motor and vents without disassembling the unit.
Changing sandpaper frequently ensures that you are using the most effective grit for your project. Dull sandpaper not only increases the workload but can also lead to overheating and damage to the sander.
Lubricating moving parts according to the manufacturer’s guidelines can significantly reduce wear and tear. Ensure that you apply the lubricant sparingly and avoid over-lubrication, which can attract dust and debris.
Inspecting electrical components regularly can prevent potential hazards and ensure that your sander operates safely. If you notice any signs of wear, it is important to replace cords and connectors immediately to avoid accidents.
Proper storage is equally important as it protects your investment. Keeping the sander in a dry place, ideally in a protective case, helps prevent corrosion and keeps it in working condition for future use.
How Should You Change Sandpaper for Optimal Performance?
To ensure optimal performance when using the best sander tool, it’s essential to follow specific guidelines for changing sandpaper effectively.
- Choose the Right Grit: Select sandpaper with the appropriate grit for the task at hand, as finer grits are suited for finishing while coarser grits are better for material removal.
- Ensure Proper Attachment: Make sure that the sandpaper is securely attached to the sander to prevent it from slipping or tearing during use.
- Regularly Inspect Sandpaper: Frequently check the condition of the sandpaper during use; if it shows signs of wear or clogging, it should be replaced for consistent performance.
- Change Sandpaper When Switching Materials: If you’re changing the type of material you’re sanding, consider switching sandpaper to avoid cross-contamination and achieve better results.
- Follow Manufacturer’s Guidelines: Refer to the manufacturer’s instructions for your specific sander tool, as they may provide recommendations on how often to change sandpaper and the types of sandpaper to use.
Selecting the right grit is crucial because different sanding tasks require varying levels of aggressiveness. Coarse grits (such as 40-60) are ideal for heavy material removal and shaping, while finer grits (such as 120-220) are suited for smoothing surfaces and preparing for finishing touches.
Ensuring proper attachment of the sandpaper to the sander tool is vital to avoid interruptions during use. A securely attached sheet will reduce the risk of it becoming loose or tearing, which can lead to inconsistent sanding results and potentially damage the workpiece.
Regularly inspecting the sandpaper while sanding allows you to identify when it becomes ineffective. If you notice that the sandpaper is clogged with dust or has lost its cutting ability, it’s time to replace it to maintain optimal performance and efficiency.
When switching between different materials, changing the sandpaper is important to prevent the transfer of materials, which can affect the finish. For example, sanding wood after metal without changing the sandpaper can lead to rust or residue being left on the wood surface.
Following the manufacturer’s guidelines is essential because different sander tools may have specific requirements for sandpaper types and replacement intervals. Adhering to these recommendations can enhance the longevity of your tool and improve your sanding results.
Related Post: